Plates
PSP8
Page 2
This
tutorial was written by Jemima ~ February
2004
Copyright © 2004 ~
Jemima ~ All rights reserved
********************************
Open a new image 400 x 400
Transparent background
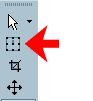
PSP7: Double click
on your SELECTION tool icon
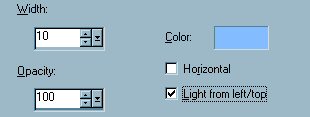
Use these settings
Click OK
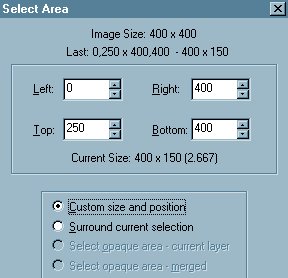
With your SELECTION TOOL
and using these settings
Click on the "Custom Selection"
icon as indicated by the red arrow.

Use these settings
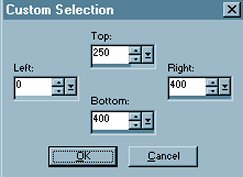
Click OK
PSP7: Continue from
here
Flood fill the selection with Pale Blue (
#C1DEFF )
Go to EFFECTS >>> Texture
Effects <<< Fine Leather
Use these settings
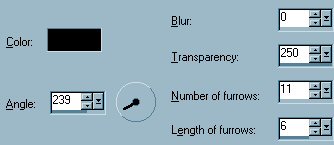
Click OK
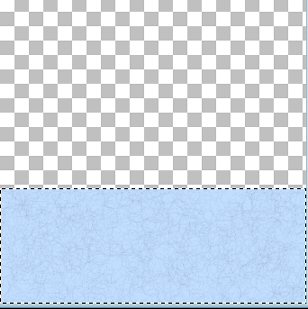
Go to SELECTIONS >>> Invert
Flood fill with the Pale Blue
Go to EFFECTS >>> Texture
Effects >>> Blinds
Use these settings
COLOR = BLUE ( #83BDFF )
Click OK
DESELECT
With your SELECTION TOOL
Same settings
Draw a rectangle as shown below

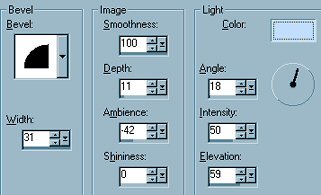
Go to EFFECTS >>> 3D Effects
>>> Inner Bevel
Use these settings
COLOR - ( #C1DEFF )
Click OK
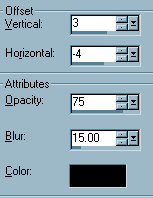
Go to EFFECTS >>> 3D Effects
>>> Drop Shadow
Use these settings
Click OK
DESELECT
Go to LAYERS >>> New Raster
Layer
Right click on the title bar of the PLATE
tube and
select COPY from the options.
Right click on the title bar of your new
image and
select PASTE AS NEW SELECTION from the
options.
SHOOT!!! IT'S HUGE!!!!
Go to IMAGE >>> Resize = 50%
Make sure "Resize All Layers"
is UNCHECKED
Go to ADJUST >>> Sharpness
>>> Sharpen
PSP7: Go to EFFECTS
>>> Sharpen >>> Sharpen
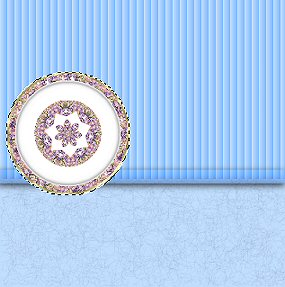
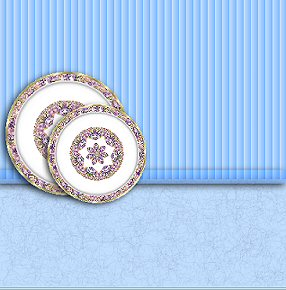
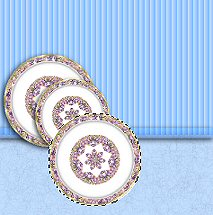
Position the plate as shown below
Go to EFFECTS >>> 3D Effects
>>> Drop Shadow
Use the same settings as last time
DESELECT
Open up your LAYER PALETTE
Right click on Raster 2 and select
DUPLICATE from the options
PSP7: Right click on
Layer 2 and select DUPLICATE from the
options
Go to IMAGE >>> Resize = 80%
Make sure "Resize All Layers"
is UNCHECKED
Go to ADJUST >>> Sharpness
>>> Sharpen
PSP7: Go to EFFECTS
>>> Sharpen >>> Sharpen
With your MOVER TOOL
Position the plate as shown below
Go to LAYERS >>> New Raster
Layer
Click on the title bar of your PLATE tube
top activate
Go to WINDOW >>> Duplicate
Go to IMAGE >>> Resize 50%
Go to ADJUST >>> Sharpness
>>> Sharpen
PSP7: Go to EFFECTS
>>> Sharpen >>> Sharpen
RIGHT Click on the title bar of your
duplicate PLATE tube and
select COPY from the options.
Right click on the title bar of your new
image and
select PASTE AS NEW SELECTION from the
options.
Position as shown
Select your DEFORMATION TOOL
Pull down the centre top node and
push up the centre bottom node until the
plate looks similar to the one below

Go to ADJUST >>> Sharpness
>>> Sharpen
PSP7: Go to EFFECTS
>>> Sharpen >>> Sharpen
Go to EFFECTS >>>3D Effects
>>> Drop Shadow
Use same settings as before.
NEXT
Page designed by

for

http://www.coldfusion-vpm.com/~jemima/Artistry_Pages/index.html
Copyright
© 2000-2004 Artistry In PSP / PSP
Artistry
All rights reserved.
Unless specifically made available for
download,
no graphics or text may be removed from
this site for any reason
without written permission from Artistry
In PSP / PSP Artistry
TUTORIAL INDEX
|