
MAKING
YOUR OWN FRAMES
(From Masks)
Frame 2 ~ Fancy Frame
PSP7
This
tutorial was written by Jemima ~ March
2004
Copyright © 2004 ~
Jemima ~ All rights reserved
********************************
You will need the "teom_metal"
Gradient HERE
Extract to your PSP
7 /Gradients folder
and the "0 Sandy frame1" Mask HERE
Extract to your PSP
7 /Masks folder
Eye Candy 4000
download
Extract to your PSP
7 /Plugins folder
********************************
Open up a new image 450 x 350
Transparent Background
Go to LAYERS >>>> New Raster
Layer
Load your 'teom_metal' gradient into your
lower
(background) STYLES box in your COLOR
PALETTE and
Use these settings

Go to MASKS >>> Load Mask from
Disk
Locate the "0 Sandy frame 1' mask
and click on it to load
Go to MASKS >>> View Mask
Flood fill with the gradient
Go to MASKS >>> Delete
Click YES on the following options box
Go to EFFECTS >>> 3D Effects
>>> Drop Shadow
Use these settings
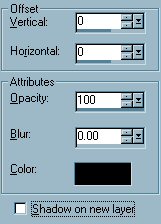
Click OK
Go to EFFECTS >>> Sharpen
>>> Sharpen
Go to EFFECTS <<< Plugins
>>> Eye Candy 4000 >>>
Glass
First click on the SETTINGS TAB and
select GLASS TUBING
then use these settings
(Bevel width = 36.14)

Click OK
Go to EFFECTS >>> Sharpen
>>> Sharpen

Go to your LAYER PALETTE and click on
Layer 1 to activate
CLOSE Layer 2 by clicking on the
"Glasses"
Change the settings on your lower
(background)
COLOUR PALETTE
Repeats = 20

Select your SELECTION TOOL
Settings
Selection Type = Rectangle
Mode = Replace
Feather = 0
Antialias = UNCHECKED
Double click on your SELECTION TOOL icon
Use these settings

Go to SELECTIONS >>> Invert
Flood fill with the gradient
Go to SELECTIONS >>> Invert
Go to SELECTIONS >>> Modify
>>> Expand = 10
Go to SELECTIONS >>> Invert
Go to EDIT >>> Clear
DESELECT
With your MAGIC WAND
Tolerance = 150
Select the border
Go to EFFECTS >>> Glass
(It should be showing at the bottom of
the options menu)
Use the same settings
Click OK
Go to EFFECTS >>> Sharpen
>>> Sharpen
DESELECT
Change the settings on your lower
(background)
MATERIALS PALETTE
Repeats = 30
With your MAGIC WAND
Tolerance = 0
Select the transparent area around the
edge of your image
Flood fill with the gradient
Go to EFFECTS >>> Glass
(It should be showing at the bottom of
the options menu)
Use the same settings
Click OK
Go to EFFECTS >>> 3D Effects
>>> Drop Shadow
Use these settings
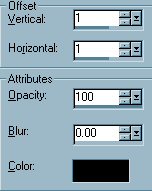
Click OK
Repeat Drop Shadow effect changing
Vertical & Horizontal Offsets to - (
minus ) 1
Click OK
DESELECT
Go to EFFECTS >>> Sharpen
>>> Sharpen More
Go to your LAYER PALETTE
OPEN up Layer 2 by clicking on the
'glasses"
Go to LAYERS >>> Merge
>>> Merge Visible
Save as a .PspImage (tube)
NEXT
Page designed by

Copyright ©
2000-2004 Jemima
All rights reserved.
Unless specifically made available for
download,
no graphics or text may be removed from
this site for any reason
without written permission from Jemima

http://www.coldfusion-vpm.com/~jemima/Artistry_Pages/index.html
NEW TUTORIAL INDEX
|