MAKING
YOUR OWN FRAMES
(From Masks)
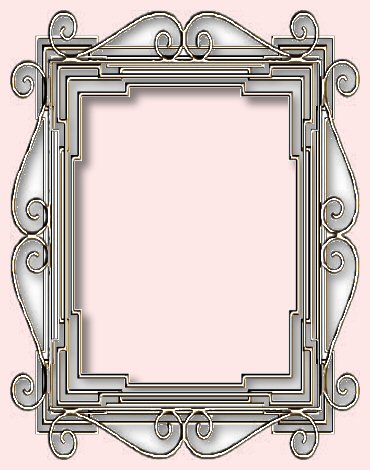
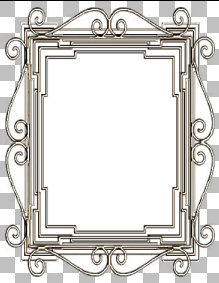
Frame 3 ~ Elegant Frame
PSP7
This
tutorial was written by Jemima ~ March
2004..
Copyright © 2004 ~
Jemima ~ All rights reserved
********************************
"MARK_20" &
"SNFrame31" Masks
can be downloaded HERE
Extract to your PSP
7 /Masks folder
********************************
Open up a new image 300 x 400
Transparent Background
Go to LAYERS >>>> New Raster
Layer
Go to MASKS >>> Load Mask from
Disk
Locate the "MARK_20" mask
Click To LOAD
Go to MASKS >>> View Mask
Flood fill the transparent area with
WHITE
Go to MASKS >>> Delete
Click YES on the following options box
With your MAGIC WAND and
using these settings
MATCH MODE = Opacity
TOLERANCE = 0
FEATHER = 0
SAMPLE MERGED = UNchecked
Holding down your SHIFT key
Select the white sections of the Mask
Go to SELECTIONS >>> Modify
>>> Expand = 1
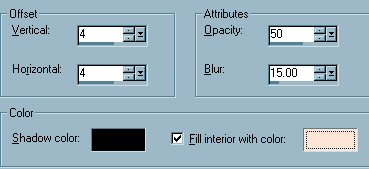
Go to EFFECTS >>> 3D Effects
>>> Drop Shadow
Use these settings
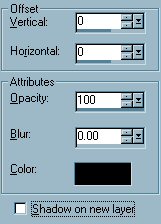
Click OK
Go to EFFECTS >>> Sharpen
>>> Sharpen
Go to EFFECTS >>> 3D Effects
>>> Inner bevel
Use these settings
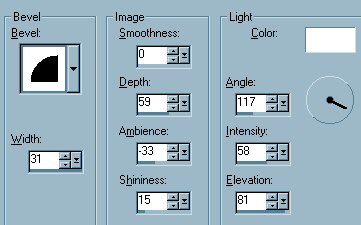
Click OK
Go to COLORS >>> Colorize
Use these settings
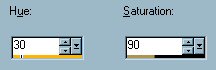
Click OK
DESELECT
Go to COLORS >>> Adjust
>>> Gamma Correction
Use these settings
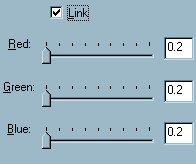
Click OK
Go to LAYERS >>> Duplicate
Go to IMAGE >>> Resize = 90%
Ensure "RESIZE ALL LAYERS is
UNCHECKED
Go to your LAYER PALETTE and CLOSE Layer
1 by clicking on the "Glasses"
Go to LAYERS >>> Merge
>>> Merge Visible
Go to IMAGE >>> Canvas Size
Use these settings

Click OK
Go to your LAYER PALETTE and make sure
the
MERGED Layer is highlighted
Go to LAYERS >>> New Raster
Layer
Go to MASKS >>> Load Mask from
Disk
Locate the "SNFrame31" mask
Click to LOAD
Flood fill with WHITE
Go to MASKS >>> Delete
Click YES on the following options box
Go to EFFECTS >>> 3D Effects
>>> Drop Shadow
Use the same settings
Click OK
Go to EFFECTS >>> 3D Effects
>>> Inner bevel
Use the same settings
Click OK
Go to COLORS >>> Colorize
Use the same settings
Click OK
Go to COLORS >>> Adjust
>>> Gamma Correction
Use the same settings
Go to LAYERS >>>> Merge
>>> Merge visible
Go to IMAGE >>> Canvas Size
Use these settings
Width = 370
Height = 470
With your MAGIC WAND
using these settings
MATCH MODE = Opacity
TOLERANCE = 20
FEATHER = 0
SAMPLE MERGED = UNchecked
Click on the outer transparent area
Go to SELECTIONS >>> Invert
Go to your LAYER PALETTE and OPEN and
highlight Layer 1 to activate
Flood fill with WHITE
Go to LAYERS >>> Merge
>>> Merge visible
DESELECT
With your MAGIC WAND
using these settings
MATCH MODE = RGB Value
TOLERANCE = 0
FEATHER = 0
SAMPLE MERGED = unchecked
Click on the centre white area
Go to EDIT >>> Clear
DESELECT
With your MAGIC WAND
using these settings
MATCH MODE = RGB Value
TOLERANCE = 20
FEATHER = 0
SAMPLE MERGED = unchecked
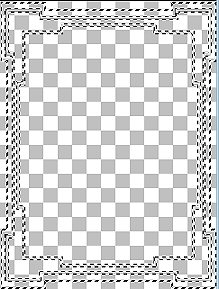
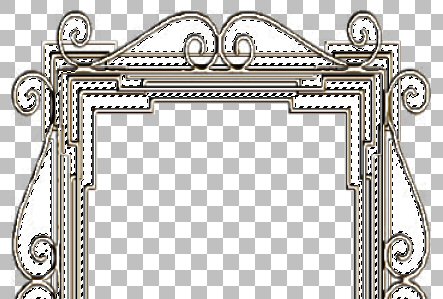
Hold down your SHIFT key as you select.
Select the White areas as shown below..
You may have to ZOOM in to do this..
If you're observant... you'll see I
missed a couple in this image *S*
(BUT I'll fix that *S*)
Go to LAYERS >>> New Raster
Layer
Go to EFFECTS >>> 3D Effects
>>> Cutout
Use these settings
COLOUR = ( #FEE6D6 )
Click OK
DESELECT
Go to LAYERS >>> Merge
>>> Merge Visible
Resize if you wish.
Save as a .psp image (tube)
The posibilities of creating frames with
MASKS
is only limited by your own imagination.
That's All Folks!! *S*
If you would like to see more examples of
possibilities
click on the NEXT button.
NEXT
Page designed by

Copyright ©
2000-2004 Jemima
All rights reserved.
Unless specifically made available for
download,
no graphics or text may be removed from
this site for any reason
without written permission from Jemima

NEW TUTORIAL INDEX
|