
ANIMATED EASTER
BUNNY
PSP8
This
tutorial was written by Jemima ~ December
2003..
Copyright © 2003 ~
Jemima ~ All rights reserved
********************************
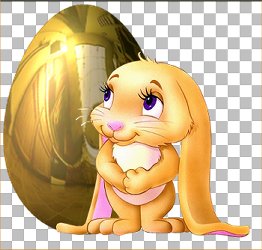
Get the 'Easter Bunny' tube HERE
Get the 'GoldEgg' tube HERE
Extract to a folder
on your computer
********************************
Open up the Bunny tube in your PSP
workspace.
Go to WINDOW >>> Duplicate
Close the original image
Activate your duplicated image
Go to LAYERS >>> New Raster
Layer
Go to LAYERS >>> Arrange
>>> Send to bottom
Open up the GoldEgg tube in your PSP
workspace.
Right click on the title bar and select
COPY from the options
Right click on the title bar of the Bunny
image and select
PASTE AS NEW SELECTION
from the options.
Go to IMAGE >>> Resize = 120%
Make sure "Resize All Layers"
is UNCHECKED
Click OK
Go to your LAYER PALETTE
Click on Layer 1 to activate
Go to IMAGE >>> Resize = 90%
Make sure "Resize All Layers"
is UNCHECKED
Click OK
Go to IMAGE >>> Resize = 90%
(again)
Click OK
(Make sure the Bunny's ear is exactly
level with the bottom of the egg)
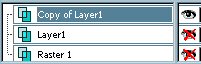
Go to LAYERS >>> Duplicate (Copy
of Layer 1)
Go to your LAYER PALETTE
Close Layers 1 and 2
Make sure "Copy of Layer1" is
highlighted
With your EYEDROPPER tool
right click on the darker part of the
eyelid
to select the background colour.
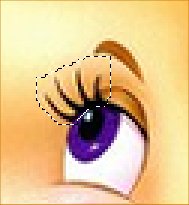
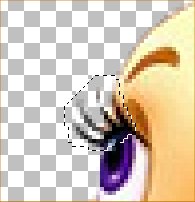
With your FREEHAND tool (Lasso)

Section off the eyelashes as shown below
Right click on the title bar and select
COPY from the options
Right click in your PSP workspace and
select
PASTE AS NEW IMAGE
from the options.
BEFORE you deselect...
on your duplicated image
Go to ADJUST >>> Soften
>>> Soften More
Go to EDIT >>> Repeat Soften
More (THREE TIMES)
DESELECT
NOW >>> Lets do the other Lashes
With your FREEHAND tool (Lasso)
Section off the eyelashes as shown below
Right click on the title bar and select
COPY from the options
Right click in your PSP workspace and
select
PASTE AS NEW IMAGE
from the options.
DESELECT
With your ERASER tool
Carefully erase the eyelashes
as shown below
With the other eye....
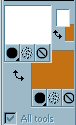
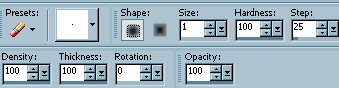
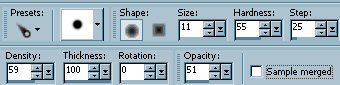
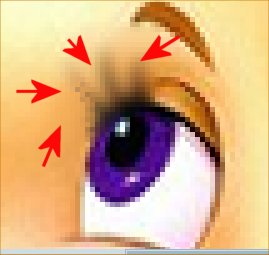
Select your PUSH brush tool
Use these settings
and carefully work from the outside
>> in
... in the direction of the arrows in the
image below.
This takes a little practise...
REMEMBER.. you can always EDIT
.>>> Undo
If you're not happy with the result.
ALSO.. it's best to ZOOM IN while doing
theis
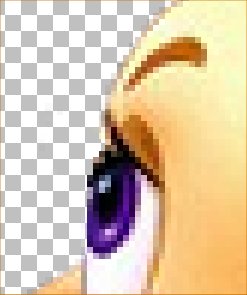
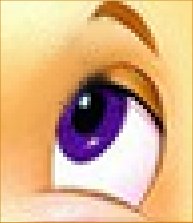
This is the result we're going for
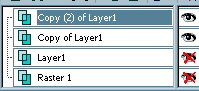
Go to LAYERS >>> Duplicate
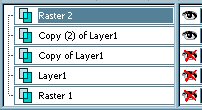
Your LAYER PALETTE should look like this
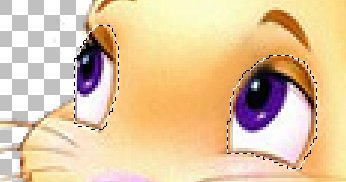
With your FREEHAND (Lasso) tool
Same settings as before
Section of the Right Eye as shown below.
To section off the Left eye at the same
time
hold down your SHIFT key as you do the
second eye.
Flood fill with the Background colour
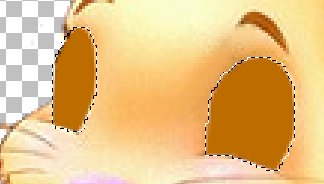
DO NOT DESELECT
Go to LAYERS >>> New Raster
Layer (Raster 2)
Go to EFFECTS >>> 3D Effects
>>> Cutout

Click OK
DESELECT
Go to your LAYER PALETTE
and CLOSE "Copy of Layer1"
Go to LAYERS >>> Merge
>>> Merge Visible
NEXT
Page designed by

for

http://www.artistrypsp.com/
Copyright © 2000-2004 Artistry In PSP / PSP Artistry
All rights reserved.
Unless specifically made available for download,
no graphics or text may be removed from this site for any reason
without written permission from Artistry In PSP / PSP Artistry
|