
BOOK FRAME
PSP8
This
tutorial was written by Jemima ~ October
2004
Copyright © 2004 ~
Jemima ~ All rights reserved
********************************
You will
need the following to complete this
tutorial
Right click and save this
"t_120" Texture image to a
folder on your computer.

You will need the "LS210Corner"
tube
which you can download HERE
Extract to a folder
on your computer
You will also need the
"Vi_Android_Fairy" tube
which you can download HERE
Extract to a folder
on your computer
********************************
Open up your Texture image and you Corner
and Android_Fairy tubes
in your PSP workspace and minimize.
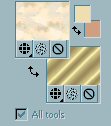
Go to your MATERIALS PALETTE and
Load CREAM ( #EEDFB4 ) in your Foreground
box.
Load TAN ( #D29F7A ) in your Background
box.
NOW
Load the
"t_120" Pattern into
your Foreground box.
and the
"Gold
Foil" Pattern
into your Background box.
Scale = 100
Angle = 0
for both patterns
Your MATERIALS PALETTE should look like
this
Open up a new image 500 x 350
Transparent background
Go to LAYERS >>> NEW RASTER
LAYER
Select your SELECTION TOOL
Click on the Custom Selection Icon

and enter the following co-ordinates.
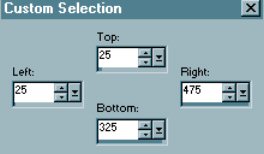
Click OK
Flood fill the selected area withj the
FOREGROUND pattern
Go to ADJUST >>> BLUR
>>> GAUSSIAN BLUR
Radius = 5.95
DESELECT
Select your SELECTION TOOL
Click on the Custom Selection Icon
CHANGE the "RIGHT" co-ordinate
to 80.
Left = 25
Right = 80
Top = 25
Bottom = 325
Click OK
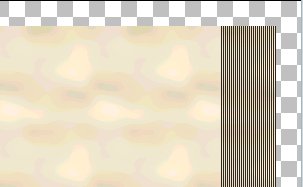
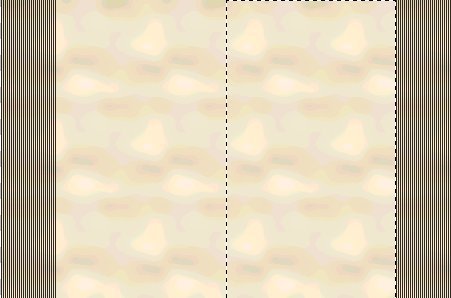
Go to EFFECTS >>> TEXTURE
EFFECTS >>> BLINDS
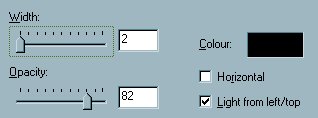
Click OK
Right click on the title bar and
select COPY from the options.
Right click on the title bar and
select PASTE AS NEW LAYER from the
options.
DESELECT
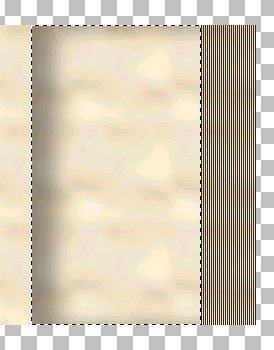
With your MOVER TOOL and using your ZOOM
slide the 'blinds' to the right hand side
of your image
so that it fits exactly with the
edge of the image

Go to your LAYER PALETTE
close Raster 1

Go to LAYERS >>> MERGE
>>> MERGE VISIBLE
Select your SELECTION TOOL
Click on the Custom Selection Icon
Enter the following co-ordinates
Left = 80
Right = 420
Top = 25
Bottom = 325
Click OK
Go to LAYERS >>> DUPLICATE
Go to SELECTIONS >>> INVERT
Go to EDIT >>> CLEAR
DESELECT
Select your SELECTION TOOL
Click on the Custom Selection Icon
Enter the following co-ordinates
Left = 250
Right = 420
Top = 25
Bottom = 325
Click OK
Go to LAYERS >>> NEW RASTER
LAYER
Go to EFFECTS <<< 3D EFFECTS
>>> CUT OUT
DESELECT
Select your SELECTION TOOL
Click on the Custom Selection Icon
Enter the following co-ordinates
Left = 80
Right = 250
Top = 25
Bottom = 325
Click OK
Go to EFFECTS <<< 3D EFFECTS
>>> CUT OUT

Click OK
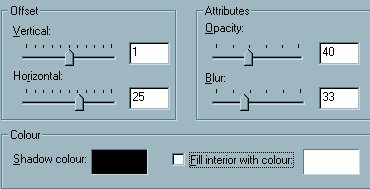
Go to EFFECTS <<< 3D EFFECTS
>>> DROP SHADOW
Vertical = 1
Horizontal = 4
Opacity = 60
Blur = 0
COLOUR = #757171
Click OK
DESELECT

Make sure Layer 1 is still CLOSED
Go to LAYERS >>> MERGE
>>> MERGE VISIBLE
NEXT
Page designed by

for

http://www.artistrypsp.com/
Copyright © 2000-2004 Artistry In PSP / PSP Artistry
All rights reserved.
Unless specifically made available for download,
no graphics or text may be removed from this site for any reason
without written permission from Artistry In PSP / PSP Artistry
|