On this page we will create the frame,
after which you can add your own images
OR
continue on to the next page
to complete as shown above.
|
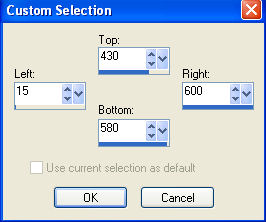
STEP 1
Open a new image 600 x 600
Transparent background
PSPX - X2: Colour Depth = 8bits/channel
PSPX3: Colour Depth RGB = 8bits/channel
Flood fill with GRAY #c0c0c0
Choose your SELECTION TOOL then click on the
CUSTOM SELECTION symbol
and enter these coordinates.
EDIT >>> CLEAR
DESELECT
|
|
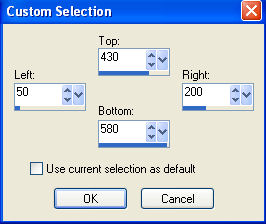
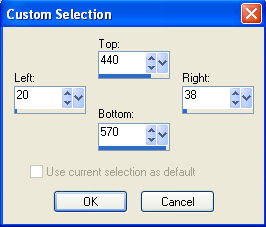
STEP 2
Choose your SELECTION TOOL then click on the
CUSTOM SELECTION symbol
and enter these coordinates.
EDIT >>> CLEAR
DESELECT
|
|
STEP 3
LAYERS >>> NEW RASTER LAYER
LAYERS >>> ARRANGE >>> MOVE DOWN
Flood fill with BLACK
Choose your SELECTION TOOL then click on the
CUSTOM SELECTION symbol
and enter these coordinates.
EDIT >>> CLEAR
DESELECT
|
|
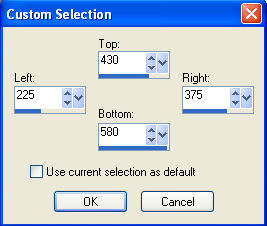
STEP 4
Choose your SELECTION TOOL then click on the
CUSTOM SELECTION symbol
and enter these coordinates.
EDIT >>> CLEAR
DESELECT |
|
STEP 5
Choose your SELECTION TOOL then click on the
CUSTOM SELECTION symbol
and enter these coordinates.
EDIT >>> CLEAR
DESELECT |
|
STEP 6
Choose your SELECTION TOOL then click on the
CUSTOM SELECTION symbol
and enter these coordinates.
EDIT >>> CLEAR
DESELECT |
|
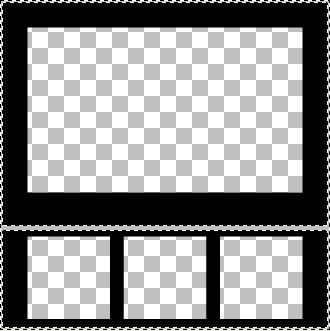
STEP 7
ACTIVATE RASTER 1
With your MAGIC WAND
Mode = Replace
Match Mode = RGB Value
Tolerance = 0
Feather = 0
Antialias = UNchecked
Sample Merged = UNCHECKED
PSP9 - X3: Check CONTIGUOUS
PSPX - X3: There is no " Sample Merged"
PSPX - X3: Use all layers = UNChecked
Select the gray border
|
|
STEP 8
ACTIVATE RASTER 2
SELECTIONS >>> MODIFY >>> CONTRACT = 2
EDIT >>> CLEAR
DESELECT
Save as frame_template.pspimage
|
STEP 9
ACTIVATE RASTER 1
EFFECTS >>> TEXTURE EFFECTS >>> SCULPTURE
PATTERN - goldenbeads
ADJUST >>> SHARPNESS >>> SHARPEN MORE
|
STEP 10
LAYERS >>> DUPLICATE
IMAGE >>> RESIZE = 99%
Ensure "Resize all layers" is UNCHECKED
Resample using WEIGHTED AVERAGE
ADJUST >>> SHARPNESS >>> SHARPEN
LAYERS >>> MERGE >>> MERGE DOWN
|
|
STEP 11
Choose your SELECTION TOOL then click on the
CUSTOM SELECTION symbol
and enter these coordinates.
|
|
STEP 12
LAYERS >>> NEW RASTER LAYER
Flood fill with DARK GRAY #808080
EFFECTS >>> TEXTURE EFFECTS >>> BLINDS
|
|
STEP 13
EDIT >>> Repeat Blinds
SELECTIONS >>> MODIFY >>> CONTRACT = 15
EDIT >>> CLEAR
DO NOT DESELECT
|
|
STEP 14
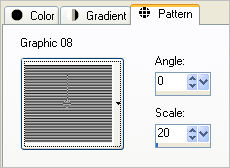
In your MATERIALS PALETTE load the
Graphic 08 pattern in the background
using these settings
|
|
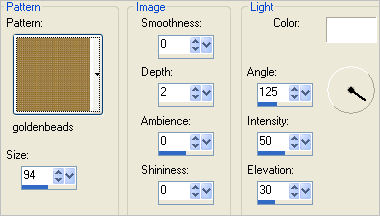
STEP 15
LAYERS >>> NEW RASTER LAYER
Flood fill with DARK GRAY #808080
SELECTIONS >>> MODIFY >>> CONTRACT = 20
EDIT >>> CLEAR
DESELECT
With your MAGIC WAND ... Same settings
Select the gray border
Flood fill with the background pattern
DESELECT
With your MAGIC WAND ... Same settings
Select the CENTRE transparent area
|
|
STEP 16
LAYERS >>> NEW RASTER LAYER
Flood fill with DARK GRAY #808080
EFFECTS >>> TEXTURE EFFECTS >>> SCULPTURE
Same settings
ADJUST >>> SHARPNESS >>> SHARPEN MORE
SELECTIONS >>> MODIFY >>> CONTRACT = 5
EDIT >>> CLEAR
ACTIVATE RASTER 2
EDIT >>> CLEAR
DESELECT
|
|
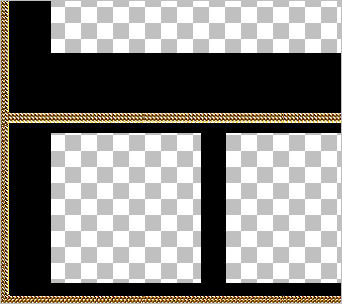
STEP 17
ACTIVATE RASTER 5
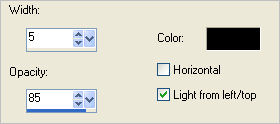
EFFECTS >>> 3D EFFECTS >>> DROP SHADOW
Vertical & Horizontal offsets = 1
Colour = Black
Opacity = 85
Blur = 0
Repeat Drop Shadow effect changing
Vertical & Horizontal Offsets to - ( minus ) 1
Click OK
Save your image |
|
STEP 18
ACTIVATE RASTER 2
With your MAGIC WAND ... Same settings
Select the lower black section
|
|
STEP 19
LAYERS >>> NEW RASTER LAYER
SELECTIONS >>> MODIFY >>> CONTRACT = 10
Flood fill with DARK GRAY #808080
DESELECT
EFFECTS >>> TEXTURE EFFECTS >>> BLINDS
Same settings
|
|
STEP 20
Choose your SELECTION TOOL then click on the
CUSTOM SELECTION symbol
and enter these coordinates. |
|
STEP 21
SELECTIONS >>> INVERT
EDIT >>> CLEAR
DESELECT
 |
STEP 22
Choose your SELECTION TOOL then click on the
CUSTOM SELECTION symbol
and enter these coordinates.
LAYERS >>> NEW RASTER LAYER
Flood fill with background stripe pattern
|
|
STEP 23
EFFECTS >>> 3D EFFECTS >>> DROP SHADOW
Vertical & Horizontal offsets = 1
Colour = Black
Opacity = 85
Blur = 0
Repeat Drop Shadow effect changing
Vertical & Horizontal Offsets to - ( minus ) 1
Click OK
DESELECT
|
|
STEP 24
LAYERS >>> DUPLICATE
IMAGE >>> MIRROR
Reposition with your MOVER tool
LAYERS >>> MERGE >>> MERGE VISIBLE
Save your image
|
|
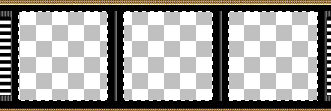
STEP 25
With your MAGIC WAND.... Same settings.
and while depressing your SHIFT KEY...
Slect the 3 lower transparent squares
|
|
STEP 26
LAYERS >>> NEW RASTER LAYER
Flood fill with DARK GRAY #808080
EFFECTS >>> TEXTURE EFFECTS >>> SCULPTURE
Same settings
ADJUST >>> SHARPNESS >>> SHARPEN MORE
SELECTIONS >>> MODIFY >>> CONTRACT = 5
EDIT >>> CLEAR
EFFECTS >>> 3D EFFECTS >>> DROP SHADOW
Vertical & Horizontal offsets = 1
Colour = Black
Opacity = 85
Blur = 0
Repeat Drop Shadow effect changing
Vertical & Horizontal Offsets to - ( minus ) 1
Click OK
DESELECT
LAYERS >>> MERGE >>> MERGE VISIBLE
Save your image
|
|
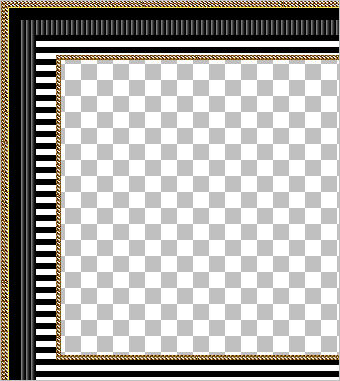
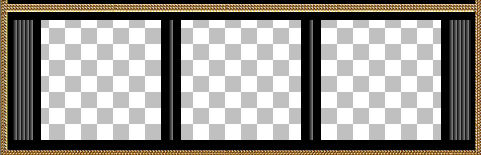
OK... that's your frame....
Now you can add your own images
OR
go to the NEXT PAGE to complete the exercise as I did. |
|
|
|
|
|
|