NOTE: this is an advanced tutorial and has several animations.
It is best to take it slow step by step and rest if needed.
It's a VERY LONG tutorial with lots of STEPS
|
STEP 1
Open up the downloaded images in your PSP workspace and minimize.
Open a new image 600 x 400
Raster background
Color = WHITE
PSPX - X2: Colour Depth = 8bits/channel
PSPX3: Colour Depth RGB = 8bits/channel
SELECTIONS >> SELECT ALL
|
STEP 2
Open MistySnowyMountains in your PSP workspace
Activate Group - Layer1
Right click on Title Bar and select
Copy from the options
Right click on the Title Bar of your tag image
and select PASTE INTO SELECTION from the options
DESELECT
LAYERS >>> PROMOTE BACKGROUND LAYER
Rename this layer scene
|
|
STEP 3
Open lace ribbon in your PSP workspace
Right click on the Title Bar
and select COPY from the options.
Right click on the Title Bar of your 'working' image
and select PASTE AS NEW LAYER from the options.
Rename this layer lace |
|
STEP 4
Open frame in your PSP workspace
Right click on the Title Bar
and select COPY from the options.
Right click on the Title Bar of your 'working' image
and select PASTE AS NEW LAYER from the options.
Rename this layer frame
|
|
STEP 5
Open holly corners in your PSP workspace
Right click on the Title Bar
and select COPY from the options.
Right click on the Title Bar of your 'working' image
and select PASTE AS NEW LAYER from the options.
Rename this layer corners |
|
STEP 6
Open Agincourt in your PSP workspace
Activate the text layer
Right click on the Title Bar
and select COPY from the options.
Right click on the Title Bar of your 'working' image
and select PASTE AS NEW LAYER from the options.
Rename this layer text
Place text as shown
|
STEP 7
Open SantaOldTimeGGK in your PSP workspace
Right click on the Title Bar
and select COPY from the options.
Right click on the Title Bar of your 'working' image
and select PASTE AS NEW LAYER from the options
IMAGE >> RESIZE = 65%
Ensure "Resize all layers" is UNCHECKED
ADJUST >>> SHARPNESS >>> SHARPEN
Rename this layer santa |
|
STEP 8
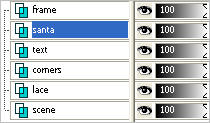
Set up LAYER PALETTE as shown
|
|
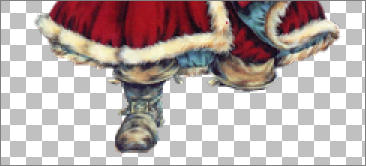
Placement of Santa DON"T MOVE AFTER THIS.
|
NOTE: when talking about the Santa's right and left foot I'm
talking about the feet as you look at the computer right and left side.
|
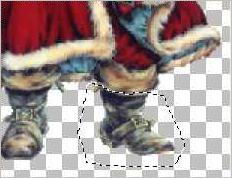
STEP 9
Close all layers except santa
Activate santa layer and Zoom in.
Choose your FREEHAND SELECTION TOOL
Selection Type = Point to Point
Mode = Replace
Feather = 0
Antialias = Checked
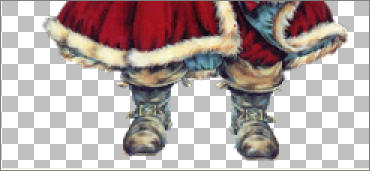
Go around the right boot as shown
DELETE
DESELECT
|
|
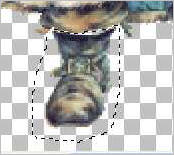
STEP 10
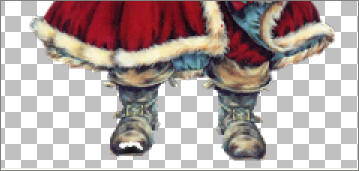
Choose your FREEHAND SELECTION TOOL
Same settings
Go around the left boot as shown
DELETE
DESELECT
|
|
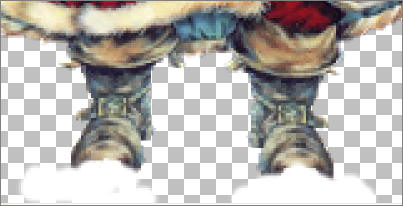
STEP 11
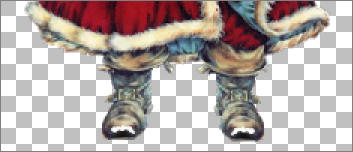
Open up the boots master image in your PSP workspace
Activate the left foot down layer
Right click on the Title Bar and select COPY from the options
Right click on the Title Bar of your tag image
and select PASTE AS NEW LAYER from the options.
Reposition with your MOVER tool
LAYERS >>> ARRANGE >>> MOVE DOWN
Rename this layer left foot down
|
|
STEP 12
LAYERS >>> DUPLICATE
IMAGE >>> MIRROR
Reposition with your MOVER tool
Rename this layer right foot down
|
|
STEP 13
Open up the boots master image in your PSP workspace
Activate the L foot up snowcap layer
Right click on the Title Bar and select COPY from the options
Right click on the Title Bar of your tag image
and select PASTE AS NEW LAYER from the options.
Reposition with your MOVER tool
over the top of the
existing left boot
Rename this layer L foot up snowcap |
|
STEP 14
Open up the boots master image in your PSP workspace
Activate the R foot up snowcap layer
Right click on the Title Bar and select COPY from the options
Right click on the Title Bar of your tag image
and select PASTE AS NEW LAYER from the options.
Reposition with your MOVER tool
over the top of the existing rightt boot
Rename this layer R foot up snowcap |
|
STEP 15
Open up the boots master image in your PSP workspace
Activate the left snow layer
Right click on the Title Bar and select COPY from the options
Right click on the Title Bar of your tag image
and select PASTE AS NEW LAYER from the options.
Reposition with your MOVER tool
over the top of the existing left boot
Rename this layer left snow |
|
STEP 16
Open up the boots master image in your PSP workspace
Activate the right snow layer
Right click on the Title Bar and select COPY from the options
Right click on the Title Bar of your tag image
and select PASTE AS NEW LAYER from the options.
Reposition with your MOVER tool
over the top of the existing right boot
Rename this layer right snow |
|
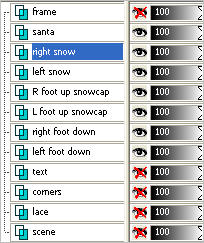
Your LAYER PALETTE should look like this |
|
STEP 17
Set up your LAYER PALETTE as shown |
|
| |
... |