STEP 18
OK... Feet all finished on to the body
Activate santa layer
Rename this layer santa left
LAYERS >> DUPLICATE
Rename this layer santa right
Close santa right
Activate layer santa left
IMAGE >> ROTATE >> FREE ROTATE = LEFT 1.00
Ensure "All layers" is UNCHECKED
Note: check to see if your rotation has caused
a separation with the feet and body.
DON"T MOVE THE FEET!
|
|
STEP 19
If needed... with your Mover Tool
Move Santa down to be over the boot.
|
|
STEP 20
Close layer santa left
Open & Activate layer santa right
IMAGE >> ROTATE >> FREE ROTATE = RIGHT 1.00
Ensure "All layers" is UNCHECKED
Again check and move santa down if needed to cover boot.
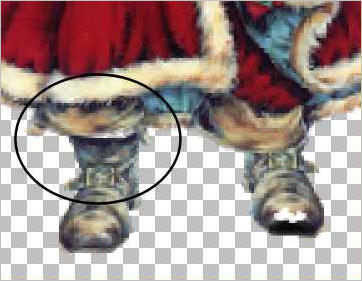
With layer santa right activated
Select your Freehand Selection Tool
(Lasso)
Selection Type = Point to Point
Mode = Replace
Feather = 0
Antialias = Checked
Select as shown
|
|
STEP 21
Effects >> Distortion Effects >> Punch
STRENGTH = 15
DESELECT |
STEP 22
Close layer santa right
Open & Activate layer santa left
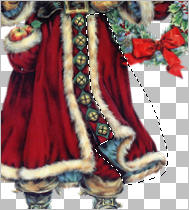
Select your Freehand Selection Tool
(Lasso)
Same settings
Select area shown
|
|
STEP 23
Effects >> Distortion Effects >> Punch
STRENGTH = 15
DESELECT
NOTE: we will now save this animation to use on another tag.
Save as .psp image
or
.pspimage
|
STEP 24
Open a new image 400 x 400
Transparent background
PSPX - X2: Colour Depth = 8bits/channel
PSPX3: Colour Depth RGB = 8bits/channel
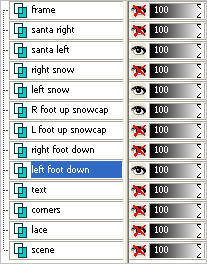
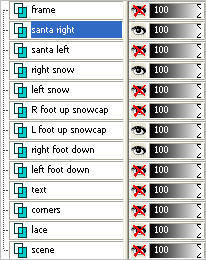
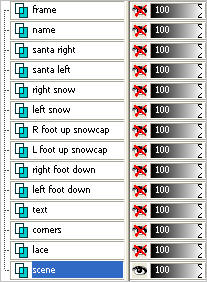
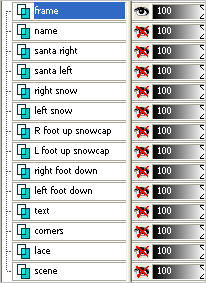
On working image
Set up LAYER PALETTE as shown
|
|
STEP 25
Right click on Title Bar of your working image and select
Copy merged from the options
Right click on the Title Bar of your 'new blank' image
and select PASTE AS NEW LAYER from the options. |
|
STEP 26
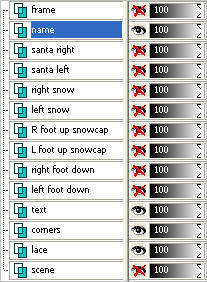
On your 'working' image
Set up LAYER PALETTE as shown
|
|
STEP 27
Right click on the Title Bar of your 'working' image
Right click on Title Bar and select
Copy merged from the options
Right click on the Title Bar of your 'new' image
and select PASTE AS NEW LAYER from the options.
Close Raster 2 and this is what you should have --->>>> |
|
STEP 28
On your 'new' image
Close raster 3 layer
Open & Activate raster 2 layer (the bottom santa)
Right click on Title Bar and select
Copy merged from the options
In ANIMATION SHOP
Right click the workspace and select
'Paste As New Animation' from the options. |
|
STEP 29
Back to PSP.
On your 'new' image
Close raster 2 layer
Open & Activate raster 3 layer (the top santa)
Right click on Title Bar and select
Copy merged from the options
In ANIMATION SHOP
Right click the workspace and select
'Paste After Current Frame' from the options

Minimize for now |
STEP 30
Back to PSP.
On your working Image
LAYERS >> NEW RASTER LAYER
Select your TEXT TOOL
with font and settings of your choice
add your name to the bottom left corner of the layer.
Rename this layer name. |
|
NOTE:
PSPX3.. click the "A" tool
then before clicking on the work
hold down the shift key and then click,
it will bring up the entry box as other versions do |
STEP 31
Set up LAYER PALETTE as shown
|
|
STEP 32
Right click on Title Bar and select
Copy from the options
In ANIMATION SHOP
Right click the workspace and select
'Paste As New Animation' from the options. |
|
STEP 33
With your CAPS LOCK on
Hold down your Ctrl key hit L (Upper case) 5 times to give you 6 frames

|
STEP 34
Still in ANIMATION SHOP
FILE >>> OPEN
Locate
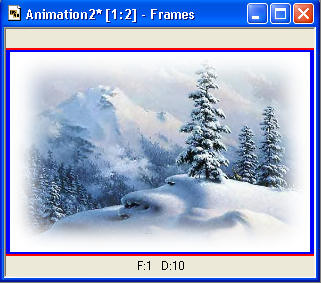
your 600x400 6 frame snow.mng from you supplies

Click OPEN
Edit >> Select All
Edit >> Copy
Edit >> Propagate Paste |
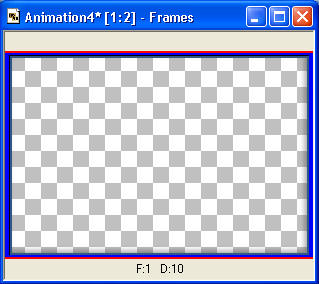
STEP 35
Activate the scene frames
Edit >> Select All
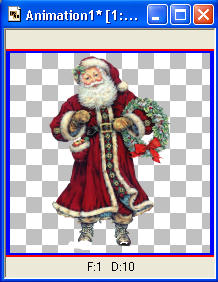
Edit >> Paste into selected frame
ZOOM in on the first frame (F:1)place the image
then release your mouse button
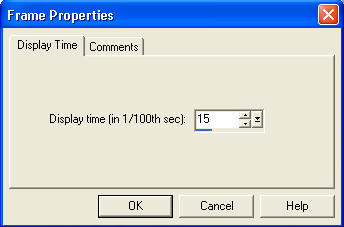
Right click on Title Bar of frames
Select 'Frame Properties' from the options
Display time = 15 |
|
STEP 36
Back to PSP.
Set up LAYER PALETTE as shown
|
|
STEP 37
Right click on Title Bar and select
Copy merged from the options
In ANIMATION SHOP
Right click the workspace and select
'Paste As New Animation' from the options.
With your CAPS LOCK on
Hold down your Ctrl key hit L (Upper case) 5 times to give you 6 frames
Edit >> Select All
Edit >> Copy
Edit >> Propagate Paste
|
STEP 38
Activate snow scene (working image) frames
Edit >> Paste into selected frame
Your image will be attached to your mouse center it in the first frame (F:1) and
left click to place it.

|
STEP 39
Still in ANIMATION SHOP
Open up your Santa that was minimized
File Save as
click the drop down and save it as a .mng
and there will be no outline on it and can be used again. |
NOTE: We need 6 frames on the santa to match the background
we will make 3 frames of each of the santa.
.
|
STEP 40
Still on the santa animation
Scroll the arrow on the bottom of the frame to first frame ( F:1)
Click the gray rim around the picture to highlight it,
Edit >> Copy
Edit >> Paste After Current Frame
Repeat Edit >> Paste After Current Frame
to give you 2 extra frames

Scroll the arrow on the bottom of the frame to last frame ( F:4)
Click the gray rim around the picture to highlight it,
Edit >> Copy
Edit >> Paste After Current Frame
Repeat Edit >> Paste After Current Frame
to give you 2 extra frames

|
STEP 41
Edit >> Select All
Right click on Title Bar of frames
Select 'Frame Properties' from the options
Display time = 15 |
STEP 42
Edit >> Copy
Edit >> Propagate Paste
Activate the scene animation frames
Edit >> Paste into selected frame
and place santa as shown |
|
STEP 43
Back to PSP.
Set up LAYER PALETTE as shown
|
|
STEP 44
Right click on Title Bar and select
Copy from the options
In ANIMATION SHOP
Right click the workspace and select
'Paste As New Animation' from the options. |
|
STEP 45
Edit >> Select All
Edit >> Copy
Edit >> Propagate Paste
Activate scene animation frames
Edit >> Select All
Edit >> Paste into selected frame
Center frame in first frame (F:1) and left click to place it.
|
STEP 46
View >> Animation
and while it is still running,
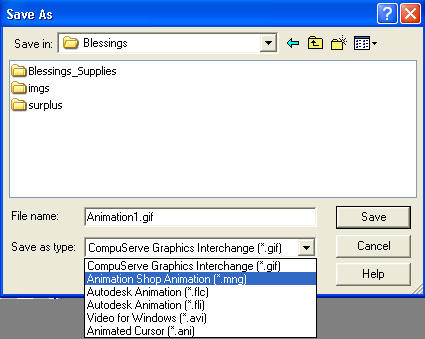
File >> Save As
Locate the folder in which you wish to save it.
Name your animation.
With the Gif Optimiser keep pressing NEXT
until you get to the last one... click FINISH
Close the Animation
Close the frames.
Close Animation Shop |
... |
I know this was long but I hope you have learned some things and had fun*S*
Rebba
|
... |