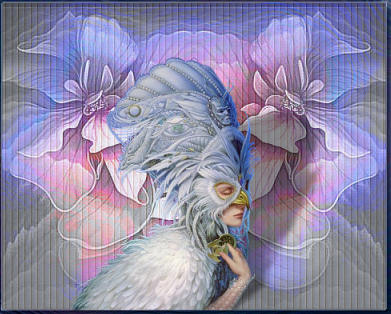
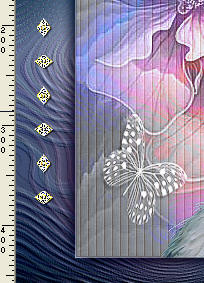
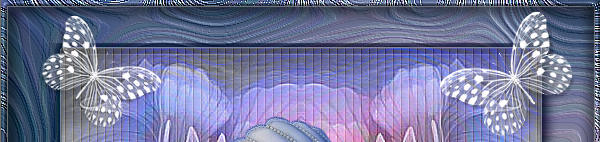
SNOW QUEEN
PSP8 to PSPX3
With animation option
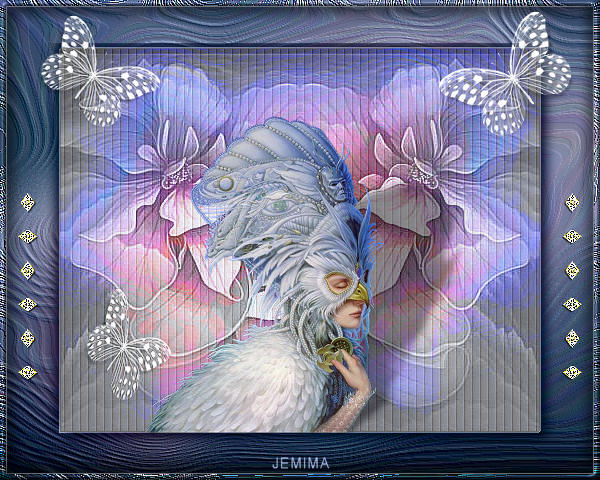
This tutorial was written by Jemima ~ MARCH 2012
Copyright © 2012 ~ Jemima ~ All rights reserved
This was created using PSP9 but can be adapted for other versions of PSP.
********************************
No artists or copyright infringement is intended on any of the tubes used in this tutorial.
The tubes were acquired in good faith as to their legality.
If there is a problem, please contact the author and the image/s will be removed.
You will need the
following to complete this tutorial
Materials
EC9.jpg
tiere_chinni36.psp
tiere_chinni36B.pspimage
!SnowQueen~MaFawkett.psp
pp_GoldDiamondSideBord1.psp
Save to a folder on your computer
Plugins
** EYE CANDY3 **
http://www.pircnet.com/downloads.html
If you wish to animate
ANIMATION SHOP
********************************
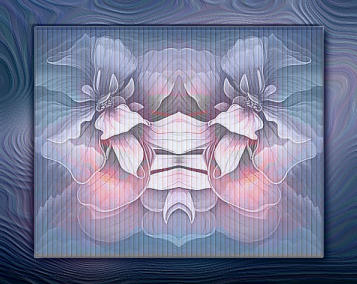
Open up the EC9 image in your PSP workspace
WINDOW >>> DUPLICATE
Close the original Image
LAYERS >>> Promote background layer
LAYERS >>> DUPLICATE
CLOSE Copy of Raster 1
ACTIVATE RASTER 1
EFFECTS >>> TEXTURE EFFECTS >>> FINE LEATHER
COLOUR = #c0c0c0
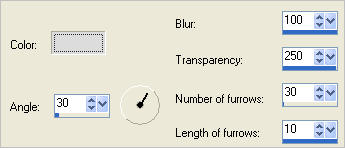
EFFECTS >>> TEXTURE EFFECTS >>> SOFT PLASTIC
OPEN & ACTIVATE Copy of Raster 1
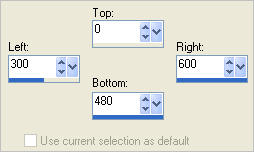
Choose your SELECTION TOOL then click on the CUSTOM SELECTION symbol
and enter these coordinates.
EDIT >>> CLEAR
DESELECT
LAYERS >>> DUPLICATE
IMAGE >>> MIRROR
LAYERS >>> MERGE >>> MERGE DOWN
IMAGE >>> RESIZE = 80%
Ensure "Resize all layers" is UNCHECKED
Resample using WEIGHTED AVERAGE
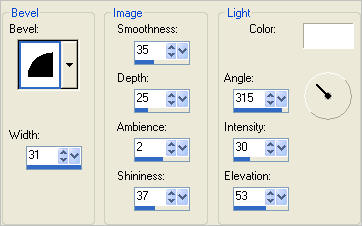
EFFECTS >>> 3D EFFECTS >>> DROP SHADOW
Vertical & Horizontal offsets = 1
Colour = WHITE
Opacity = 55
Blur = 0
Repeat Drop Shadow effect changing
Vertical & Horizontal Offsets to - ( minus ) 1
Click OK
LAYERS >>> DUPLICATE
IMAGE >>> FLIP
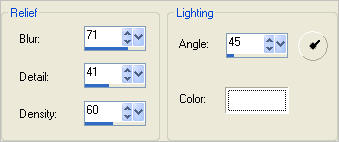
EFFECTS >>> EDGE EFFECTS >>> ENHANCE MORE
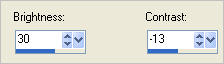
ADJUST >>> BRIGHTNESS and CONTRAST >>> BRIGHTNESS/CONTRAST
In your LAYER PALETTE change the BLEND MODE to LUMINANCE (L)
SELECTIONS >>> SELECT ALL
SELECTIONS >>> FLOAT
SELECTIONS >>> DEFLOAT
LAYERS >>> NEW RASTER LAYER
Flood fill with PALE BLUE #b3c8f3
EFFECTS >>> TEXTURE EFFECTS >>> BLINDS
COLOUR =
#808080
EFFECTS >>> EDGE EFFECTS >>> ENHANCE MORE
In your LAYER PALETTE change the OPACITY to 25%
DESELECT
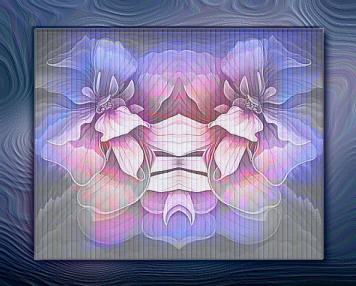
ACTIVATE Copy (2) of Raster 1
EFFECTS >>> PLUGINS >>> EYE CANDY 3 >>> DROP SHADOW
EDIT >>> Repeat Drop Shadow.. change DIRECTION to 135
In your LAYER PALETTE
On Copy of Raster 1change the BLEND MODE to BURN
ACTIVATE RASTER 2
Open up the !SnowQueen~MaFawkett image in your PSP workspace
Right click on the Title Bar and select COPY from the options
Right click on the Title Bar of your tag image
and select PASTE AS NEW LAYER from the options.
IMAGE >>> RESIZE = 50%
Ensure "Resize all layers" is UNCHECKED
Resample using WEIGHTED AVERAGE
ADJUST >>> SHARPNESS >>> SHARPEN
EFFECTS >>> PLUGINS >>> EYE CANDY 3 >>> PERSPECTIVE SHADOW
Reposition with your MOVER tool down and to the left.
Open up the tiere_chinni36 image in your PSP workspace
Right click on the Title Bar and select COPY from the options
Right click on the Title Bar of your tag image
and select PASTE AS NEW LAYER from the options.
Reposition with your MOVER tool
LAYERS >>> DUPLICATE
IMAGE >>> MIRROR
IMAGE >>> RESIZE = 90%
Ensure "Resize all layers" is UNCHECKED
Resample using WEIGHTED AVERAGE
ADJUST >>> SHARPNESS >>> SHARPEN
Reposition with your MOVER tool
Open up the tiere_chinni36B image in your PSP workspace
Right click on the Title Bar and select COPY from the options
Right click on the Title Bar of your tag image
and select PASTE AS NEW LAYER from the options.
Reposition with your MOVER tool
Open up the pp_GoldDiamondSideBord1 image in your PSP workspace
Right click on the Title Bar and select COPY from the options
Right click on the Title Bar of your tag image
and select PASTE AS NEW LAYER from the options.
EFFECTS >>> EDGE EFFECTS >>> ENHANCE MORE
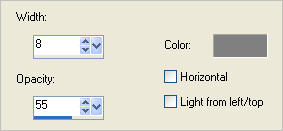
EFFECTS >>> 3D EFFECTS >>> DROP SHADOW
Vertical & Horizontal offsets = 1
Colour = Black
Opacity = 70
Blur = 0
Reposition with your MOVER tool
LAYERS >>> DUPLICATE
IMAGE >>> MIRROR
LAYERS >>> MERGE >>> MERGE DOWN
ACTIVATE RASTER 1
SELECTIONS >>> SELECT ALL
SELECTIONS >>> MODIFY >>> CONTRACT = 6
SELECTIONS >>> INVERT
EFFECTS >>> EDGE EFFECTS >>> ENHANCE MORE
EFFECTS >>> 3D EFFECTS >>> INNER BEVEL
EFFECTS >>> 3D EFFECTS >>> DROP SHADOW
Vertical & Horizontal offsets = 1
Colour = WHITE
Opacity = 70
Blur = 0
Repeat Drop Shadow effect changing
Vertical & Horizontal Offsets to - ( minus ) 1
Click OK
EFFECTS >>> PLUGINS >>> EYE CANDY 3 >>> DROP SHADOW
Same settings
EDIT >>> Repeat Drop Shadow.. change DIRECTION to 315
DESELECT
If you DO NOT wish to animate the Butterfly
LAYERS >>> MERGE >>> MERGE ALL (Flatten)
Save as .jpg image
|
If you DO wish to animate the Butterfly
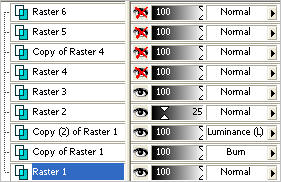
Set up LAYER PALETTE as shown
LAYERS >>> MERGE >>> MERGE VISIBLE
Save as .psp image
or
.pspimage
and go to the NEXT page.
TESTERS RESULTS
Page designed by

for
http://www.artistrypsp.com/
Copyright ©
2003-2012 Artistry In PSP / PSP Artistry
All rights reserved.
Unless specifically made available for
download,
no graphics or text may be removed from
this site for any reason
without written permission from Artistry
In PSP / PSP Artistry
|