RAINBOWS
PSP8 to PSPX3
This tutorial was written by Jemima ~ APRIL 2011
Copyright © 2011 ~ Jemima ~ All rights reserved
********************************
This was created using PSP9 but can be adapted for other versions of PSP.
You will need the
following to complete this tutorial
Materials
1-fly-schwan04.pspimage
rivierepourpre_colorel.pspimage
Save to a folder on your computer
CatoeCountryRainbow.jgd
Save to your PSP Gradients folder
PSP8: C:\Program Files\Jasc Software\Paint Shop Pro 8\Gradients
PSP9: C:\Program Files\Jasc Software\Paint Shop Pro 9\Gradients
PSPX: C:\Program Files\Corel\Corel Paint Shop Pro X\Gradients
PSPXI / X2: C:\Program Files\Corel\Corel Paint Shop Pro Photo X2\Corel_06
PSPX3: C:\Program Files\Corel\X3\PSPClassic\Corel_06
tex-11.jpg
Save to your PSP Textures folder
PSP8: C:\Program Files\Jasc Software\Paint Shop Pro 8\Textures
PSP9: C:\Program Files\Jasc Software\Paint Shop Pro 9\Textures
PSPX: C:\Program Files\Corel\Corel Paint Shop Pro X\Textures
PSPXI / X2: C:\Program Files\Corel\Corel Paint Shop Pro Photo X2\Corel_15
PSPX3: C:\Program Files\Corel\X3\PSPClassic\Corel_15
NO Plugins
********************************
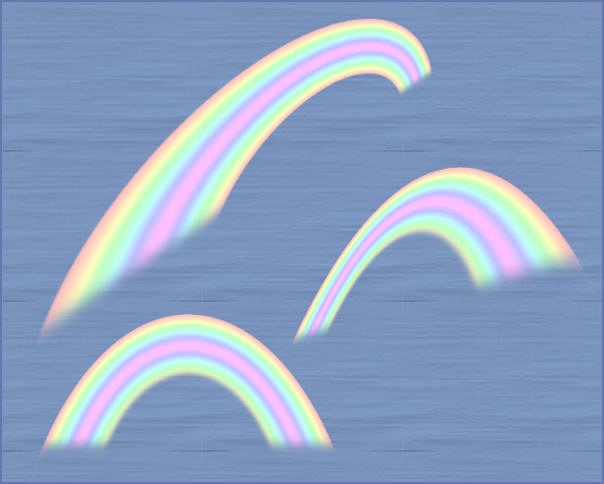
Let's create the rainbows first...then we'll create something with one of them. *S*
In your MATERIALS PALETTE
Load the ' CatoeCountryRainbow ' gradient in your foreground
using the settings below.

Load BLUE ' #acbed6 ' in your background
Open a new image 500 x 500
Transparent background
PSPX - X2: Colour Depth = 8bits/channel
PSPX3: Colour Depth RGB = 8bits/channel
Choose your SELECTION TOOL then click on the CUSTOM SELECTION symbol
and enter these coordinates.

Flood fill the selected area with Gradient.
DESELECT
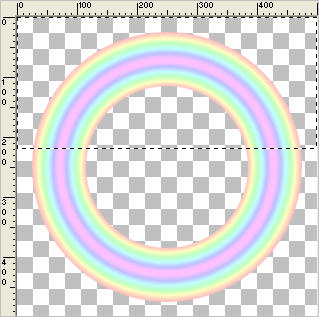
EFFECTS >>> DISTORTION EFFECTS >>> POLAR COORDINATES
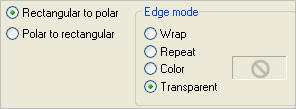
IMAGE >>> RESIZE = 90 %
Ensure "Resize all layers" is UNCHECKED
Resample using WEIGHTED AVERAGE
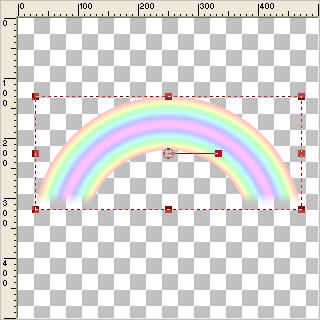
VIEW >>> RULER
Choose your SELECTION TOOL
Selection Type = Rectangle
Mode = Replace
Feather = 2 0
Antialias = UNChecked
Draw a rectangle starting from 0 pixels across and 0 pixels down
to 200 pixels down and 500 pixels across.
The lower part of the rectangle will be at 220 down because of the feather setting
SELECTIONS >>> INVERT
EDIT >>> CLEAR
Hit your DELETE key twice
DESELECT
Reposition with your mover tool to the middle of your image
Save as .psp image
WINDOW >>> DUPLICATE
MINIMIZE the original Image
Select your DEFORMATION tool
Mode = SCALE
use default settings
PSPX-X3:Select your PICK tool
With your SHIFT KEY depressed move the top right node upwards
to around the 5 pixel mark on the left ruler
and the bottom right node upwards to around the 100 pixel mark on the left ruler.
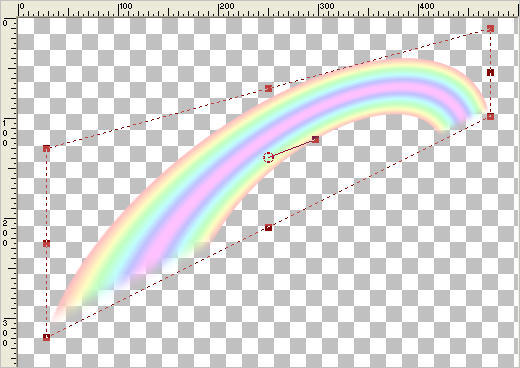
Drag the lower centre node down to the 300 pixel mark on the left ruler,
then depressing the SHIFT key drag the lower right node up to the
100 pixel mark on the left ruler.
Click the RESET RECTANGLE arrow
Click your MOVER tool to disengage the DEFORMATION / PICK TOOL
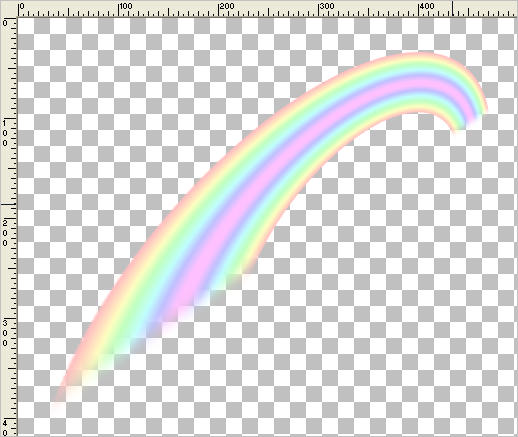
Save as rainbow1.psp image
Now, by duplicating your original rainbow image and using the
DEFORMATION / PICK TOOL you can create lots of different shaped rainbows.
Your imagination is your best friend. *S*
PAGE 2
Page designed by

for
http://www.artistrypsp.com/
Copyright ©
2000-2011 Artistry In PSP / PSP Artistry
All rights reserved.
Unless specifically made available for
download,
no graphics or text may be removed from
this site for any reason
without written permission from Artistry
In PSP / PSP Artistry
|