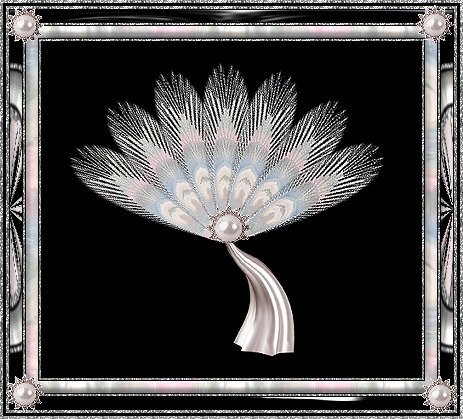
FEATHER FAN
PSP7
This
tutorial was written by Jemima ~ November
2003..
Copyright © 2003 ~
Jemima ~ All rights reserved
********************************
If you didn't make your own feather tube
using my tutorial
you will need to download this and the 2
pearl tubes from
the tube 'accessories.zip' HERE
Extract to a folder
on your computer.
You will need EyeCandy 3
download
You'll need Simple Filters
Flaming Pear (Ornament)
download
Scroll down to "Free Plugins"
Download and extract
to your PSP Plugins Folder.
********************************
Open a new image 550 x 400
translucent background
(I like lots of space to work)
FLOOD FILL with BLACK
(This makes it easier to see what you are
doing,
you can change it later if you wish)
Open up all the tubes you download in
your PSP workspace.
Go to LAYERS >>> New Raster
Layer
Go to VIEW >>> Change Grid and
Guide Properties
Use these settings
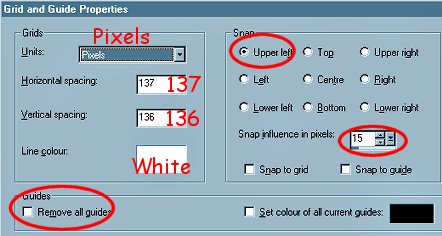
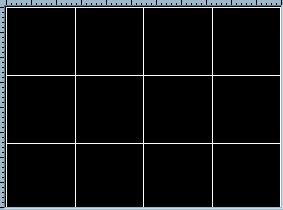
Go to VIEW >>> Grid
Right Click on the title bar of the
'feather' tube and select
COPY from the drop down options.
Right Click on the title bar of your new
image and select
PASTE AS NEW SELECTION
from the drop down options.
Position the feather in the upper centre
of your image.
Go to IMAGE >>> Resize 75%
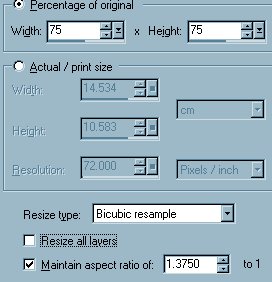
Click OK
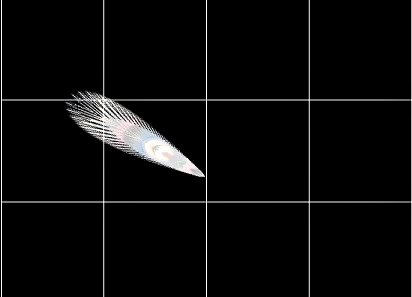
Go to IMAGE >>> Rotate = LEFT 60
Reposition the feather so that the bottom
is in the centre of your image
as shown below
Right Click on the title bar of your new
image and select
COPY from the drop down options.
Go to LAYERS >>> New Raster
Layer
Right Click on the title bar of your new
image and select
PASTE AS NEW SELECTION
from the drop down options.
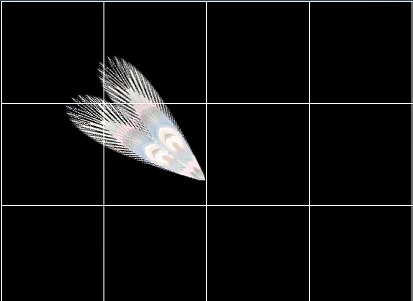
Go to IMAGE >>> Rotate = RIGHT
20
Reposition the feather as shown below.
DESELECT
Go to EFFECTS >>> Sharpen
>>> Sharpen
(The reason for sharpening is.. because
as you rotate.. the image blurs slightly)
Right Click on the
title bar of your new image and select
COPY from the drop down options.
Go to LAYERS >>> New Raster
Layer
Right Click on the title bar of your new
image and select
PASTE AS NEW SELECTION
from the drop down options.
Go to IMAGE >>> Rotate = RIGHT
20
Reposition the feather as shown below.
DESELECT
Go to EFFECTS >>> Sharpen
>>> Sharpen
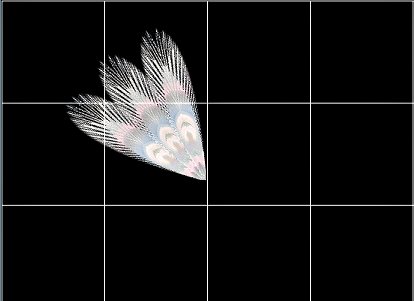
Continue the
instructions typed in RED above until you have 4
more feathers
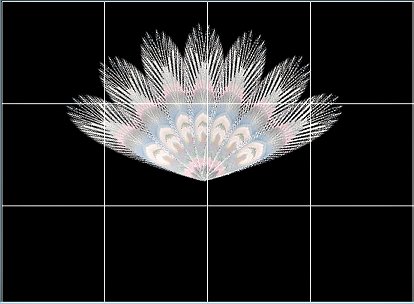
in your image as shown below
Go to VIEW >>> Grid
(This will turn off the grid)
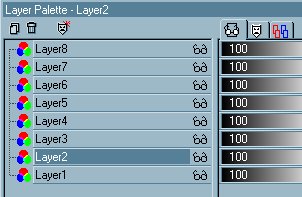
Go to your LAYER PALETTE
Click on Layer 2 to make it active
Go to EFFECTS >>>Plugins
>>> EyeCandy 3 >>> Drop
Shadow
Use these settings
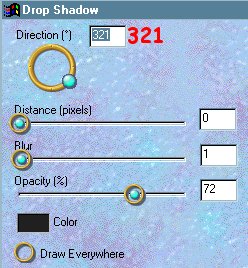
Click OK
Go to your LAYER PALETTE
Click on Layer 3 to make it active
Go to EFFECTS >>>Plugins
>>> Drop Shadow
(This should be sitting just above your
Plugins link)
Click OK
Go to your LAYER PALETTE
Click on Layer 4 to make it active
Go to EFFECTS >>>Plugins
>>> Drop Shadow
Click OK
Continue with these instructions until
you finish with Layer 8
Go to your LAYER PALETTE
Click on the Glasses on Layer 1 to CLOSE
the layer
Make sure one of the other layers is
active
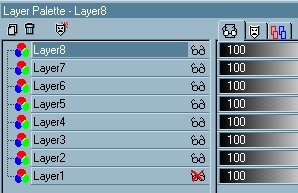
Go to LAYERS >>> Merge
>>> Merge Visible
Go to your LAYER PALETTE
and click on Layer 1 to make it active
Go to LAYERS >>>New Raster Layer
Right click on the title bar of the
"TASSLE" tube and select
COPY from the drop down options.
Right click on the title bar of your Fan
image and select
PASTE AS NEW SELECTION
from the drop down options.
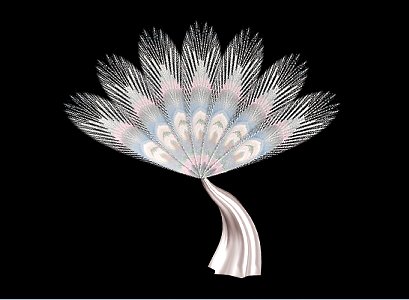
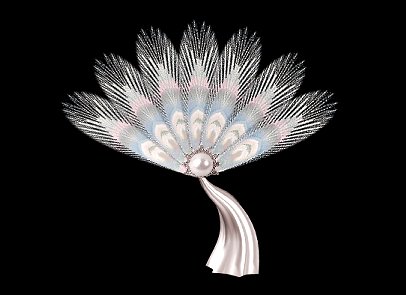
Position it at the centre bottom of your
fan.
Go to your LAYER PALETTE
and click on the MERGED Layer to make it
active
Go to LAYERS >>>New Raster Layer
Right click on the title bar of the
'pearlcut' image
(I removed the bottom section to save
work *S*)
and select COPY from the drop down
options.
Right click on the title bar of your Fan
image and select
PASTE AS NEW SELECTION
from the drop down options.
Go to IMAGE >>> Resize = 35%

Click OK
Position it at the centre bottom of your
fan.
If you wish to save
your work as a TUBE...
Go to your LAYER PALETTE
Right click on Layer 1 and select DELETE
from the drop down options
Go to LAYERS >>> Merge
>>> Merge Visible
and then save as a .psp image
If you wish to
change your background colour... now is
the time to do it.
Go to your LAYER PALETTE and click on
Layer 1
Flood fill with the colour of your
choice.
I'm leaving mine black *S*
Go to LAYERS >>> Merge
>>> Merge All (Flatten)
Go to the NEXT page if you wish to frame
the image
NEXT
Page designed by

for

http://www.artistrypsp.com/
Copyright
© 2000-2004 Artistry In PSP / PSP
Artistry
All rights reserved.
Unless specifically made available for
download,
no graphics or text may be removed from
this site for any reason
without written permission from Artistry
In PSP / PSP Artistry
|