FRAMING THE
FEATHER FAN
Page 2
This
tutorial was written by Jemima ~ November
2003..
Copyright © 2003 ~
Jemima ~ All rights reserved
********************************
You will need to Right click the
'silverpattern'image below
and save it to a folder on your computer.

Open it up in your PSP workspace
Right click the 'Swirl'image below
and save it to a folder on your computer.

Open it up in your PSP workspace
****************************************************
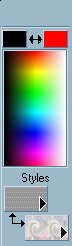
Load the 'silverpattern' into your
Foreground (upper) Styles box
Load the 'swirl' into your Background
(lower) Styles box
At the top of your COLOUR PALETTE
Load red into the righthand (Background)
box
and Black into the lefthand (Foreground)
box
With your SELECTION tool
Settings
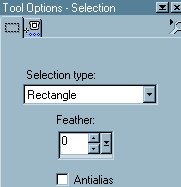
Draw a rectangle around the excess area
on your image
Go to IMAGE >>> Crop to
selection.
Go to IMAGE >>> Resize = 85%
Go to IMAGE >>> Add Borders = 3
With your MAGIC WAND
Settings:
Match Mode = RGB value
Tolerance = 0
Feather = 0
Sample Merged = UNChecked
Select the RED border
FLOOD FILL with the 'silverpattern'
Go to EFFECTS >>> 3D Effects
>>> Drop Shadow
Use these settings
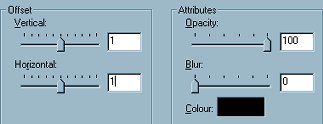
Click OK
Repeat the Drop Shadow changing the
Vertical & Horizontal settings to -
(minus) 1
Click OK
DESELECT
Border 2
Go to IMAGE >>> Add Borders = 13
With your MAGIC WAND
Select the RED border
FLOOD FILL with the 'swirl' pattern
Go to EFFECTS >>> 3D Effects
>>> Inner Bevel
Use these settings
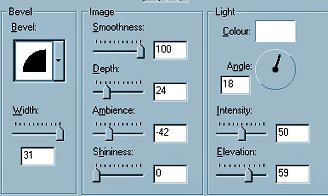
Click OK
REPEAT Inner Bevel
Click OK
Go to EFFECTS >>> 3D Effects
>>> Drop Shadow
Use the same settings
Click OK
Repeat the Drop Shadow changing the
Vertical & Horizontal settings to -
(minus) 1
Click OK
DESELECT
BORDER 3
Go to IMAGE >>> Add Borders = 3
With your MAGIC WAND
Settings:
Match Mode = RGB value
Tolerance = 0
Feather = 0
Sample Merged = UNChecked
Select the RED border
FLOOD FILL with the 'silverpattern'
Go to EFFECTS >>> 3D Effects
>>> Drop Shadow
Click OK
Repeat the Drop Shadow changing the
Vertical & Horizontal settings to -
(minus) 1
Click OK
DESELECT
Border 4
With your EYEDROPPER TOOL
Right click on a pink section of your
image

To change to background colour to PINK
Go to IMAGE >>> Add Borders = 13
With your MAGIC WAND
Select the PINK border
Go to EFFECTS >>>Plugins
>>> Simple >>> Diamonds
Go to EFFECTS >>>Plugins
>>> Flaming Pear >>>
Ornament
Go to EFFECTS >>> 3D Effects
>>> Inner Bevel
Use the same settings
Click OK
REPEAT Inner Bevel
Click OK
Go to EFFECTS >>> 3D Effects
>>> Drop Shadow
Use the same settings
Click OK
Repeat the Drop Shadow changing the
Vertical & Horizontal settings to -
(minus) 1
Click OK
DESELECT

Right click on the PINK Background box on
your COLOUR PALETTE
and select RED from the options
BORDER 5
Go to IMAGE >>> Add Borders = 3
With your MAGIC WAND
Settings:
Match Mode = RGB value
Tolerance = 0
Feather = 0
Sample Merged = UNChecked
Select the RED border
FLOOD FILL with the 'silverpattern'
Go to EFFECTS >>> 3D Effects
>>> Drop Shadow
Click OK
Repeat the Drop Shadow changing the
Vertical & Horizontal settings to -
(minus) 1
Click OK
DESELECT
BORDER 6
Right click on the RED Background box on
your COLOUR PALETTE
and select BLACK from the options
Go to IMAGE >>> Add Borders = 3
BORDER 7
Right click on the BLACK Background box
on your COLOUR PALETTE
and select RED from the options
Go to IMAGE >>> Add Borders = 3
With your MAGIC WAND
Select the RED border
FLOOD FILL with the 'silverpattern'
Go to EFFECTS >>> 3D Effects
>>> Drop Shadow
Click OK
Repeat the Drop Shadow changing the
Vertical & Horizontal settings to -
(minus) 1
Click OK
DESELECT
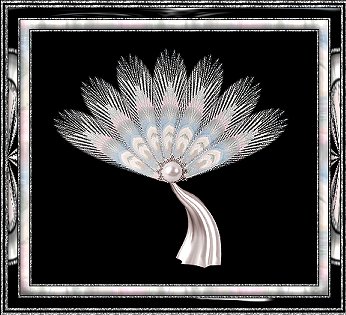
Right click on the title bar of the PEARL
tube
(NOT the 'pearlcut' tube)
Select COPY from the drop down options
Right click on the title bar of your FAN
image and
select PASTE AS NEW SELECTION
from the drop down options.
Go to IMAGE >>> Resize = 25%
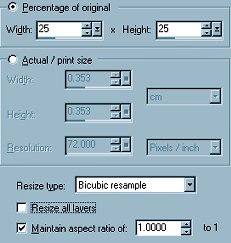
Click OK
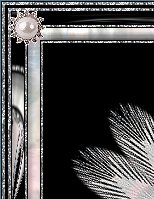
Position the 'pearl' in one of the
corners as shown below.
Right click on the title bar of your FAN
image and
Select COPY from the drop down options
DESELECT
Right click on the
title bar of your FAN image and
select PASTE AS NEW SELECTION
from the drop down options.
Position the 'pearl' in one of the other
corners
DESELECT
Repeat the instruction (in RED) until
there is a pearl in all 4 corners
Resize your image to suit.
Save as a .jpg image
You could add some text if you wished

MAIN TUTORIAL INDEX
Page designed by

for

http://www.artistrypsp.com/
Copyright © 2000-2004 Artistry In PSP / PSP Artistry
All rights reserved.
Unless specifically made available for download,
no graphics or text may be removed from this site for any reason
without written permission from Artistry In PSP / PSP Artistry
|