VALENTINE 09
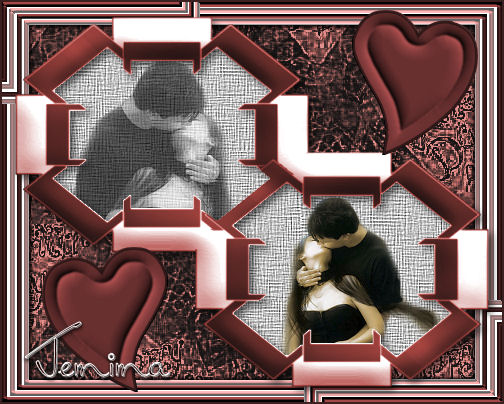
This tutorial was
created by Jemima using PSP9 ~ January 2009
BUT should be creatable using all versions of PSP
Copyright © 2009 ~ Jemima
~ All rights reserved
********************************
You will need the
following to complete this tutorial
Materials
VAL09 Materials ZIP
bavelvetred.PspGradient
Save to your PSP Gradients folder
linenPOP.bmp
Save to your PSP Textures folder
SK Random 33.PspShape
Save to your PSP Shapes folder
dd_modern01[1]..jpg
1281dwtubes.pspimage
c_bg_valentine8.jpg
Save to a folder on your computer
Plugins
** EYE CANDY3 **
http://www.pircnet.com/downloads.html
********************************
Open up the downloaded images in your PSP workspace
and minimize.
In your MATERIALS PALETTE
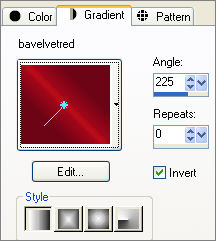
Load the ' bavelvetred ' pattern in your foreground
using the settings below
Load SOLID WHITE in your background
Open a new image 500 x 400
Transparent background
PSPX: Colour Depth = 8bits/channel
Flood fill with the Gradient
LAYERS >>> NEW RASTER LAYER
Flood fill with WHITE
LAYERS >>> NEW MASK LAYER >>> FROM IMAGE
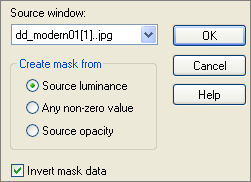
LAYERS >>> DELETE

(Or similar message depending on which version you are using)
YES
LAYERS >>> MERGE >>> MERGE GROUP
With your MAGIC WAND
Mode = Replace
Match Mode = RGB Value
Tolerance = 0
Feather = 1
Antialias = Checked
Sample Merged = UNCHECKED
PSP9/X: Check CONTIGUOUS
PSPX: There is no " Sample Merged"
PSPX: Use all layers = UNChecked
PSP9/X: ANTIALIAS =OUTside
Select the area outside the mask
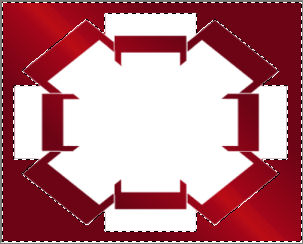
ACTIVATE RASTER 1
EDIT >>> CLEAR
DESELECT
LAYERS >>> MERGE >>> MERGE VISIBLE
IMAGE >>> RESIZE = 80%
Ensure "Resize all layers" is UNCHECKED
Resample using WEIGHTED AVERAGE
EDIT >>> Repeat RESIZE
Reposition with your MOVER tool
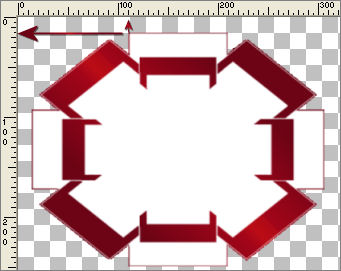
LAYERS >>> DUPLICATE
IMAGE >>> FLIP
IMAGE >>> MIRROR
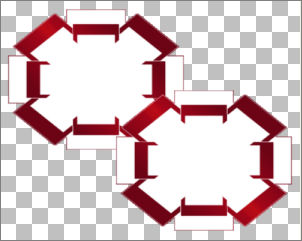
With your MAGIC WAND
Mode = Replace
Match Mode = RGB Value
Tolerance = 25
Feather = 0
Antialias = Checked
Sample Merged = UNCHECKED
PSP9/X: Check CONTIGUOUS
PSPX: There is no " Sample Merged"
PSPX: Use all layers = UNChecked
PSP9/X: ANTIALIAS = Inside ..
Select the area shown
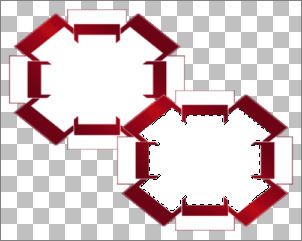
EDIT >>> CLEAR
Activate the MERGED layer
EDIT >>> CLEAR
DESELECT
With your MAGIC WAND
Same settings..
Select the area shown
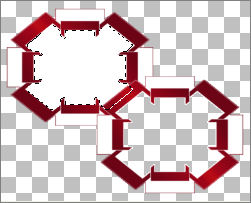
EDIT >>> CLEAR
Activate the Copy of MERGED layer
EDIT >>> CLEAR
DESELECT
Choose your FREEHAND SELECTION TOOL
Selection Type = Point to Point
Mode = Replace
Feather = 0
Antialias = Checked
Section of the area shown
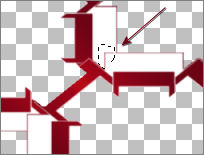
Flood fill with WHITE
DESELECT
Choose your FREEHAND SELECTION TOOL
Same settings
Section of the area shown
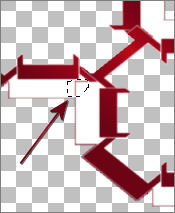
Flood fill with WHITE
DESELECT
LAYERS >>> MERGE >>> MERGE VISIBLE
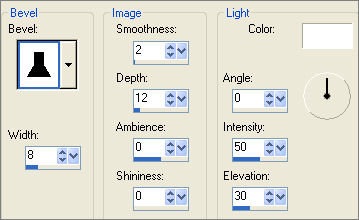
EFFECTS >>> 3D EFFECTS >>> INNER BEVEL
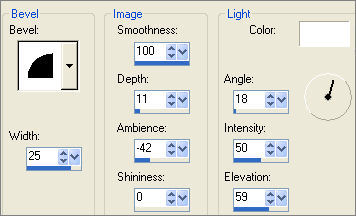
EDIT >>> Repeat Inner Bevel
ADJUST >>> HUE & SATURATION >>> COLORIZE
HUE = 2 / SATURATION =
110
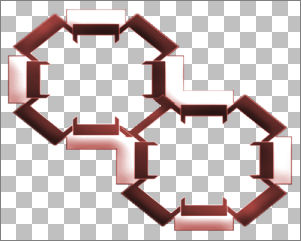
With your MAGIC WAND
Mode = Replace
Match Mode = RGB Value
Tolerance = 0
Feather = 0
Antialias = Checked
Sample Merged = UNCHECKED
PSP9/X: Check CONTIGUOUS
PSPX: There is no " Sample Merged"
PSPX: Use all layers = UNChecked
PSP9/X: ANTIALIAS = Inside ..
Select the OUTER transparent area
SELECTIONS >>> MODIFY >>> EXPAND = 2
LAYERS >>> NEW RASTER LAYER
LAYERS >>> ARRANGE >>> MOVE DOWN
In your MATERIALS PALETTE
Load the ' c_bg_valentine8.jpg ' pattern in your background
using the settings below.

Flood fill with c_bg_valentine8.jpg pattern
PSP8/9:- ADJUST >>> Brightness & Contrast >>> Gamma Correction
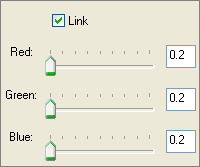
PSPX:- ADJUST >>> Brightness & Contrast >>> Histogram Adjustment

PSP8/9/X: Repeat Gamma Correction
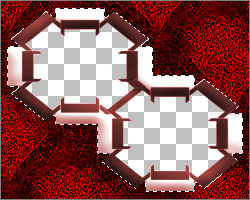
ADJUST >>> HUE & SATURATION >>> COLORIZE
HUE = 2 / SATURATION = 85
ADJUST >>> BRIGHTNESS and CONTRAST >>> BRIGHTNESS/CONTRAST

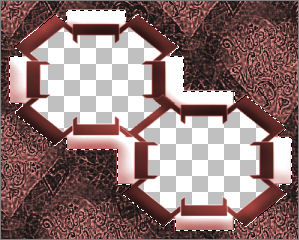
DESELECT
Activate the MERGED layer
SELECTIONS >>> SELECT ALL
SELECTIONS >>> FLOAT
SELECTIONS >>> DEFLOAT
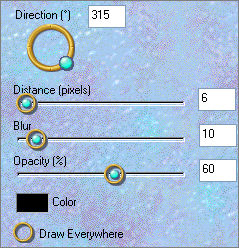
EFFECTS >>> PLUGINS >>> EYE CANDY 3 >>> DROP SHADOW
LAYERS >>> NEW RASTER LAYER
LAYERS >>> ARRANGE >>> MOVE DOWN
SELECTIONS >>> SELECT ALL
SELECTIONS >>> MODIFY >>> CONTRACT = 5
SELECTIONS >>> INVERT
Flood fill with MAROON #532525
EFFECTS >>> 3D EFFECTS >>> INNER BEVEL
DESELECT
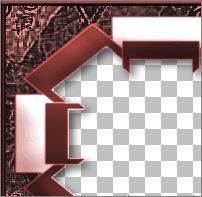
Border 2: LAYERS >>> DUPLICATE
IMAGE >>> RESIZE = 97%
Ensure "Resize all layers" is UNCHECKED
Resample using WEIGHTED AVERAGE
Border 3: LAYERS >>> DUPLICATE
IMAGE >>> RESIZE = 97%
Ensure "Resize all layers" is UNCHECKED
Resample using WEIGHTED AVERAGE
Border 4: LAYERS >>> DUPLICATE
IMAGE >>> RESIZE = 97%
Ensure "Resize all layers" is UNCHECKED
Resample using WEIGHTED AVERAGE
ADJUST >>> BRIGHTNESS and CONTRAST >>> BRIGHTNESS/CONTRAST

ACTIVATE "Copy of Raster 2"
ADJUST >>> BRIGHTNESS and CONTRAST >>> BRIGHTNESS/CONTRAST
Same settings
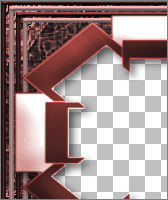
CLOSE Raster 1 and the MERGED layer
LAYERS >>> MERGE >>> MERGE VISIBLE
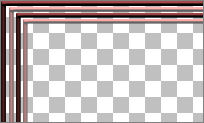
With your MAGIC WAND
Mode = Replace
Match Mode = RGB Value
Tolerance = 0
Feather = 0
Antialias = UNchecked
Sample Merged = UNCHECKED
PSP9/X: Check CONTIGUOUS
PSPX: There is no " Sample Merged"
PSPX: Use all layers = UNChecked
Select the CENTRE transparent area.
SELECTIONS >>> INVERT
LAYERS >>> NEW RASTER LAYER
Flood fill with WHITE
LAYERS >>> ARRANGE >>> MOVE DOWN
DESELECT
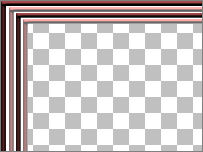
LAYERS >>> MERGE >>> MERGE VISIBLE
LAYERS >>> DUPLICATE
EFFECTS >>> REFLECTION EFFECTS >>> ROTATING MIRROR

LAYERS >>> DUPLICATE
IMAGE >>> FLIP
IMAGE >>> MIRROR
Close the layers shown
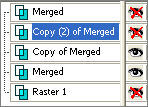
With Copy (2) of Merged active .. but CLOSED...
Choose your FREEHAND SELECTION TOOL
Selection Type = Point to Point
Mode = Replace
Feather = 0
Antialias = Checked
Section off the area below.. but remain on Copy (2) of Merged
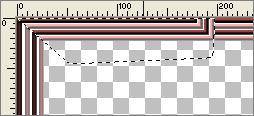
EDIT >>> CLEAR
DESELECT
Section off the area below at the bottom right.. but remain on Copy (2) of Merged
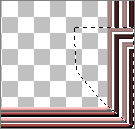
EDIT >>> CLEAR
DESELECT
OPEN " Copy (2) of Merged "
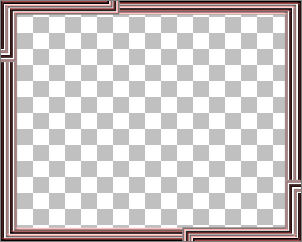
LAYERS >>> MERGE >>> MERGE VISIBLE
With your MAGIC WAND...
Same settings..
Select the CENTRE transparent area
SELECTIONS >>> INVERT
EFFECTS >>> PLUGINS >>> EYE CANDY 3 >>> DROP SHADOW
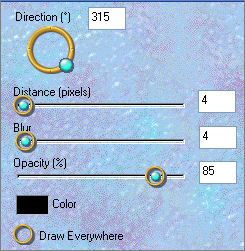
EDIT >>> Repeat Drop Shadow.. change DIRECTION to 135
DESELECT
OPEN ALL LAYERS
Activate the top MERGED layer
LAYERS >>> NEW RASTER LAYER
In your MATERIALS PALETTE load
#3d2020 in the foreground and
#7f3a3a in the background
Select your PRESET SHAPES tool
Locate the
SK Random 33.PspShape

Draw the heart in the bottom left corner
EFFECTS >>> 3D EFFECTS >>> INNER BEVEL
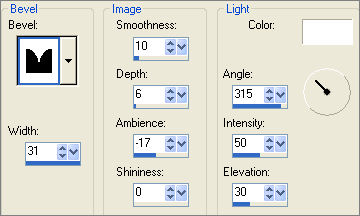
LAYERS >>> DUPLICATE
IMAGE >>> MIRROR
Reposition with your MOVER tool
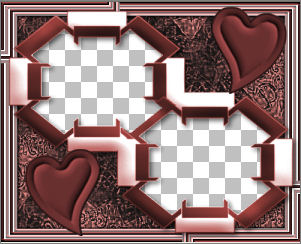
LAYERS >>> MERGE >>> MERGE VISIBLE
Save as .psp image
*************************
LAYERS >>> NEW RASTER LAYER
LAYERS >>> ARRANGE >>> MOVE DOWN
Flood Fill with GREY #c0c0c0
EFFECTS >>> TEXTURE EFFECTS >>> TEXTURE
COLOUR = #c0c0c0
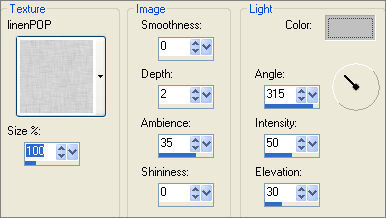
EFFECTS >>> EDGE EFFECTS >>> ENHANCE
Open up the 1281dwtubes.pspimage image in your PSP workspace
Right click on the Title Bar and select COPY from the options
Right click on the Title Bar of your frame image
and select PASTE AS NEW LAYER from the options.
IMAGE >>> RESIZE = 40%
Ensure "Resize all layers" is UNCHECKED
Resample using WEIGHTED AVERAGE
Reposition with your MOVER tool
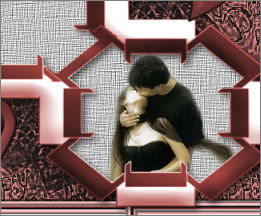
Right click on the Title Bar of your frame image
and select PASTE AS NEW LAYER from the options.
IMAGE >>> MIRROR
IMAGE >>> RESIZE = 55%
Ensure "Resize all layers" is UNCHECKED
Resample using WEIGHTED AVERAGE
Reposition with your MOVER tool
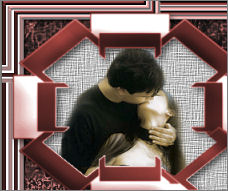
In your LAYER PALETTE change the OPACITY to 70%
Change the BLEND MODE to LUMINANCE (L)
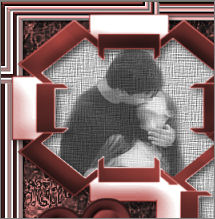
LAYERS >>> MERGE >>> MERGE ALL (Flatten)
IMAGE >>> ADD BORDERS = 2 MAROON #3d2020
Save as .jpg image
Testers Results
Page designed by

for

http://www.artistrypsp.com/
Copyright © 2000-2009 Artistry In PSP / PSP Artistry
All rights reserved.
Unless specifically made available for
download,
no graphics or text may be removed from
this site for any reason
without written permission from Artistry
In PSP / PSP Artistry
TUTORIAL
INDEX
|