TULIP TIME

This tutorial was
created by Jemima using PSP9 ~ January 2009
BUT should be creatable using all versions of PSP
Copyright © 2009 ~ Jemima
~ All rights reserved
********************************
You will need the
following to complete this tutorial
Materials
Tulip Time Materials ZIP
blintz2[1].jpeg
Save to your PSP Patterns folder
linenPOP
Save to your PSP Textures folder
LONETULIP_DBT.PSP
swanja_pink_tulips.psp
Save to a folder on your computer
Plugins
** EYE CANDY3 **
HERE
********************************
In your MATERIALS PALETTE
Load SOLID LIGHT BLUE ' #b6c1fa ' in your foreground
Load SOLID DARK BLUE ' #526cf0 ' in your background
Open a new image 500 x 500
Transparent background
PSPX: Colour Depth = 8bits/channel
Choose your SELECTION TOOL
Selection Type = Ellipse
Mode = Replace
Feather = 1
Antialias = Checked
Starting at 250 pixels across and 250 pixels down
drag your cursor to 400 pixels across and 450 pixels down.
Flood fill with DARK BLUE.
SELECTIONS >>> MODIFY >>> CONTRACT = 25
EDIT >>> CLEAR
DESELECT
EFFECTS >>> TEXTURE EFFECTS >>> WEAVE
COLOUR = DARK BLUE
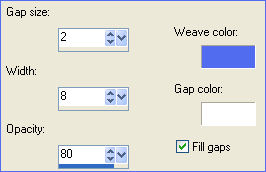
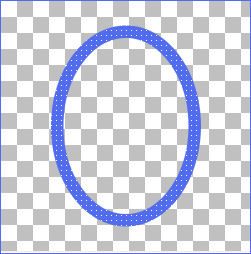
EFFECTS >>> 3D EFFECTS >>> INNER BEVEL
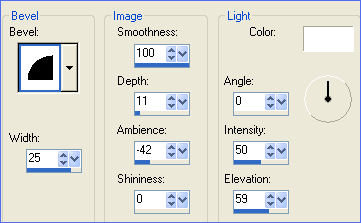
EDIT >>> Repeat Inner Bevel
EFFECTS >>> 3D EFFECTS >>> DROP SHADOW
Vertical & Horizontal offsets = 1
Colour = Black
Opacity = 75
Blur = 2.00
Repeat Drop Shadow effect changing
Vertical & Horizontal Offsets to - ( minus ) 1
Click OK
With your MAGIC WAND
Mode = Replace
Match Mode = RGB Value
Tolerance = 0
Feather = 1
Antialias = Checked
Sample Merged = UNCHECKED
PSP9/X: Check CONTIGUOUS
PSPX: There is no " Sample Merged"
PSPX: Use all layers = UNChecked
PSP9/X: ANTIALIAS = Inside
Select the CENTRE transparent area
SELECTIONS >>> MODIFY >>> EXPAND = 2
LAYERS >>> NEW RASTER LAYER
LAYERS >>> ARRANGE >>> MOVE DOWN
Flood fill with LIGHT BLUE
SELECTIONS >>> MODIFY >>> CONTRACT = 15
EDIT >>> CLEAR
DESELECT
EFFECTS >>> TEXTURE EFFECTS >>> WEAVE
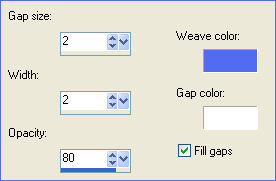
EFFECTS >>> 3D EFFECTS >>> INNER BEVEL
Same settings
EDIT >>> Repeat Inner Bevel
EFFECTS >>> 3D EFFECTS >>> DROP SHADOW
Vertical & Horizontal offsets = 1
Colour = Black
Opacity = 75
Blur = 2.00
Repeat Drop Shadow effect changing
Vertical & Horizontal Offsets to - ( minus ) 1
Click OK
ADJUST >>> SHARPNESS >>> SHARPEN MORE
LAYERS >>> MERGE >>> MERGE VISIBLE
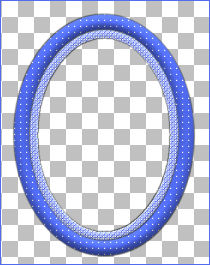
To make sure the image is centred...
Right click on the Title Bar and select COPY from the options
Right click on the Title Bar of your frame image
and select PASTE AS NEW LAYER from the options.
In your LAYER PALETTE right click on the MERGED layer
and select DELETE from the options
IMAGE >>> RESIZE = 90%
Ensure "Resize all layers" is UNCHECKED
Resample using WEIGHTED AVERAGE
ADJUST >>> SHARPNESS >>> SHARPEN
LAYERS >>> NEW RASTER LAYER
SELECTIONS >>> SELECT ALL
Flood fill with DARK BLUE
SELECTIONS >>> MODIFY >>> CONTRACT = 20
EDIT >>> CLEAR
SELECTIONS >>> INVERT
EFFECTS >>> TEXTURE EFFECTS >>> WEAVE
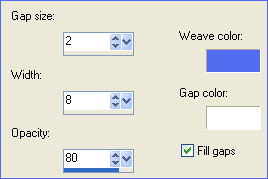 . .
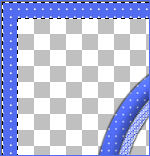
EFFECTS >>> 3D EFFECTS >>> INNER BEVEL
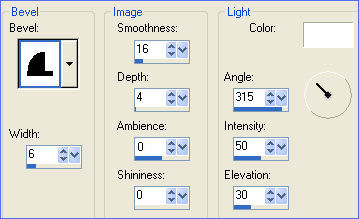
SELECTIONS >>> MODIFY >>> CONTRACT = 5
EFFECTS >>> 3D EFFECTS >>> INNER BEVEL
Same settings
DESELECT
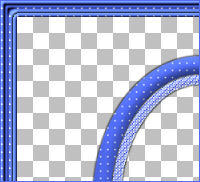
LAYERS >>> DUPLICATE
IMAGE >>> RESIZE = 80%
Ensure "Resize all layers" is UNCHECKED
Resample using WEIGHTED AVERAGE
ADJUST >>> SHARPNESS >>> SHARPEN
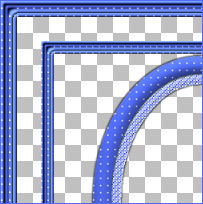
LAYERS >>> DUPLICATE
IMAGE >>> ROTATE >>> FREE ROTATE = LEFT 45
Ensure "All layers" is UNCHECKED
LAYERS >>> ARRANGE >>> SEND TO BOTTOM
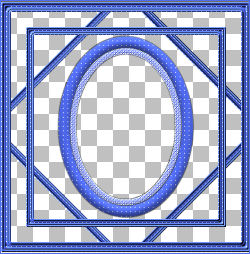
CLOSE RASTER 1 (The oval frame)
LAYERS >>> MERGE >>> MERGE VISIBLE
With your MAGIC WAND
Mode = Replace
Match Mode = RGB Value
Tolerance = 0
Feather = 0
Antialias = UNchecked
Sample Merged = UNCHECKED
PSP9/X: Check CONTIGUOUS
PSPX: There is no " Sample Merged"
PSPX: Use all layers = UNChecked
and while depressing your SHIFT KEY...
Select the transparent areas shown below
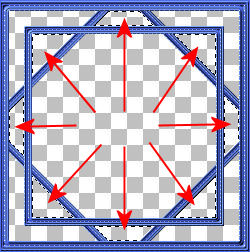
SELECTIONS >>> MODIFY >>> EXPAND = 2
LAYERS >>> NEW RASTER LAYER
LAYERS >>> ARRANGE >>> SEND TO BOTTOM
Flood fill with Dark Blue
EFFECTS >>> TEXTURE EFFECTS >>> WEAVE
Same settings
EFFECTS >>> 3D EFFECTS >>> INNER BEVEL

DESELECT
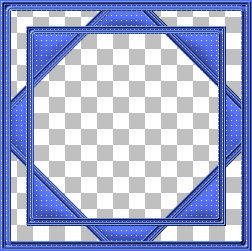
ACTIVATE THE MERGED LAYER
With your MAGIC WAND
Same settings... and while depressing your SHIFT KEY...
Select the transparent areas shown below
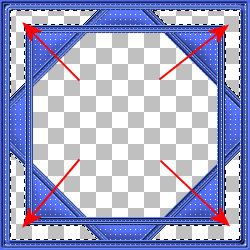
SELECTIONS >>> MODIFY >>> EXPAND = 1
ACTIVATE RASTER 2
LAYERS >>> NEW RASTER LAYER
LAYERS >>> ARRANGE >>> MOVE DOWN
Flood fill with Dark Blue
EFFECTS >>> TEXTURE EFFECTS >>> WEAVE
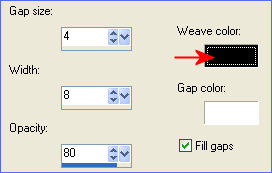
EFFECTS >>> 3D EFFECTS >>> INNER BEVEL

DESELECT
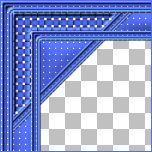
LAYERS >>> NEW RASTER LAYER
LAYERS >>> ARRANGE >>> MOVE DOWN
Choose your SELECTION TOOL then click on the CUSTOM SELECTION
symbol
and enter these coordinates.
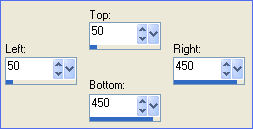
Flood fill with Light Blue
EFFECTS >>> TEXTURE EFFECTS >>> SCULPTURE
COLOUR = LIGHT BLUE
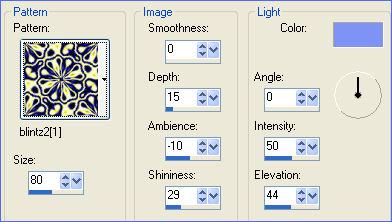
DESELECT
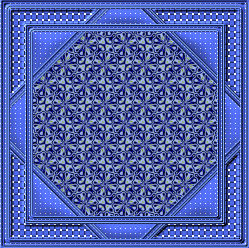
OPEN & ACTIVATE RASTER 1
With your MAGIC WAND
Same settings
Select the centre of the image
SELECTIONS >>> MODIFY >>> EXPAND = 3
ACTIVATE RASTER 4
EDIT >>> CLEAR
DESELECT
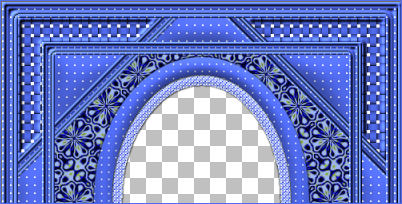
LAYERS >>> MERGE >>> MERGE VISIBLE
With your MAGIC WAND
Mode = Replace
Match Mode = RGB Value
Tolerance = 0
Feather = 1
Antialias = Checked
Sample Merged = UNCHECKED
PSP9/X: Check CONTIGUOUS
PSPX: There is no " Sample Merged"
PSPX: Use all layers = UNChecked
PSP9/X: ANTIALIAS = Inside
Select the CENTRE transparent area
SELECTIONS >>> MODIFY >>> EXPAND = 1
SELECTIONS >>> INVERT
EFFECTS >>> PLUGINS >>> EYE CANDY 3 >>> DROP SHADOW
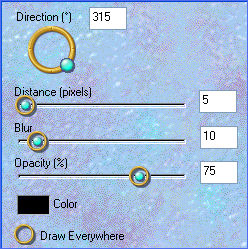
DESELECT
Save as .psp image
Now you can add an image of your own or finish off the frame as
I did with the tulips.
LAYERS >>> NEW RASTER LAYER
LAYERS >>> ARRANGE >>> MOVE DOWN
Flood fill with Light Blue
EFFECTS >>> TEXTURE EFFECTS >>> TEXTURE
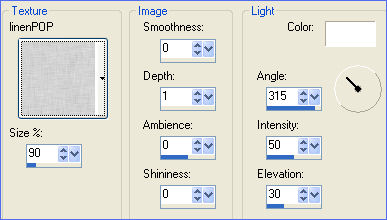
EFFECTS >>> EDGE EFFECTS >>> ENHANCE MORE
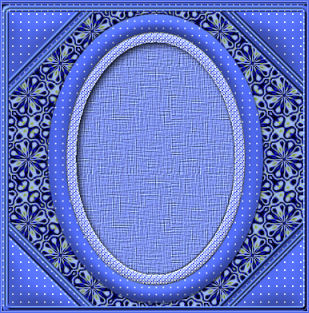
ACTIVATE THE MERGED LAYER
Open up the LONETULIP_DBT.PSP and swanja_pink_tulips.psp
images in your PSP workspace.
Right click on the Title Bar of the swanja_pink_tulips.psp image
and select COPY from the options
Right click on the Title Bar of your frame image
and select PASTE AS NEW LAYER from the options.
IMAGE >>> RESIZE = 65%
Ensure "Resize all layers" is UNCHECKED
Resample using WEIGHTED AVERAGE
ADJUST >>> SHARPNESS >>> SHARPEN
EFFECTS >>> 3D EFFECTS >>> DROP SHADOW
Vertical & Horizontal offsets = - ( minus ) 1
Colour = Black
Opacity = 75
Blur = 0
EFFECTS >>> PLUGINS >>> EYE CANDY 3 >>> DROP SHADOW
Same settings
Reposition with your MOVER tool

Right click on the Title Bar of the LONETULIP_DBT.PSP image
and select COPY from the options
Right click on the Title Bar of your frame image
and select PASTE AS NEW LAYER from the options.
IMAGE >>> RESIZE = 65%
Ensure "Resize all layers" is UNCHECKED
Resample using WEIGHTED AVERAGE
IMAGE >>> FLIP
ADJUST >>> SHARPNESS >>> SHARPEN
Reposition with your MOVER tool
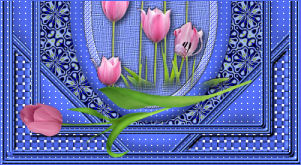
Select your DEFORMATION tool
Mode = SCALE
use default settings
PSPX/XI/XII:Select your PICK tool
(I have closed the other layers so you can see the nodes...
drag the rotation node down a little so the tulip is lying
with the stem horizontal)
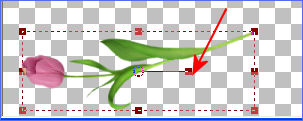
Click the RESET RECTANGLE arrow

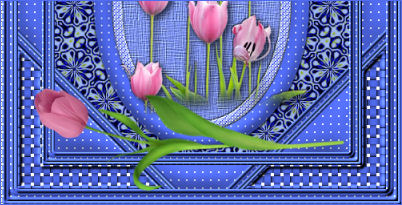
EFFECTS >>> 3D EFFECTS >>> DROP SHADOW
Vertical & Horizontal offsets = - ( minus ) 1
Colour = Black
Opacity = 75
Blur = 0
EFFECTS >>> PLUGINS >>> EYE CANDY 3 >>> DROP SHADOW
Same settings
LAYERS >>> MERGE >>> MERGE ALL (Flatten)
Save as .jpg image
Testers Results
Page designed by

for

http://www.artistrypsp.com/
Copyright ©
2000-2009 Artistry In PSP / PSP Artistry
All rights reserved.
Unless specifically made available for
download,
no graphics or text may be removed from
this site for any reason
without written permission from Artistry
In PSP / PSP Artistry
TUTORIAL
INDEX
|