LLAMA
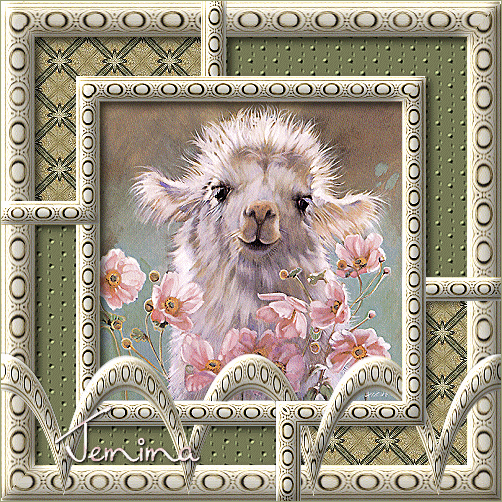
This tutorial was
created by Jemima using PSP9 ~ January 2009
BUT should be creatable using all versions of PSP
Copyright © 2009 ~ Jemima
~ All rights reserved
********************************
This is a long tutorial but I have images every step of the way.
You will need the
following to complete this tutorial
Materials
LLAMA MATERIALS ZIP
JF_Border90.pspimage
animalpicturesarchive16 jun2006.jpg
Save to a folder on your computer
ivy_decostone4.jpg
Save to your PSP Patterns folder
esp_tan_patt_9.jpg
Save to your PSP Textures folder
Plugins
** EYE CANDY3 **
http://www.pircnet.com/downloads.html
********************************
Open a new image 500 x 500
Transparent background
PSPX: Colour Depth = 8bits/channel
Open up the JF_Border90 image in your PSP workspace
Right click on the Title Bar and select COPY from the options
Right click on the Title Bar of your blankframe image
and select PASTE AS NEW LAYER from the options.
Place your cursor in the ventre of the border and
reposition with your MOVER tool to the top of your image.

LAYERS >>> DUPLICATE
IMAGE >>> ROTATE >>> FREE ROTATE = RIGHT 90
Ensure "All layers" is UNCHECKED
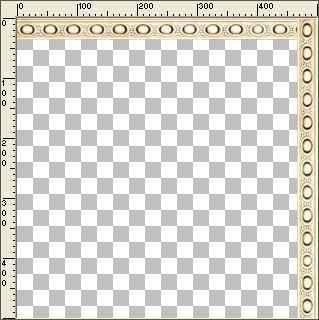
Reposition with your MOVER tool to the right side of your image.
Choose your FREEHAND SELECTION TOOL
Selection Type = Point to Point
Mode = Replace
Feather = 0
Antialias = Checked
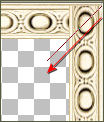
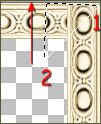
1: LEFT Click starting at the outer corner on the top right of your frame
2: Then LEFT click a second time diagonally down and to the left.
3: LEFT Click a third time at the top of the frame
4: RIGHT click
 . . 
EDIT >>> CLEAR
DESELECT
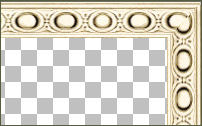
Close Raster 1
LAYERS >>> MERGE >>> MERGE VISIBLE
LAYERS >>> DUPLICATE
IMAGE >>> FLIP
IMAGE >>> MIRROR
Choose your FREEHAND SELECTION TOOL same settings and
Repeat instruction 1 to 4 above on the top left and bottom right corners
compensating for the fact
that instruction 2 will be
down and to the right (top left corner)
and up and to the left
(bottom right corner)
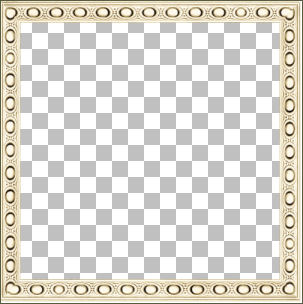
LAYERS >>> MERGE >>> MERGE VISIBLE
LAYERS >>> DUPLICATE
IMAGE >>> RESIZE = 70%
Ensure "Resize all layers" is UNCHECKED
Resample using WEIGHTED AVERAGE
ADJUST >>> SHARPNESS >>> SHARPEN MORE
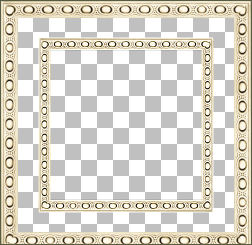
LAYERS >>> DUPLICATE
EFFECTS >>> REFLECTION EFFECTS >>> ROTATING MIRROR
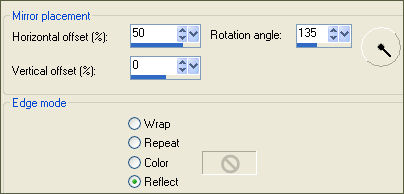
Close the layers shown below

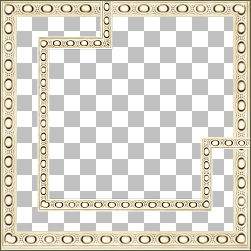
LAYERS >>> DUPLICATE
IMAGE >>> FLIP
IMAGE >>> MIRROR
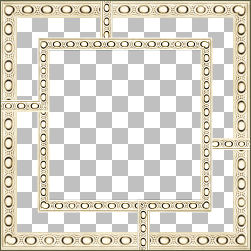
OPEN & ACTIVATE "Copy of Merged" layer
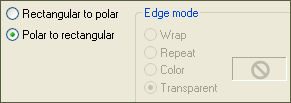
EFFECTS >>> DISTORTION EFFECTS >>> POLAR COORDINATES
Select your DEFORMATION tool
Mode = SCALE
use default settings
PSPX/XI/XII:Select your PICK tool
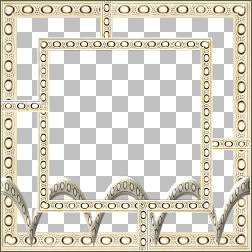
Drag the centre top node down level with the 350 pixel mark on the left ruler.
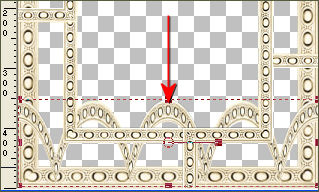
Click the RESET RECTANGLE arrow

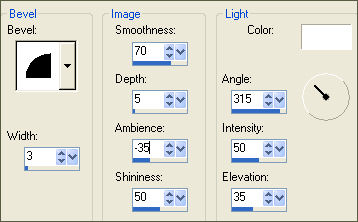
EFFECTS >>> 3D EFFECTS >>> INNER BEVEL
ACTIVATE "Copy (2) of Merged" layer
EDIT >>> Repeat Inner Bevel
ACTIVATE "Copy (3) of Merged" layer
EDIT >>> Repeat Inner Bevel
ACTIVATE "Merged" layer
EDIT >>> Repeat Inner Bevel
ADJUST >>> SHARPNESS >>> SHARPEN
ACTIVATE "Copy (3) of Merged" layer
EDIT >>> Repeat Sharpen
ACTIVATE "Copy (2) of Merged" layer
EDIT >>> Repeat Sharpen
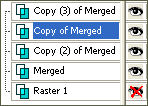
Go to your LAYER PALETTE
Move the "Copy of Merged" layer under the " Copy (3) of Merged" layer
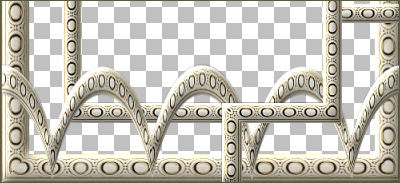
ACTIVATE "Copy (3) of Merged" layer
In your LAYER PALETTE change the OPACITY to 45%
Choose your FREEHAND SELECTION TOOL
Selection Type = Point to Point
Mode = Replace
Feather = 1
Antialias = Checked
Select the area shown below
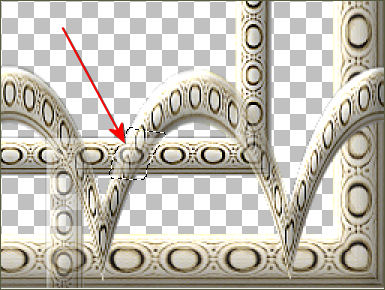
EDIT >>> CLEAR
DESELECT
In your LAYER PALETTE change the OPACITY to 100%
ACTIVATE "Copy of Merged" layer
In your LAYER PALETTE change the OPACITY to 65%
Choose your FREEHAND SELECTION TOOL
Same settings
Select the area shown below
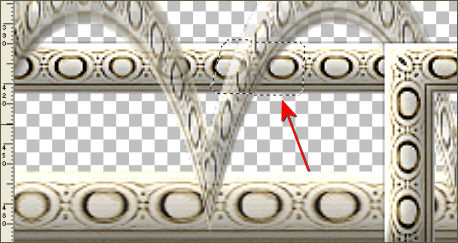
EDIT >>> CLEAR
DESELECT
In your LAYER PALETTE change the OPACITY to 100%
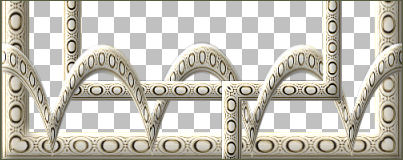
LAYERS >>> MERGE >>> MERGE VISIBLE
With your MAGIC WAND
Mode = Replace
Match Mode = RGB Value
Tolerance = 0
Feather = 0
Antialias = UNchecked
Sample Merged = UNCHECKED
PSP9/X: Check CONTIGUOUS
PSPX: There is no " Sample Merged"
PSPX: Use all layers = UNChecked
Select the INNER TOP LEFT transparent area
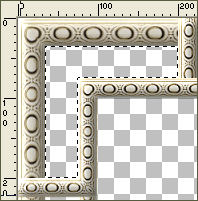
SELECTIONS >>> MODIFY >>> EXPAND = 3
LAYERS >>> NEW RASTER LAYER
LAYERS >>> ARRANGE >>> MOVE DOWN
Flood fill with CREAM #ead5c0
EFFECTS >>> TEXTURE EFFECTS>>> SCULPTURE
COLOUR = GREY #c0c0c0
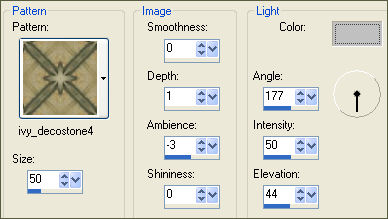
EFFECTS >>> EDGE EFFECTS >>> ENHANCE
DESELECT
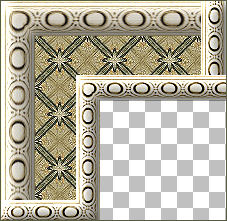
LAYERS >>> DUPLICATE
IMAGE >>> FLIP
IMAGE >>> MIRROR
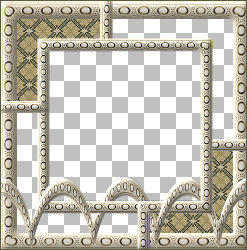
ACTIVATE "Merged" layer
With your MAGIC WAND ... same settings
Select the INNER TOP RIGHT transparent area
SELECTIONS >>> MODIFY >>> EXPAND = 3
LAYERS >>> NEW RASTER LAYER
LAYERS >>> ARRANGE >>> MOVE DOWN
Flood fill with GREEN #575c40
EFFECTS >>> TEXTURE EFFECTS >>> TEXTURE
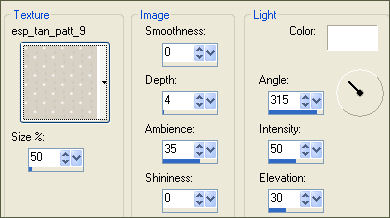
EFFECTS >>> EDGE EFFECTS >>> ENHANCE
DESELECT
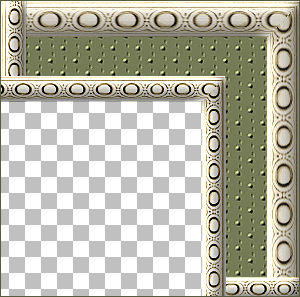
LAYERS >>> DUPLICATE
IMAGE >>> FLIP
IMAGE >>> MIRROR
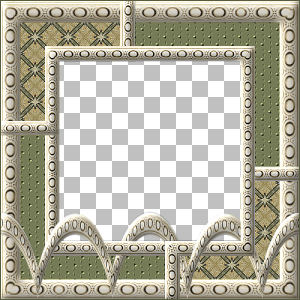
ACTIVATE "Merged" layer
Choose your SELECTION TOOL
Selection Type = Rectangle
Mode = Replace
Feather = 0
Antialias = UNchecked
Draw a rectangle as shown below in the bottom left corner of the frame.
ZOOM in so you get right on the edges of the frame
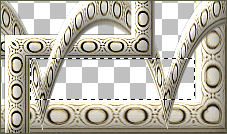
Depress your SHIFT KEY and draw another rectangle as shown overlapping
the previous rectangle ... I've gone over it in red to make the area more distinct.
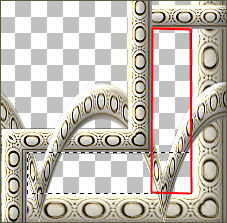
Release your mouse button.
The "corner" section should be selected.
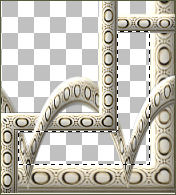
LAYERS >>> NEW RASTER LAYER
LAYERS >>> ARRANGE >>> MOVE DOWN
SELECTIONS >>> INVERT
EFFECTS >>> PLUGINS >>> EYE CANDY 3 >>> DROP SHADOW
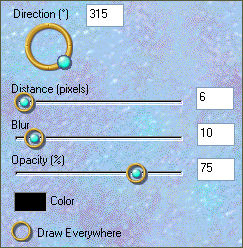
DESELECT
ACTIVATE "Merged" layer
Choose your SELECTION TOOL ... same settings.
Draw a rectangle as shown below in the bottom RIGHT corner of the frame.
ZOOM in so you get right on the edges of the frame

Depress your SHIFT KEY and draw another rectangle as shown overlapping
the previous rectangle ... I've gone over it in red to make the area more distinct.
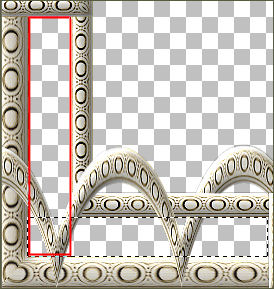
Release your mouse button.
The "corner" section should be selected.
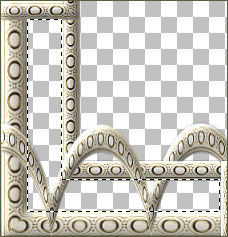
LAYERS >>> NEW RASTER LAYER
LAYERS >>> ARRANGE >>> MOVE DOWN
SELECTIONS >>> INVERT
EFFECTS >>> PLUGINS >>> EYE CANDY 3 >>> DROP SHADOW
Same settings
DESELECT
ACTIVATE "Merged" layer
With your MAGIC WAND... same settings and using your SHIFT key...
Select the top transparent areas shown below.
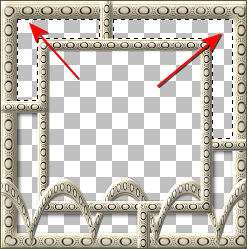
SELECTIONS >>> INVERT
ACTIVATE Raster 6
EFFECTS >>> PLUGINS >>> EYE CANDY 3 >>> DROP SHADOW
Same settings
DESELECT
Choose your SELECTION TOOL then click on the CUSTOM SELECTION symbol
and enter these coordinates.
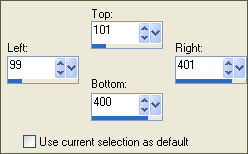
SELECTIONS >>> INVERT
LAYERS >>> NEW RASTER LAYER
LAYERS >>> ARRANGE >>> MOVE DOWN
EFFECTS >>> PLUGINS >>> EYE CANDY 3 >>> DROP SHADOW
Same settings
DESELECT
Open all layers EXCEPT Raster 1
LAYERS >>> MERGE >>> MERGE VISIBLE
Save as .psp image
Phew.... bet you're glad that's over!!!!
*/*/*/*/*/*/*
WINDOW >>> DUPLICATE
Close the original Frame image for later use.
On the duplicated image
Open & Activate Raster 1
Open up the animalpicturesarchive16 jun2006 image in your PSP workspace
Right click on the Title Bar and select COPY from the options
Go to your frame image
Right click on the Title Bar of your frame image
and select PASTE AS NEW LAYER from the options.
IMAGE >>> RESIZE = 62%
Ensure "Resize all layers" is UNCHECKED
Resample using WEIGHTED AVERAGE
EFFECTS >>> EDGE >>> ENHANCE
LAYERS >>> MERGE >>> MERGE ALL (Flatten)
Save as .jpg image
Testers Results
Page designed by

for

http://www.artistrypsp.com/
Copyright ©
2000-2009 Artistry In PSP / PSP Artistry
All rights reserved.
Unless specifically made available for
download,
no graphics or text may be removed from
this site for any reason
without written permission from Artistry
In PSP / PSP Artistry
TUTORIAL
INDEX
|