AUSTRALIA DAY

This tutorial was
created by Jemima using PSP9 ~ December 2008
BUT should be creatable using all versions of PSP
Copyright © 2008/9 ~ Jemima
~ All rights reserved
********************************
Excerpt from ...
My Country by Dorothea Mackellar
I love a sunburnt country,
A land of sweeping plains,
Of ragged mountain ranges,
Of droughts and flooding rains.
I love her far horizons,
I love her jewel-sea,
Her beauty and her terror -
The wide brown land for me!
********************************
You will need the
following to complete this tutorial
Materials
RIGHT CLICK >>> SAVE TARGET AS
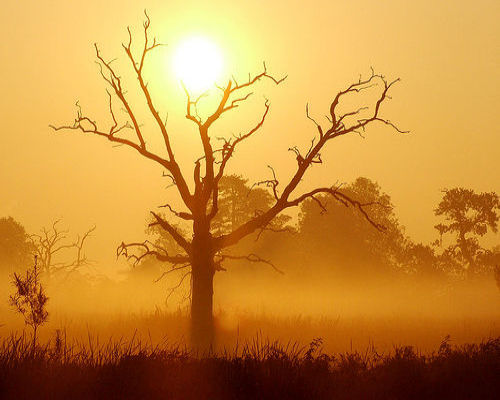
summerheat.jpg
JF_ADay.pspimage
Chucking_A_Spaz_LCT_01_08.pspimage
("Chucking a spaz" means having a "hissy fit" *S*)
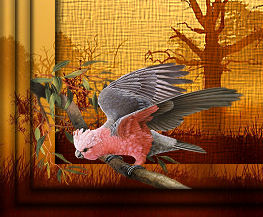
eric_shepherd_galah_small_mskitty.pspimage
Save to a folder on your computer
linenPOP
Save to your PSP Textures folder
Plugins
** EYE CANDY3 **
Download and extract to your PSP Plugins Folder
http://www.pircnet.com/downloads.html
********************************
Open up the summerheat image in your PSP workspace
WINDOW >>> DUPLICATE
LAYERS >>> Promote background layer
SELECTIONS >>> SELECT ALL
SELECTIONS >>> MODIFY >>> CONTRACT = 15
EDIT >>> CLEAR
DESELECT
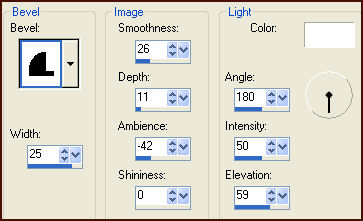
EFFECTS >>> 3D EFFECTS >>> INNER BEVEL
Right click on the Title Bar of your summerheat image
and select COPY from the options
Right click on the Title Bar of your frame image
and select PASTE AS NEW LAYER from the options.
LAYERS >>> ARRANGE >>> MOVE DOWN
SELECTIONS >>> SELECT ALL
SELECTIONS >>> MODIFY >>> CONTRACT = 30
EDIT >>> CLEAR
DESELECT
Right click on the Title Bar of your summerheat image
and select COPY from the options
Right click on the Title Bar of your frame image
and select PASTE AS NEW LAYER from the options.
LAYERS >>> ARRANGE >>> MOVE DOWN
SELECTIONS >>> SELECT ALL
SELECTIONS >>> MODIFY >>> CONTRACT = 55
EDIT >>> CLEAR
DESELECT
ACTIVATE RASTER 1
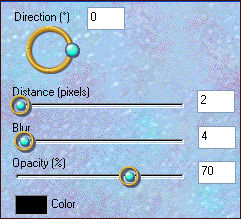
EFFECTS >>> PLUGINS >>> EYE CANDY 3 >>> DROP SHADOW
ACTIVATE RASTER 2
EFFECTS >>> PLUGINS >>> EYE CANDY 3 >>> DROP SHADOW
Same settings
EFFECTS >>> PLUGINS >>> EYE CANDY 3 >>> DROP SHADOW
Change DIRECTION to 180
ACTIVATE RASTER 1
EFFECTS >>> PLUGINS >>> EYE CANDY 3 >>> DROP SHADOW
Same settings
EFFECTS >>> PLUGINS >>> EYE CANDY 3 >>> DROP SHADOW
Change DIRECTION to 90
ACTIVATE RASTER 2
EFFECTS >>> PLUGINS >>> EYE CANDY 3 >>> DROP SHADOW
Same settings
ACTIVATE RASTER 3
With your MAGIC WAND
Mode = Replace
Match Mode = RGB Value
Tolerance = 0
Feather = 0
Antialias = UNchecked
Sample Merged = UNCHECKED
PSP9/X: Check CONTIGUOUS
PSPX: There is no " Sample Merged"
PSPX: Use all layers = UNChecked
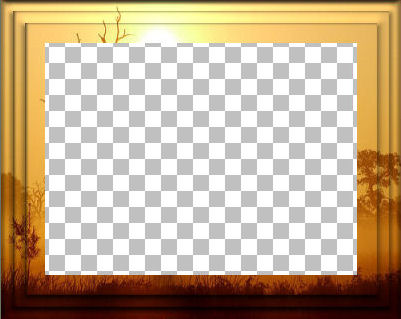
Select the transparent centre of your frame image
SELECTIONS >>> MODIFY >>> EXPAND = 3
LAYERS >>> NEW RASTER LAYER
LAYERS >>> ARRANGE >>> MOVE DOWN
Right click on the Title Bar of your summerheat image
and select COPY from the options
Right click on the Title Bar of your frame image
and select PASTE INTO SELECTION from the options.
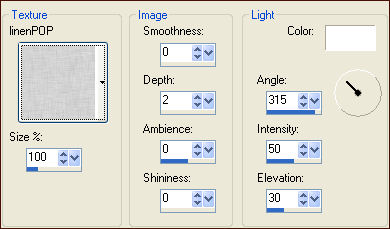
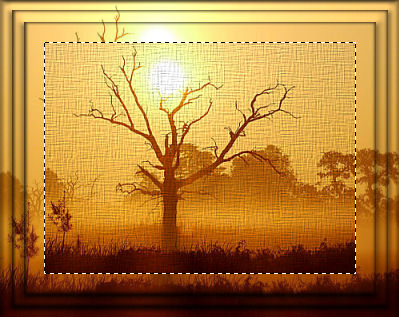
EFFECTS >>> TEXTURE EFFECTS >>> TEXTURE
ADJUST >>> SHARPNESS >>> SHARPEN MORE
DESELECT
ACTIVATE RASTER 3
With your MAGIC WAND
Same settings..
Select the centre of your frame image
SELECTIONS >>> INVERT
LAYERS >>> NEW RASTER LAYER
LAYERS >>> ARRANGE >>> MOVE DOWN
EFFECTS >>> PLUGINS >>> EYE CANDY 3 >>> DROP SHADOW
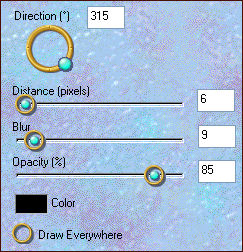
EFFECTS >>> PLUGINS >>> EYE CANDY 3 >>> DROP SHADOW
Change DIRECTION to 225
DESELECT
ACTIVATE RASTER 4
Open up the Chucking_A_Spaz_LCT_01_08.pspimage
image in your PSP workspace
Right click on the Title Bar and select COPY from the options
Right click on the Title Bar of your frame image
and select PASTE AS NEW LAYER from the options.
IMAGE >>> RESIZE = 50%
Ensure "Resize all layers" is UNCHECKED
Resample using WEIGHTED AVERAGE
IMAGE >>> MIRROR
Reposition with your MOVER tool
EFFECTS >>> PLUGINS >>> EYE CANDY 3 >>> DROP SHADOW
Change DIRECTION to 225
ACTIVATE RASTER 3
Open up the eric_shepherd_galah_small_mskitty.pspimage
image in your PSP workspace
Right click on the Title Bar and select COPY from the options
Right click on the Title Bar of your frame image
and select PASTE AS NEW LAYER from the options.
IMAGE >>> RESIZE = 30%
Ensure "Resize all layers" is UNCHECKED
Resample using WEIGHTED AVERAGE
ADJUST >>> SHARPNESS >>> SHARPEN
Reposition with your MOVER tool to bottom left corner.
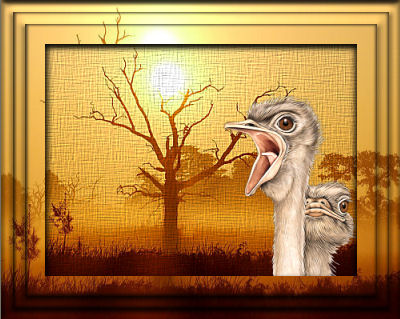
EFFECTS >>> PLUGINS >>> EYE CANDY 3 >>> DROP SHADOW
Same settings
Save as .psp image
You may want to change the images I used
so saving it as a .psp image gives you that option.
*********
This last part is optional... adding the 'quote'.
ACTIVATE THE TOP LAYER
Open up the JF_ADay.pspimage
image in your PSP workspace
Right click on the Title Bar and select COPY from the options
Right click on the Title Bar of your frame image
and select PASTE AS NEW LAYER from the options.
Reposition with your MOVER tool
LAYERS >>> MERGE >>> MERGE ALL (Flatten)
Save as .jpg image
*****************************************
You can do this with any painting you have on your computer,
it's all up to YOUR imagination.
*****************************************
TESTERS RESULTS
Page designed by

for

http://www.artistrypsp.com/
Copyright ©
2000-2009 Artistry In PSP / PSP Artistry
All rights reserved.
Unless specifically made available for
download,
no graphics or text may be removed from
this site for any reason
without written permission from Artistry
In PSP / PSP Artistry
TUTORIAL
INDEX
|