GOLD SWIRL FRAME
PSP8/9/X
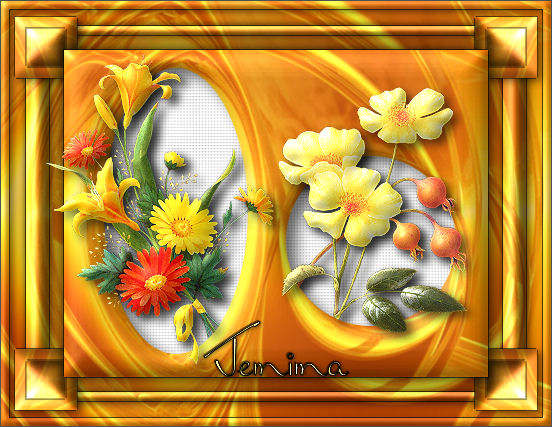
This tutorial was written by Jemima ~ July 2007
Copyright © 2007/8 ~ Jemima ~ All rights reserved
********************************
You will need the
following to complete this tutorial
Materials
RIGHT CLICK >>> SAVE TARGET AS
goldswirl.jpg
YellowBouquetsm~RM.psp
Mtm_Bloemen 183-Golden wings-small 10 Jan 2007.psp
Save to a folder on your computer
tuval1.gif
Save to your PSP Textures folder
Plugins
** EYE CANDY3 **
http://www.chezkiki.com/les_filtres.htm
OR
http://www.pircnet.com/downloads.html
** SIMPLE FILTERS **
download
Download and extract to your PSP Plugins Folder.
********************************
REMEMBER TO SAVE YOUR WORK OFTEN
********************************
Open up the goldswirl.jpg image in your PSP workspace
WINDOW >>> DUPLICATE
Close the original Image
LAYERS >>> Promote to Layer
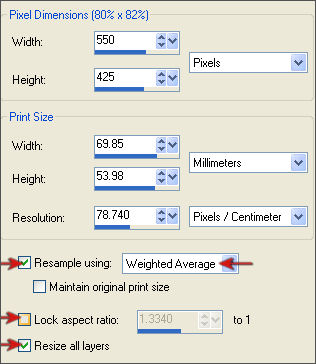
IMAGE >>> RESIZE
Ensure "Resize all layers" is CHECKED
LAYERS >>> DUPLICATE
IMAGE >>> RESIZE
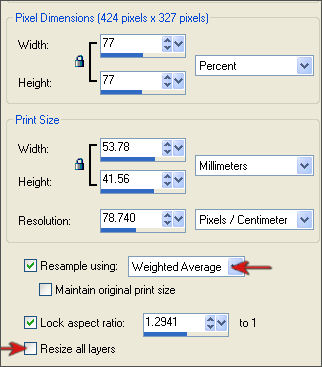
Choose your SELECTION TOOL

Starting at position 175 pixels across and 210 pixels down
draw an ellipse finishing at (approx) 247 across
and 353 pixels down.

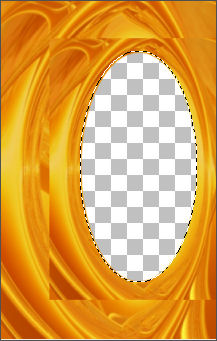
EDIT >>> CLEAR
ACTIVATE RASTER 1
EDIT >>> CLEAR
DESELECT
ACTIVATE "
Copy of Raster 1 "
With your SELECTION TOOL ... same settings ... BUT CHANGE "SELECTION TYPE" TO "CIRCLE"
Starting at position 370 pixels across and 240 pixels down
draw an ellipse finishing at (approx) 455 across and 325 pixels down.
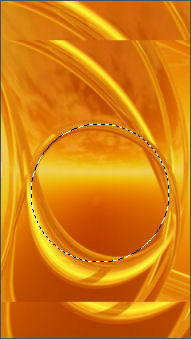
EDIT >>> CLEAR
ACTIVATE RASTER 1
EDIT >>> CLEAR
DESELECT
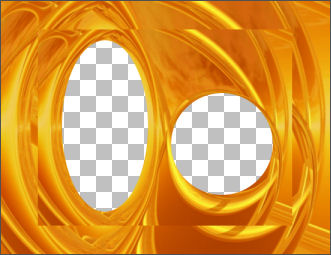
SELECTIONS >>> SELECT ALL
SELECTIONS >>> MODIFY >>> CONTRACT = 8
SELECTIONS >>> INVERT
EFFECTS >>> 3D EFFECTS >>> INNER BEVEL
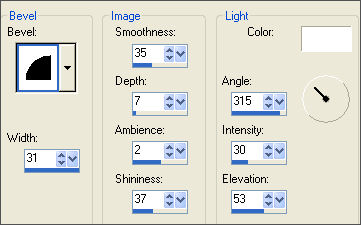
EFFECTS >>> 3D EFFECTS >>> DROP SHADOW
Vertical & Horizontal offsets = 1
Colour = Black
Opacity = 60
Blur = 0
Repeat Drop Shadow effect changing
Vertical & Horizontal Offsets to - ( minus ) 1
Click OK
DESELECT
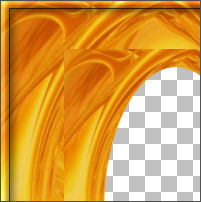
ACTIVATE " Copy of Raster 1 "
EFFECTS >>> 3D EFFECTS >>> INNER BEVEL
Same settings
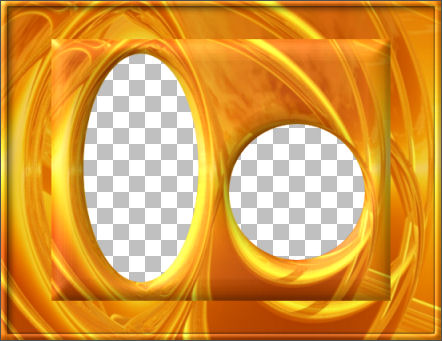
With your MAGIC WAND
Mode = Replace
Match Mode = RGB Value
Tolerance = 0
Feather = 0
Antialias = UNchecked
Sample Merged = UNCHECKED
PSP9/X: Check CONTIGUOUS
PSPX: There is no " Sample Merged"
PSPX: Use all layers = UNChecked
Select the area outside the centre bevelled image
SELECTIONS >>> INVERT
EFFECTS >>> 3D EFFECTS >>> DROP SHADOW
Vertical & Horizontal offsets = 1
Colour = Black
Opacity = 60
Blur = 0
Repeat Drop Shadow effect changing
Vertical & Horizontal Offsets to - ( minus ) 1
Click OK
SELECTIONS >>> MODIFY >>> CONTRACT = 3
LAYERS >>> NEW RASTER LAYER
LAYERS >>> ARRANGE >>> MOVE DOWN
EFFECTS >>> PLUGINS >>> EYE CANDY 3 >>> DROP SHADOW
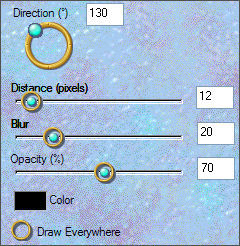
EFFECTS >>> PLUGINS >>> EYE CANDY 3 >>> DROP SHADOW
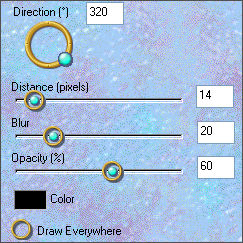
Same settings ... BUT CHANGE "DIRECTION" TO 320
SELECTIONS >>> MODIFY >>> CONTRACT = 7
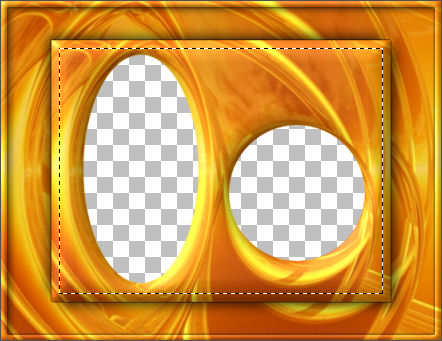
ACTIVATE RASTER 1
EDIT >>> CLEAR
DESELECT
With your MAGIC WAND
Same settings
Select the CENTRE transparent area
SELECTIONS >>> INVERT
SELECTIONS >>> MODIFY >>> CONTRACT = 25
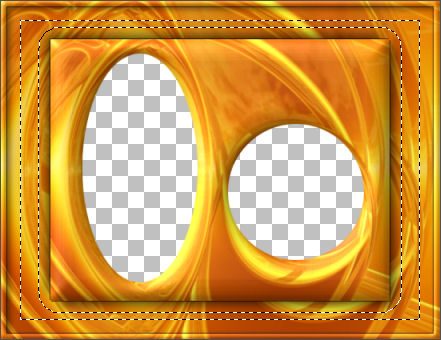
EFFECTS >>> 3D EFFECTS >>> INNER BEVEL
Same settings
EDIT >>> Repeat Inner Bevel
EFFECTS >>> 3D EFFECTS >>> DROP SHADOW
Use the same settings
Click OK
Repeat Drop Shadow effect changing
Vertical & Horizontal Offsets to 1
Click OK
EFFECTS >>> PLUGINS >>> EYE CANDY 3 >>> DROP SHADOW
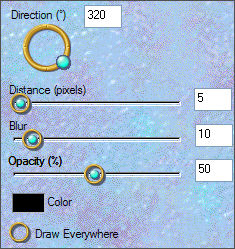
EFFECTS >>> PLUGINS >>> EYE CANDY 3 >>> DROP SHADOW
Same settings ... BUT CHANGE "DIRECTION" TO 130
DESELECT
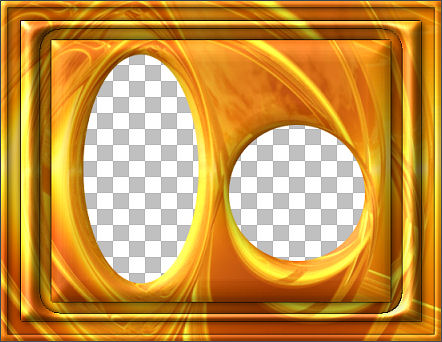
ACTIVATE " Copy of Raster 1 "
Choose your SELECTION TOOL then click on the CUSTOM SELECTION
symbol
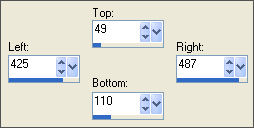 . . 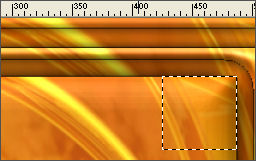
Right click on the Title Bar and select COPY from the options
DESELECT
ACTIVATE RASTER 1
LAYERS >>> NEW RASTER LAYER
Right click on the Title Bar
and select PASTE AS NEW SELECTION from the options,
and place at the top left corner a shown below
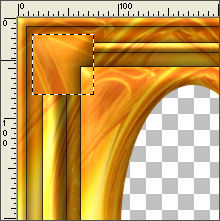
EFFECTS >>> 3D EFFECTS >>> DROP SHADOW
Use the same settings
Click OK
Repeat Drop Shadow effect changing
Vertical & Horizontal Offsets to 1
Click OK
EFFECTS >>> 3D EFFECTS >>> INNER BEVEL
Same settings
SELECTIONS >>> DEFLOAT
SELECTIONS >>> MODIFY >>> CONTRACT = 12
EFFECTS >>> 3D EFFECTS >>> INNER BEVEL
Same settings
EDIT >>> Repeat Inner Bevel
EFFECTS >>> 3D EFFECTS >>> DROP SHADOW
Use the same settings
Click OK
Repeat Drop Shadow effect changing
Vertical & Horizontal Offsets to 1
Click OK
DESELECT
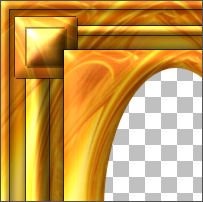
EFFECTS >>> PLUGINS >>> SIMPLE >>> TOP LEFT MIRROR
EFFECTS >>> PLUGINS >>> EYE CANDY 3 >>> DROP SHADOW
Same settings ... BUT CHANGE "DIRECTION" TO 320
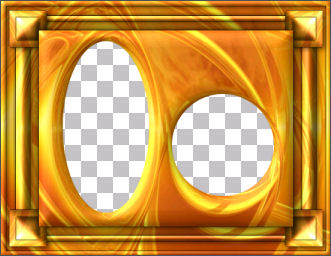
LAYERS >>> MERGE >>> MERGE VISIBLE
With your MAGIC WAND
Same settings. and using your SHIFT key...
Select BOTH of the CENTRE transparent areas
SELECTIONS >>> MODIFY >>> EXPAND = 3
SELECTIONS >>> INVERT
LAYERS >>> NEW RASTER LAYER
LAYERS >>> ARRANGE >>> MOVE DOWN
EFFECTS >>> PLUGINS >>> EYE CANDY 3 >>> DROP SHADOW
DESELECT
LAYERS >>> MERGE >>> MERGE VISIBLE
Save as .psp image
LAYERS >>> NEW RASTER LAYER
Flood fill with WHITE
LAYERS >>> ARRANGE >>> MOVE DOWN
ACTIVATE the MERGED layer
Open up the YellowBouquetsm~RM.psp image in your PSP workspace
Right click on the Title Bar and select COPY from the options
Go to your frame image ...
Right click on the Title Bar
and select PASTE AS NEW LAYER from the options.
IMAGE >>> RESIZE = 50%
Ensure "Resize all layers" is UNCHECKED
Reposition with your MOVER tool
ADJUST >>> SHARPNESS >>> SHARPEN

Choose your FREEHAND SELECTION TOOL
Selection Type = Point to Point
Mode = Replace
Feather = 0
Antialias = Checked
Section off the stems as shown below
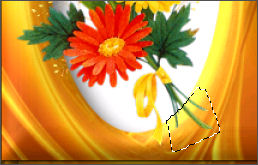
EDIT >>> CLEAR
DESELECT
LAYERS >>> DUPLICATE
LAYERS >>> ARRANGE >>> MOVE DOWN
EDIT>>> Repeat Move Layer Down
EFFECTS >>> PLUGINS >>> EYE CANDY 3 >>> DROP SHADOW
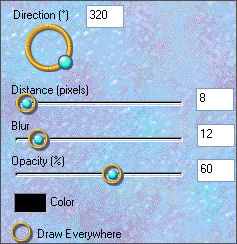
ACTIVATE RASTER 2
EFFECTS >>> 3D EFFECTS >>> INNER BEVEL
Same settings

Open up the Mtm_Bloemen 183-Golden wings-small 10 Jan 2007.psp image
in your PSP workspace
Right click on the Title Bar and select COPY from the options
Go to your frame image ...
Right click on the Title Bar
and select PASTE AS NEW LAYER from the options.
IMAGE >>> RESIZE = 50%
Ensure "Resize all layers" is UNCHECKED
Reposition with your MOVER tool
ADJUST >>> SHARPNESS >>> SHARPEN
Choose your FREEHAND SELECTION TOOL
Selection Type = Point to Point
Mode = Replace
Feather = 0
Antialias = Checked
Section off the stems as shown below
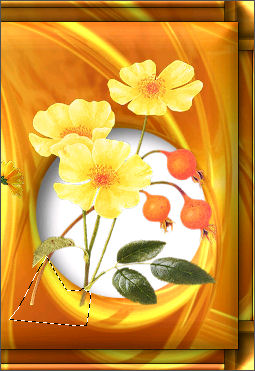
EDIT >>> CLEAR
DESELECT
LAYERS >>> DUPLICATE
LAYERS >>> ARRANGE >>> MOVE DOWN
EDIT>>> Repeat Move Layer Down
EDIT>>> Repeat Move Layer Down
EFFECTS >>> PLUGINS >>> EYE CANDY 3 >>> DROP SHADOW
Same settings
ACTIVATE RASTER 3
EFFECTS >>> 3D EFFECTS >>> INNER BEVEL
Same settings
ADJUST >>> SHARPNESS >>> SHARPEN
EFFECTS >>> PLUGINS >>> EYE CANDY 3 >>> DROP SHADOW
Same settings
ACTIVATE RASTER 2
EFFECTS >>> PLUGINS >>> EYE CANDY 3 >>> DROP SHADOW
Same settings
ACTIVATE RASTER 1
EFFECTS >>> TEXTURE EFFECTS >>> TEXTURE
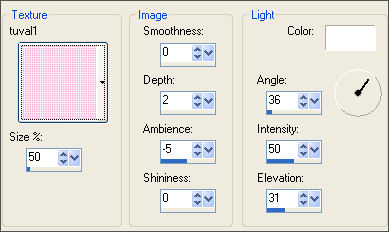
LAYERS >>> MERGE >>> MERGE ALL (Flatten)
Save as .jpg image
TESTERS RESULTS
Page designed by

for

http://www.artistrypsp.com/
Copyright ©
2000-2008 Artistry In PSP / PSP Artistry
All rights reserved.
Unless specifically made available for
download,
no graphics or text may be removed from
this site for any reason
without written permission from Artistry
In PSP / PSP Artistry
TUTORIAL
INDEX
|