GEOMETRIC FRAME
PSP8/9/X
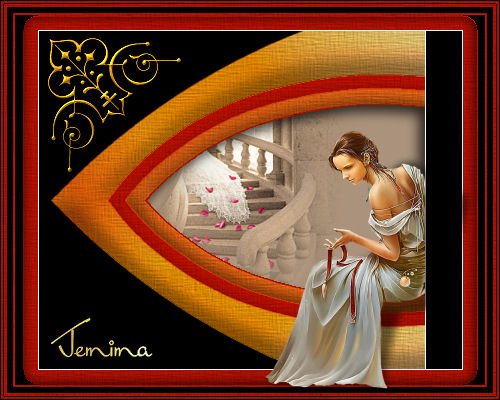
This tutorial was written by Jemima ~ July 2007
Copyright © 2007/8 ~ Jemima ~ All rights reserved
********************************
You will need the
following to complete this tutorial
Materials
abstract46jf.jpg
NikMultiCorners85.psp
TheEncha.psp
SKF_BeautySit309[1].06.psp
Save to a folder on your computer
Plugins
** EYE CANDY3 **
http://www.pircnet.com/downloads.html
********************************
REMEMBER TO SAVE YOUR WORK OFTEN
********************************
Open up the " abstract46jf.jpg " image in your PSP workspace
WINDOW >>> DUPLICATE
Close the original Image
LAYERS >>> Promote background layer
Select your DEFORMATION tool

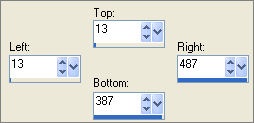
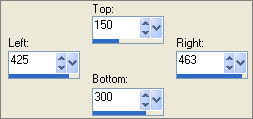
Drag the centre bottom node up level with the left 240 pixel mark
Click the RESET RECTANGLE arrow

LAYERS >>> DUPLICATE
IMAGE >>> FLIP
LAYERS >>> MERGE >>> MERGE VISIBLE
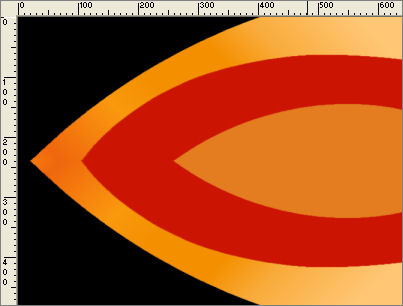
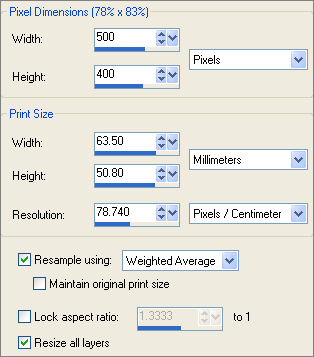
IMAGE >>> RESIZE
With your MAGIC WAND
Mode = Replace
Match Mode = RGB Value
Tolerance = 21
Feather = 2
Antialias = CHECKED
Sample Merged = CHECKED
PSP9/X: Antialias = CHECKED (inside)
PSP9/X: Check CONTIGUOUS
PSPX: There is no " Sample Merged"
PSPX: Use all layers = UNChecked
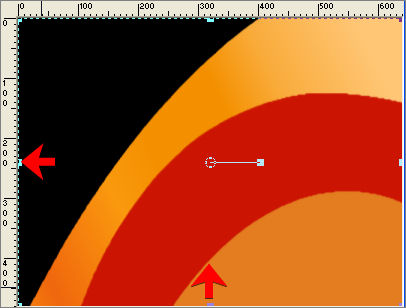
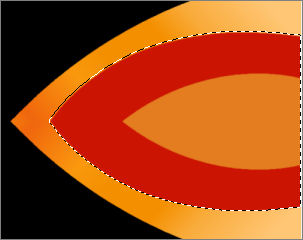
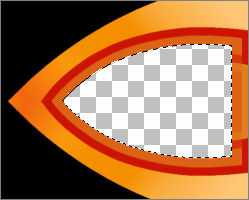
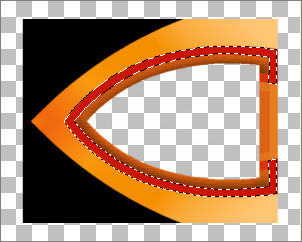
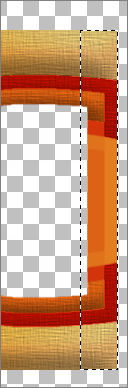
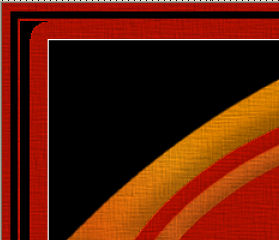
Select the area shown below, also using your SHIFT key
to pick up the yellow area.
SELECTIONS >>> MODIFY >>> CONTRACT = 16
Flood fill with ORANGE " #dc6316 "
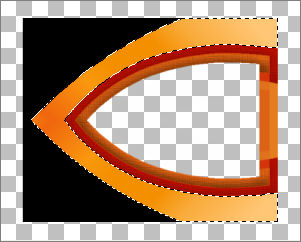
You may end up wih this result... Ignore it for the moment
SELECTIONS >>> MODIFY >>> CONTRACT = 20
keep pressing your DELETE key until this 'mirage' completely disappears.
 . . 
DESELECT
IMAGE >>> RESIZE = 85%
Ensure "Resize all layers" is UNCHECKED
With your MAGIC WAND
Same settings
EXCEPT change FEATHER = 0
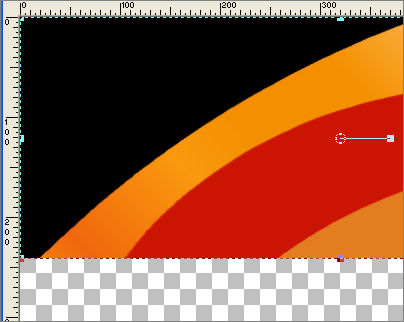
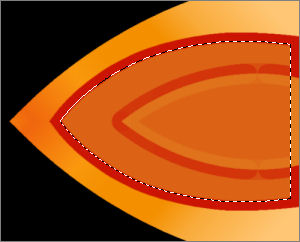
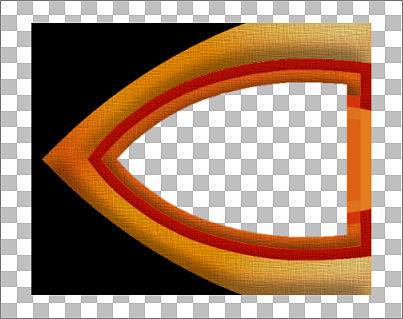
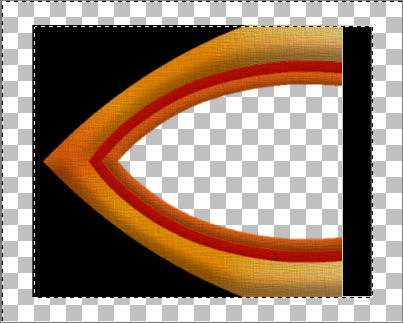
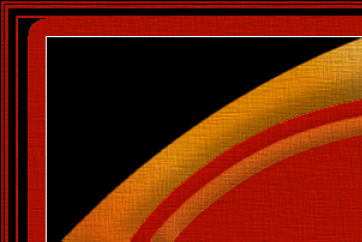
Select the area shown below
EFFECTS >>> 3D EFFECTS >>> INNER BEVEL
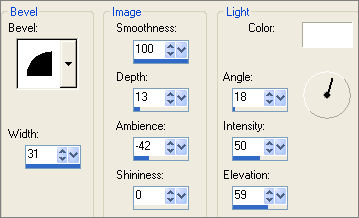
EDIT >>> Repeat Inner Bevel
EFFECTS >>> TEXTURE EFFECTS >>> TEXTURE
COLOUR = " #e6e4e4 "
TEXTURE = linenPOP
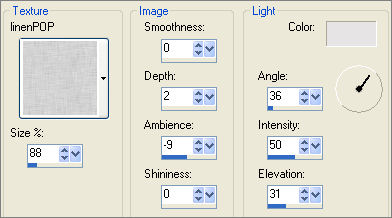
ADJUST >>> SHARPNESS >>> SHARPEN
DESELECT
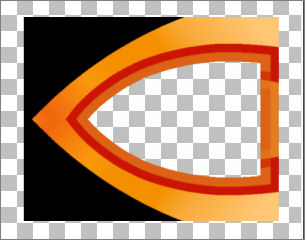
With your MAGIC WAND
Same settings
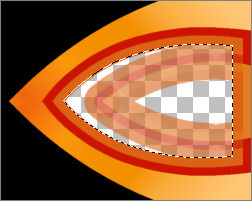
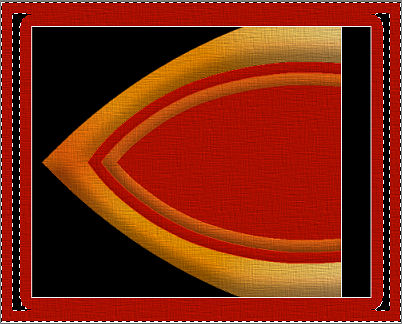
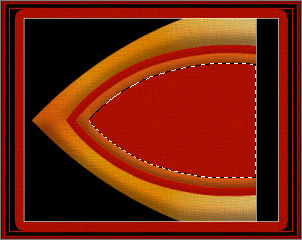
Select the area shown below
EFFECTS >>> 3D EFFECTS >>> INNER BEVEL
Same settings
EFFECTS >>> TEXTURE EFFECTS >>> TEXTURE
Same settings
ADJUST >>> SHARPNESS >>> SHARPEN
DESELECT
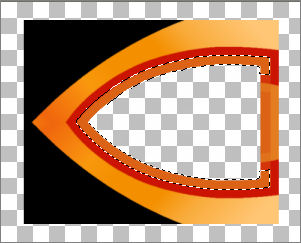
With your MAGIC WAND
Change TOLERANCE to 55...
and also using your SHIFT key
Select the area shown below
EFFECTS >>> 3D EFFECTS >>> INNER BEVEL
Same settings
EFFECTS >>> TEXTURE EFFECTS >>> TEXTURE
Same settings
ADJUST >>> SHARPNESS >>> SHARPEN
DESELECT
LAYERS >>> NEW RASTER LAYER
Choose your SELECTION TOOL then click on the CUSTOM SELECTION
symbol
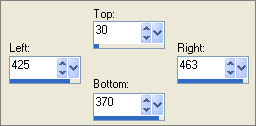 . . 
Flood fill with WHITE
SELECTIONS >>> MODIFY >>> CONTRACT = 1
Flood fill with BLACK
LAYERS >>> MERGE >>> MERGE VISIBLE
With your MAGIC WAND
Mode = Replace
Match Mode = RGB Value
Tolerance = 0
Feather = 0
Antialias = UNchecked
Sample Merged = UNCHECKED
PSP9/X: Check CONTIGUOUS
PSPX: There is no " Sample Merged"
PSPX: Use all layers = UNChecked
Select the OUTER transparent area
SELECTIONS >>> MODIFY >>> EXPAND = 1
LAYERS >>> NEW RASTER LAYER
Flood fill with WHITE
SELECTIONS >>> INVERT
SELECTIONS >>> MODIFY >>> EXPAND = 1
SELECTIONS >>> INVERT
EDIT >>> CLEAR
DESELECT
LAYERS >>> MERGE >>> MERGE VISIBLE
With your MAGIC WAND
Same settings
Select the OUTER transparent area
LAYERS >>> NEW RASTER LAYER
LAYERS >>> ARRANGE >>> MOVE DOWN
SELECTIONS >>> MODIFY >>> CONTRACT = 15
Flood fill with BLACK
SELECTIONS >>> INVERT
Flood fill with " #cc1402 "
EFFECTS >>> TEXTURE EFFECTS >>> TEXTURE
Same settings
ADJUST >>> SHARPNESS >>> SHARPEN
DESELECT
LAYERS >>> NEW RASTER LAYER
LAYERS >>> ARRANGE >>> BRING TO TOP
Choose your SELECTION TOOL then click on the CUSTOM SELECTION
symbol
SELECTIONS >>> INVERT
Flood fill with BLACK
DESELECT
SELECTIONS >>> SELECT ALL
SELECTIONS >>> MODIFY >>> CONTRACT = 6
SELECTIONS >>> INVERT
EDIT >>> CLEAR
DESELECT
SELECTIONS >>> SELECT ALL
SELECTIONS >>> MODIFY >>> CONTRACT = 4
SELECTIONS >>> INVERT
Flood fill with BLACK
SELECTIONS >>> MODIFY >>> CONTRACT = 1
EDIT >>> CLEAR
DESELECT
ACTIVATE THE MERGED LAYER
With your MAGIC WAND
Same settings...and also using your SHIFT key
Select the area shown below
SELECTIONS >>> MODIFY >>> EXPAND = 3
ACTIVATE Raster 1
EDIT >>> CLEAR
LAYERS >>> NEW RASTER LAYER
LAYERS >>> ARRANGE >>> MOVE DOWN
SELECTIONS >>> INVERT
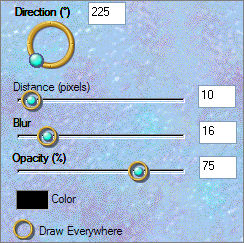
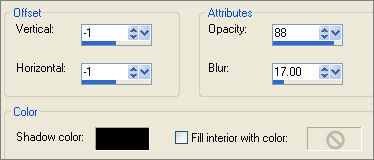
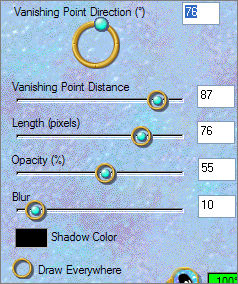
EFFECTS >>> PLUGINS >>> EYE CANDY 3 >>> DROP SHADOW
LAYERS >>> MERGE >>> MERGE VISIBLE
DESELECT
Open up the " NikMultiCorners85 " image in your PSP workspace
activate the gold layer.
Right click on the Title Bar and select COPY from the options
Go to your frame image ...
Right click on the Title Bar
and select PASTE AS NEW LAYER from the options.
IMAGE >>> RESIZE = 40%
Ensure "Resize all layers" is UNCHECKED
With your MOVER tool reposition as shown below
EFFECTS >>> 3D EFFECTS >>> DROP SHADOW
Vertical & Horizontal offsets = 1
Colour = Black
Opacity = 60
Blur = 0
Repeat Drop Shadow effect changing
Vertical & Horizontal Offsets to - ( minus ) 1
Click OK
LAYERS >>> DUPLICATE
LAYERS >>> MERGE >>> MERGE VISIBLE
Save as .psp image
Choose your SELECTION TOOL then click on the CUSTOM SELECTION symbol

LAYERS >>> NEW RASTER LAYER
EFFECTS >>> 3D EFFECTS >>> CUTOUT
LAYERS >>> MERGE >>> MERGE VISIBLE
DESELECT
Open up the " SKF_BeautySit309[1].06 " image in your PSP workspace
Right click on the Title Bar and select COPY from the options
Go to your frame image ... Right click on the Title Bar
and select PASTE AS NEW LAYER from the options.
IMAGE >>> RESIZE = 40%
Ensure "Resize all layers" is UNCHECKED
ADJUST >>> SHARPNESS >>> SHARPEN
IMAGE >>> MIRROR
With your MOVER tool reposition as shown below
LAYERS >>> DUPLICATE
LAYERS >>> ARRANGE >>> SEND TO BOTTOM
ACTIVATE Raster 1
Choose your SELECTION TOOL then click on the CUSTOM SELECTION symbol
 . . 
EDIT >>> CLEAR
DESELECT
EFFECTS >>> PLUGINS >>> EYE CANDY 3 >>> PERSPECTIVE SHADOW
Open up the " TheEncha " image in your PSP workspace
Activate the "background" layer
Right click on the Title Bar and select COPY from the options
Go to your frame image ... Right click on the Title Bar
and select PASTE AS NEW LAYER from the options.
LAYERS >>> ARRANGE >>> SEND TO BOTTOM
Go back to " TheEncha " image
Activate the "tube" layer
Right click on the Title Bar and select COPY from the options
Go to your frame image ... Right click on the Title Bar
and select PASTE AS NEW LAYER from the options.
IMAGE >>> MIRROR
IMAGE >>> RESIZE = 60%
Ensure "Resize all layers" is UNCHECKED
Use your DEFORMATION tool to reposition if you wish.
LAYERS >>> MERGE >>> MERGE ALL (Flatten)
Save as .jpg image
TESTERS RESULTS
Page designed by

for
http://www.artistrypsp.com/
Copyright ©
2000-2008 Artistry In PSP / PSP Artistry
All rights reserved.
Unless specifically made available for
download,
no graphics or text may be removed from
this site for any reason
without written permission from Artistry
In PSP / PSP Artistry
TUTORIAL
INDEX
|
