CHRISTMAS GLOBE
Page 2
Novice
or Artists Level
No 3rd party Plugins used.
This
tutorial was written by Jemima ~ 17 June
2003
************************************
(If you'd
rather have a base.... then skip to the
instructions
further down the tutorial)
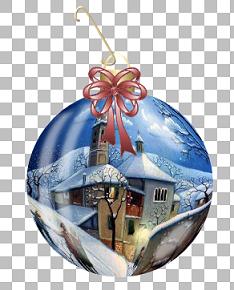
If you are going to use the 'fine and
bow' (hanger)
Select your mover tool and move your
globe
a little further down.
Go to your LAYER PALETTE
Click on Layer2 to make it active.
Right click on the title bar of 'fine and
bow' image and
select COPY from the options menu.
Right click on the title bar of your
'globe' image and
select PASTE AS NEW SELECTION from the
options menu.
Position the 'fine and bow' at the top of
your globe and
DESELECT
At this point I decided to crop the
excess area
using the SELECTION TOOL set to
Rectangle,
Feather = 0 and Antialias = UNchecked
Go to IMAGE >>> Crop to
selection
Go to your LAYER PALETTE and click on
Layer1 to make it active
Flood fill with a background of your
choice.
I opted for a gradient

Close Layer1 by clicking on the 'glasses'
in your LAYER PALETTE
Click on the Merged Layer.
Go to LAYERS >>> Merge
>>> Merge Visible
With your SELECTION tool, still set to
Rectangle,
draw a rectangle around you image.
Then click inside the rectangle so as to
select the image.
Go to EFFECTS >>> 3D Effects
>>> Drop Shadow.
Use these settings.

Click OK.
DESELECT
Go to your LAYER PALETTE and click on the
'glasses' on Layer1
to reopen it.
Go to LAYERS >>> Merge
>>> Merge All (Flatten)
Your image is now ready to have a frame
added
which I will leave up to you to do.

Save your image>
*****************************************
Now, if
you'd rather have a Base....
Open up the Base tube in your PSP
workspace.
Right click on the title bar of the
'Base' tube and
select COPY from the drop down options.
Right click on the title bar of the globe
image and
select PASTE AS NEW SELECTION
from the drop down options.
Position the base as shown in the image
below

Close Layer1 by clicking on the 'glasses'
in your LAYER PALETTE
Click on the Merged Layer.
Go to LAYERS >>> Merge
>>> Merge Visible
With your SELECTION tool, still set to
Rectangle,
draw a rectangle around you image.
Then click inside the rectangle so as to
select the image.
Go to EFFECTS >>> 3D Effects
>>> Drop Shadow.
Use these settings.
Click OK.
DESELECT
At this point I decided to crop the
excess area
using the SELECTION TOOL set to
Rectangle,
Feather = 0 and Antialias = UNchecked
Go to your LAYER PALETTE and click on the
'glasses' on Layer1
to reopen it.
I decided to Flood fill Layer 1 with a
Dark Blue

Go to LAYERS >>> Merge
>>> Merge All (Flatten)
Your image is now ready to have a frame
added
which I will leave up to you to do.

That's all folks *S*
Hope you enjoyed this tutorial.
To see some more
examples go to the NEXT page
NEXT

Copyright
© 2000-2003 Artistry In PSP / PSP
Artistry
All rights reserved.
Unless specifically made available for
download,
no graphics or text may be removed from
this site for any reason
without written permission from Artistry
In PSP / PSP Artistry

EMAIL

|