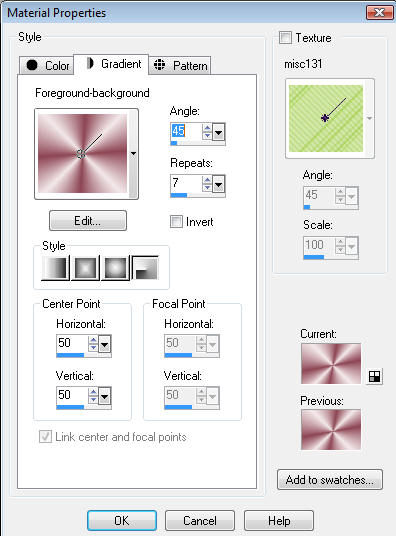
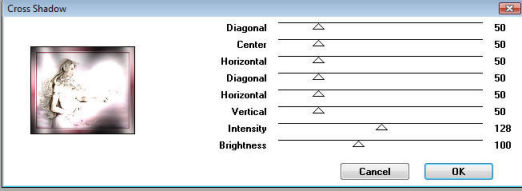
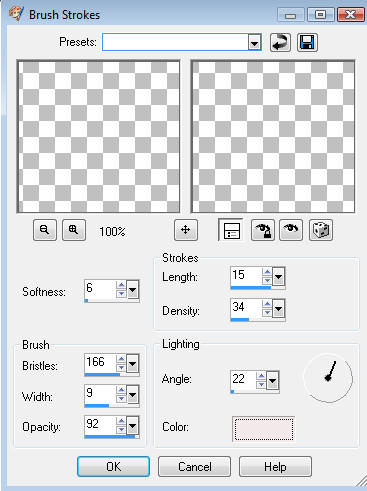
BRUSHSTROKES GRADIENT FRAME


********************************

This tut is the property of Whitemagik and any images used are from group shares.
If you wish to share my tut you are more then welcome to do so just don't claim the tut as your own
And please give me credit when you create using my tut.
 
Choose a graphic to use.

Now from your image choose 2 colours
Light for your foreground and dark for your background
 
All settings remain the same unless otherwise instructed.
 
Notes: order of foreground and background for 2pixel borders is of creators choice.
 
Tools needed
Plugins: Graphics Plus >> Cross Shadow.
Or you can use Gregs Factory Output 2 >> Pool Shadow same settings.
 

1.  Image add border = 2 pixels Symmetric ticked  (foreground colour)

2.  Using your magic wand select this border
    Mode = Replace
     Match Mode = RGB Value
     Tolerance = 0
     Sample Merged = Unchecked
     Contiguous = Checked
     Feather = 0
    Anti-Alias - Unchecked
 
3.  Selections  Invert
 
4.  Effects >> 3D effects >> Cutout
    Vertical = 2 
    Horizontal = (minus) -2
    Opacity = 50
    Blur = 5
    Shadow colour = background colour.


5.  Repeat cutout but this time changing the vertical to -2 and the horizontal to 2.
     Everything else stays the same. Selections  Select none.
 
6.  Image  Add Border  2 Symmetric ticked (background colour)
 
7.  Now change your foreground colour to gradient and use the
     foreground/background 
     Gradient    
     Style = Radial,
     Angle = 45
     Repeats = 7
     Centre Point = horizontal 50 and vertical 50 
     Texture = not checked
     Invert  = not checked.


8.  Image Add border 15 Symmetric ticked. 
     Use a colour not used in image
 
9.  Select Magic Wand same settings
 
10. Now flood fill with gradient.
 
11. Keep selected, effects plugins, Graphics Plus, Cross Shadow
      Use default settings except change Brightness to 100 or use
      Gregs Factory Output 2, Pool Shadow
      The same settings apply.
      Selections, select none.


12. Change your foreground back to colour.
 
13. Image  Add border 2 (foreground colour.)
 
14. Image  Add border  2 (background colour.)
 
15. Image  Add border 20 (use a colour not in image.)
 
16. Select border with magic wand same settings as before.
      Select 20 pixel border
 
17. Selections invert,
      Effects 3d effects, cutout
      Settings as steps 4 and 5.
 
18. Selections invert
 
19. Change foreground back to gradient but this time select  "Invert"
      Floodfill border with gradient
 
20. Effects  ArtMedia Effects  Brushstrokes.  
      Softness   6        length  15
      Bristles  166      density 34
      Width    9        angle   22
      Opacity  92       colour foreground
 
      .
 
       Selections  Select None.
 
21. Selections Select all
     Repeat Instructions as per steps 4 & 5
     Selections Select None
 
22. Image Add Border 2 Symmetric ticked (foreground colour)
 
23. Image Add Border 2 Symmetric Ticked (background colour)
 
24. Now repeat steps 8 to 14.
 
25. Now resize if you so desire, add new layer and add watermark
 
26. Now save file export JPEG Optimizer, save at 25 or preferred settings.
 
 
Tut created by
Whitemagik


Testers Results


Page designed by


for


http://www.artistrypsp.com/

Copyright © 2000-2009 Artistry In PSP / PSP Artistry
All rights reserved.
Unless specifically made available for download,
no graphics or text may be removed from this site for any reason
without written permission from Whitemagik @ Artistry In PSP