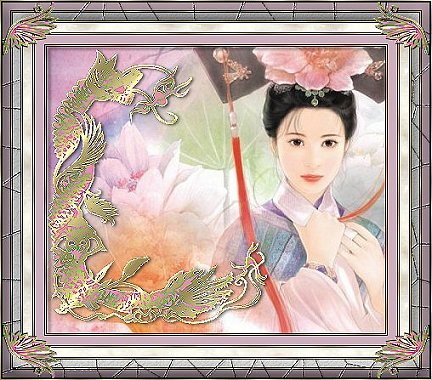
ORIENTAL LADY
PSP8
Page 2
Go to LAYERS >>> MERGE
>>> MERGE ALL (Flatten)
BORDER 1
Go to IMAGE >>> ADD BORDERS = 2
COLOUR = Pink ( #CCB0BE )
With your MAGIC WAND
Match Mode = RGB Value
Tolerance = 0
Feather = 0
Sample Merged = UNCHECKED
Select the
Pink Border
Zoom in and Flood Fill with the Gold
Foil.
Go to
EFFECTS >>> 3D Effects
>>> Drop Shadow
Vertical & Horizontal offsets = 1
Colour = Black
Opacity = 100
Blur = 0
Repeat Drop
Shadow effect changing
Vertical & Horizontal Offsets to - (
minus ) 1
Click OK
Go to EFFECTS >>> Plugins
>>> Eye Candy 3 >>>
Drop Shadow
Use the same settings
EXCEPT
Change the distance to 7
DESELECT
BORDER 2
Go to IMAGE >>> ADD BORDERS = 12
COLOUR = Pink ( #CCB0BE )
With your MAGIC WAND
Same settings
Select the
Pink Border
Go to
EFFECTS >>> 3D Effects
>>> Drop Shadow
Vertical & Horizontal offsets - (
minus ) 1
Colour = Black
Opacity = 100
Blur = 0
Repeat Drop
Shadow effect changing
Vertical & Horizontal Offsets to = 1
Click OK
DESELECT
BORDER 3
Go to IMAGE >>> ADD BORDERS = 2
COLOUR = WHITE
With your MAGIC WAND
Same settings
Select the
WHITE Border
Zoom in and
Flood Fill with the Gold Foil.
Go to EFFECTS >>> 3D Effects
>>> Drop Shadow
Vertical & Horizontal offsets = 1
Colour = Black
Opacity = 100
Blur = 0
Repeat Drop
Shadow effect changing
Vertical & Horizontal Offsets to - (
minus ) 1
Click OK
DESELECT
BORDER 4
Go to your MATERIALS PALETTE
Load the WHITEONYX pattern in the
background box
SCALE = 100
ANGLE = 0
Go to IMAGE
>>> ADD BORDERS = 12
COLOUR = WHITE
With your MAGIC WAND
Same settings
Select the
WHITE Border
Flood Fill
with the WHITEONYX pattern
Go to EFFECTS >>> 3D Effects
>>> Drop Shadow
Vertical & Horizontal offsets - (
minus ) 1
Colour = Black
Opacity = 100
Blur = 0
Repeat Drop
Shadow effect changing
Vertical & Horizontal Offsets to = 1
Click OK
DESELECT
BORDER 5
Go to IMAGE >>> ADD BORDERS = 2
COLOUR = WHITE
With your MAGIC WAND
Same settings
Select the
WHITE Border
Zoom in and
Flood Fill with the Gold Foil.
Go to EFFECTS >>> 3D Effects
>>> Drop Shadow
Vertical & Horizontal offsets = 1
Colour = Black
Opacity = 100
Blur = 0
Repeat Drop
Shadow effect changing
Vertical & Horizontal Offsets to - (
minus ) 1
Click OK
DESELECT
BORDER 6
Go to your MATERIALS PALETTE
Load the SORRYWHITE pattern in the
background box
SCALE = 100
ANGLE = 0
Go to IMAGE
>>> ADD BORDERS = 10
COLOUR = WHITE
With your MAGIC WAND
Same settings
Select the
WHITE Border
Flood Fill
with the SORRYWHITE pattern
Go to EFFECTS >>> 3D Effects
>>> Drop Shadow
Vertical & Horizontal offsets - (
minus ) 1
Colour = Black
Opacity = 100
Blur = 0
Repeat Drop
Shadow effect changing
Vertical & Horizontal Offsets to = 1
Click OK
DESELECT
BORDER 7
Go to IMAGE >>> ADD BORDERS = 2
COLOUR = Dusty Pink ( #CCB0BE )
With your MAGIC WAND
Same settings
Select the
PINK Border
Zoom in and
Flood Fill with the Gold Foil.
Go to EFFECTS >>> 3D Effects
>>> Drop Shadow
Vertical & Horizontal offsets = 1
Colour = Black
Opacity = 100
Blur = 0
Repeat Drop
Shadow effect changing
Vertical & Horizontal Offsets to - (
minus ) 1
Click OK
DESELECT
BORDER 8
Go to IMAGE >>> ADD BORDERS = 10
COLOUR = Dusty Pink ( #CCB0BE )
With your MAGIC WAND
Same settings
Select the
PINK Border
Go to EFFECTS >>> 3D Effects
>>> Drop Shadow
Vertical & Horizontal offsets - (
minus ) 1
Colour = Black
Opacity = 100
Blur = 0
Repeat Drop
Shadow effect changing
Vertical & Horizontal Offsets to = 1
Click OK
DESELECT
Go to SELECTIONS >>> Select All
Go to SELECTIONS >>> Modify
>>> Contract 22
Go to SELECTIONS >>> Invert
Go to EFFECTS >>> Plugins
>>> Xenofex >>> Baked
Earth
Use these settings
"BIG SHINY PIECES"
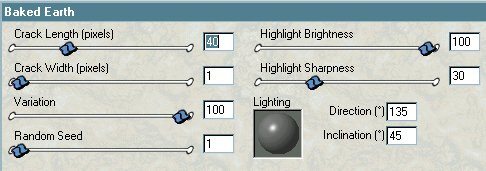
Click OK
Go to EFFECTS >>> 3D Effects
>>> Inner Bevel.
Use the following settings
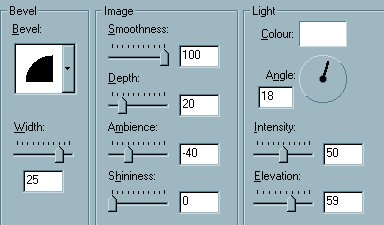
Click OK
DESELECT
BORDER 9
Go to IMAGE >>> ADD BORDERS = 2
COLOUR = WHITE
With your MAGIC WAND
Same settings
Select the
WHITE Border
Zoom in and
Flood Fill with the Gold Foil.
Go to EFFECTS >>> 3D Effects
>>> Drop Shadow
Vertical & Horizontal offsets = 1
Colour = Black
Opacity = 100
Blur = 0
Repeat Drop
Shadow effect changing
Vertical & Horizontal Offsets to - (
minus ) 1
Click OK
DESELECT
BORDER 10
REPEAT INSTRUCTIONS FOR BORDER 9
DESELECT
*****
Go to LAYERS >>> New Raster
Layer
RIGHT Click on the title bar of the
'leafcorner' tube and
select COPY from the options
RIGHT Click on the title bar of you
Oriental image and
Select PASTE AS NEW SELECTION from the
options
Slide the corner to the bottom left of
your image
Go to EFFECTS >>> 3D Effects
>>> Drop Shadow
Vertical & Horizontal offsets = - (
minus ) 1
Colour = Black
Opacity = 100
Blur = 0
DESELECT
Go to LAYERS >>> Duplicate
Go to IMAGE >>> Mirror
Go to your LAYER PALETTE and CLOSE the
Background Layer
Go to LAYERS >>> Merge
>>> Merge Visible
Go to LAYERS >>> Duplicate
Go to IMAGE >>> Flip
Go to LAYERS >>> Merge
>>> Merge Visible
Go to your LAYER PALETTE and OPEN the
Background Layer
Go to LAYERS >>> Merge
>>> Merge All (Flatten)
Resize to suit.
Go to ADJUST >>> Sharpness
>>> Sharpen
Save as a .jpg image
*~*~*~*~*~*~*~*~*~*
I would like to thank CAROLYN
from GRAFIXADDIX
for her assistance in testing this
tutorial *S*
This is Carolyn's
result *S*
Page designed by

for

http://www.coldfusion-vpm.com/~jemima/Artistry_Pages/index.html
Copyright
© 2000-2004 Artistry In PSP / PSP
Artistry
All rights reserved.
Unless specifically made available for
download,
no graphics or text may be removed from
this site for any reason
without written permission from Artistry
In PSP / PSP Artistry
TUTORIAL INDEX
|