GLASS MASK FRAME
PSP7
This
tutorial was written by Jemima ~ November
2003..
Copyright © 2003 ~
Jemima ~ All rights reserved
********************************
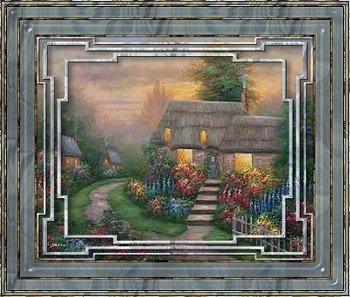
This is a very simple but effective frame
*S*
You will need
EyeCandy 3 download
The EYE CANDY
4000
plugin
You will also need this
MASK
Right click and save to a folder on your
computer
Right click and save these images to a
folder on your computer

goldglass and white glass
 
Open up the Mask and the above images in
your PSP workspace
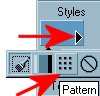
Go to your COLOUR PALETTE
Click on the small arrow in your Upper
Styles Box
and select the Pattern Icon from the drop
down options
Select the goldglass from the options
window
Scale = 100
Angle = 0

REPEAT this process loading the
'whiteglass' into your Lower Styles Box
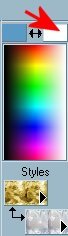
Left click the left uppermost box
(foreground) and insert BLUE ( #5B9AC5 )
Right click on the right (background)
uppermost box
(indicated by the red arrow)
and select 'white'.
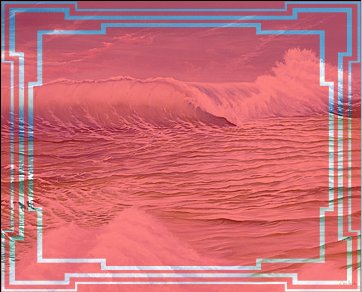
Click on the Ocean image to activate it
Go to LAYERS >>> New Raster
Layer
Go to MASK >>> New >>>
From Image
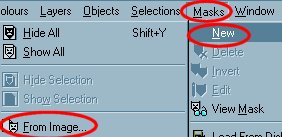
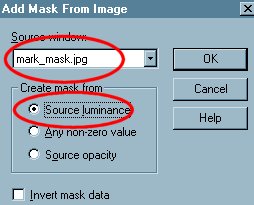
Click OK
Go to MASK >>> View Mask
Select your FLOOD FILL tool
Right click on the 'light' section of the
mask to fill
with 'whiteglass' pattern
Go to MASK >>> Delete
Go to EFFECTS >>> Plugins
>>> EyeCandy 4000 >>>
Glass
Click on the SETTINGS tab and select
GLASS TUBING
then use these settings.
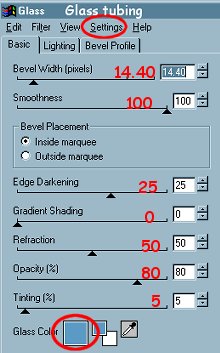
Click OK
Go to EFFECTS >>>3D Effects
>>> Drop Shadow
Settings:
Vertical & Horizontal = 1
Opacity - 80
Blur - 0
Colour = BLACK
Click OK
Go to COLOURS >>> Adjust
>>> Brightness/Contrast
Settings:
Brightness = 18
Contrast = 23
Click OK
Go to EFFECTS >>> Plugins
>>> EyeCandy 3 >>> Drop
Shadow

Click OK
Go to EFFECTS >>> Sharpen
>>> Sharpen
BORDER 1
Go to IMAGE >>> Add Borders = 2
With your MAGIC WAND
Settings:
Match Mode = RGB Value
Tolerance = 0
Feather = 0
Sample Merged = UNChecked
Select the white border and Flood Fill
with the 'goldglass' pattern
Go to EFFECTS >>>3D Effects
>>> Drop Shadow
Settings:
Vertical & Horizontal = 1
Opacity - 80
Blur - 0
Colour = BLACK
Click OK
Repeat Drop Shadow changing
Vertical and Horizontal settings to -
(minus) 1
Click OK
DESELECT
BORDER 2
Go to IMAGE >>> Add Borders = 20
With your MAGIC WAND
Select the white border and Flood Fill
with the 'whiteglass' pattern
Go to EFFECTS >>> Plugins
>>> EyeCandy 4000 >>>
Glass
Use the same settings
Go to EFFECTS >>>3D Effects
>>> Drop Shadow
Use the same settings
REPEAT the Drop Shadow with the - (minus)
settings
Click OK
DESELECT
BORDER 3
Go to IMAGE >>> Add Borders = 2
With your MAGIC WAND
Select the white border and Flood Fill
with the 'goldglass' pattern
Go to EFFECTS >>>3D Effects
>>> Drop Shadow
Use the same settings
REPEAT the Drop Shadow with the - (minus)
settings
Click OK
DESELECT
BORDER 4
Go to IMAGE >>> Add Borders
= 15
With your MAGIC WAND
Select the white border and Flood Fill
with the 'whiteglass' pattern
Go to EFFECTS >>> Plugins
>>> EyeCandy 4000 >>>
Glass
Use the same settings
Go to EFFECTS >>>3D Effects
>>> Drop Shadow
Use the same settings
REPEAT the Drop Shadow with the - (minus)
settings
Click OK
DESELECT
BORDER 5
Go to IMAGE >>> Add Borders
= 2
With your MAGIC WAND
Select the white border and Flood Fill
with the 'goldglass' pattern
Go to EFFECTS >>>3D Effects
>>> Drop Shadow
Use the same settings
REPEAT the Drop Shadow with the - (minus)
settings
Click OK
DESELECT
BORDER 6
Go to IMAGE >>> Add Borders
= 5
With your MAGIC WAND
Select the white border and Flood Fill
with the 'whiteglass' pattern
Go to EFFECTS >>> Plugins
>>> EyeCandy 4000 >>>
Glass
Use the same settings
Go to EFFECTS >>>3D Effects
>>> Drop Shadow
Use the same settings
REPEAT the Drop Shadow with the - (minus)
settings
Click OK
BORDER 7
Go to IMAGE >>> Add Borders
= 1
With your MAGIC WAND
Select the white border and Flood Fill
with the 'goldglass' pattern
Go to EFFECTS >>>3D Effects
>>> Drop Shadow
Use the same settings
REPEAT the Drop Shadow with the - (minus)
settings
Click OK
DESELECT
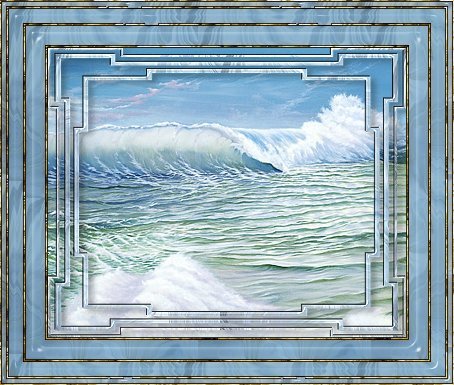
That's it!! *S*
Resize to suit
and save as a .jpg file.
If you resize... don't forget to
'sharpen' your image/
I hope you enjoyed this very simple but
effective tutorial.
I would like to
thank ANNIE
from GRAFIXADDIX
for her assistance in testing this
tutorial *S*
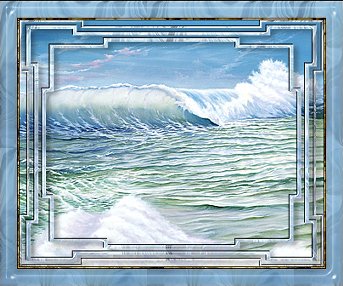
This is Annie's result
MAIN TUTORIAL INDEX
Page designed by

for

http://www.artistrypsp.com/
Copyright
© 2000-2003 Artistry In PSP / PSP
Artistry
All rights reserved.
Unless specifically made available for
download,
no graphics or text may be removed from
this site for any reason
without written permission from Artistry
In PSP / PSP Artistry
|