Here's the Church
PSP8
Page 2
This
tutorial was written by Jemima ~ December
2003..
Copyright © 2003/4
~ Jemima ~ All rights reserved
********************************
Go to IMAGE >>> Resize
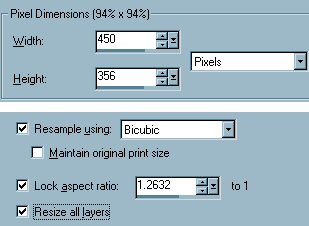
Click OK
Go to IMAGE >>> Add Borders =
Symmetric 15
COLOUR = PALE GREY FROM COLOUR SWATCH
Click OK
With your MAGIC WAND
Select the border
Load the 'patt1' into your foreground
MATERIALS box
Use these settings
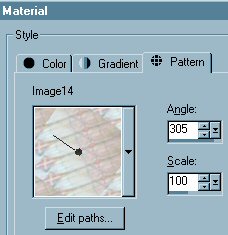
Click OK
Flood fill the border with the pattern
Go to EFFECTS >>> 3D Effects
>>> Inner Bevel
Use the same settings
Click OK
Go to EFFECTS >>> Plugins
>>> Eye Candy 3 >>>
Drop Shadow
Use the same settings
Click OK
Go to EFFECTS >>> 3D Effects
>>> Drop Shadow
Use these settings
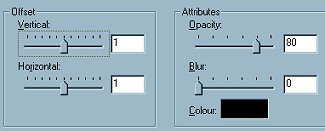
Click OK
Repeat Drop Shadow effect changing the
Vertical & Horizontal offsets to -
(minus) 1
Click OK
DESELECT
Go to IMAGE >>> Add Borders =
Symmetric 15
COLOUR = TAN COLOUR FROM SWATCH
Click OK
With your MAGIC WAND
Select the border
Go to EFFECTS >>> Texture
Effects >>> Blinds
Use the same settings
Click OK
Go to EFFECTS >>> 3D Effects
>>> Inner Bevel
Use the same settings
Click OK
Go to EFFECTS >>> 3D Effects
>>> Drop Shadow
Use the same settings
Click OK
Repeat Drop Shadow effect changing the
Vertical & Horizontal offsets to -
(minus) 1
Click OK
DESELECT
With your SELECTION tool
Set to RECTANGLE
Feather = 0
Antialias = UNchecked
Draw a rectangle as shown below
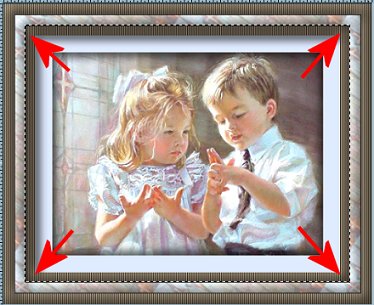
Go to SELECTIONS >>> Invert
Go to EFFECTS >>> Plugins
>>> DSB Flux >>>
Bubbles
Use these settings
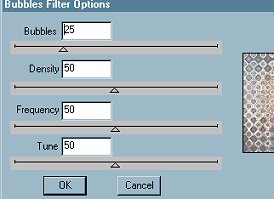
Click OK
Go to EFFECTS >>> 3D Effects
>>> Inner Bevel
Use the same settings
Click OK
DESELECT
Go to IMAGE >>> Resize
Use same settings as before
(450 x 350)
Click OK
Go to ADJUST >>> Sharpness
>>> Sharpen
Go to IMAGE >>> Add Borders =
Symmetric 15
Click OK
With your MAGIC WAND
Select the border
Go to EFFECTS >>> Texture
Effects >>> Blinds
Use the same settings
Click OK
Go to EFFECTS >>> 3D Effects
>>> Inner Bevel
Use the same settings
Click OK
REPEAT INNER BEVEL
Go to EFFECTS >>> 3D Effects
>>> Drop Shadow
Use the same settings
Click OK
Repeat Drop Shadow effect changing the
Vertical & Horizontal offsets to -
(minus) 1
Click OK
DESELECT
Resize your image to suit your purpose
(I resized mine to 450 x 372)
Go to ADJUST >>> Sharpness
>>> Sharpen
Save you image as a .JPG file
Page designed by

for

http://www.coldfusion-vpm.com/~jemima/Artistry_Pages/index.html
Copyright
© 2000-2004 Artistry In PSP / PSP
Artistry
All rights reserved.
Unless specifically made available for
download,
no graphics or text may be removed from
this site for any reason
without written permission from Artistry
In PSP / PSP Artistry
TUTORIAL INDEX
|