BOOK FRAME
PSP8
Page 3
This
tutorial was written by Jemima ~ October
2004
Copyright © 2004 ~
Jemima ~ All rights reserved
********************************

Now... we need something for the right
hand page.....
I'm going to add some text.
You can add another image
or add text of your own.
I changed my background colour to Dark
Brown ( #543F2A )
and closed my foreground box
Still on Layer 1
Select your TEXT TOOL
I used the 'Balmoral ICG' font (you can
use one of your choosing)
with the following settings

Type in your text
Click OK
Centre the text
DESELECT

Go to LAYERS >>> MERGE
>>> MERGE VISIBLE
Go to LAYERS >>> NEW RASTER
LATER
OK now we'll add some decoration.
Open up the 'corner' tube
Go to WINDOW >>> DUPLICATE
Close the original tube
Go to IMAGE >>> RESIZE = 30%
Make sure Resize All Layers is unchecked
Go to ADJUST >>> SHARPEN
>>> SHARPEN
Right click on the title bar of the
'corner' image and
select COPY from the options
Right click on the title bar of the
'Book' image and
select PASTE AS NEW SELECTION from the
options
Position the corner at the bottom right
of the
right hand page
DESELECT

Go to LAYERS >>> DUPLICATE
Go to IMAGE >>> MIRROR
Go to your LAYER PALETTE and CLOSE the
MERGED layer
Go to LAYERS >>> MERGE VISIBLE
Go to LAYERS >>> DUPLICATE
Go to IMAGE >>> FLIP
Go to LAYERS >>> MERGE VISIBLE
NOW.... if you want your corners a little
more prominent
Go to LAYERS >>> DUPLICATE
Go to LAYERS >>> MERGE VISIBLE
!!*!!!*!!!*!!!*!!!*!!!*!!!*!!
(See below for
instructions on saving the Book without a
background
or extra decorations)
~*~*~*~*~*~*~*~*~*~*~
If you wish to add some overlapping
decorations of your own
as in the example below

You will need to
only merge the 2 merged layers in your
colour palette,

Add any extra
decorations..loke the small roses above.
Then add the
background of your choice
to the bottom layer before saving your
image.
~*~*~*~*~*~*~*~*~*~*~
I did as suggested above...
I made my background layer WHITE to match
my
tutorial page.
Then I added a drop shadow to the MERGED
LAYER
Then
Go to LAYERS >>> MERGE
>>> MERGE ALL (Flatten)
and youre
DONE!!!
Save as a .jpg image
IF YOU WISH TO SAVE
THE BOOK WITHOUT A BACKGROUND
GO BACK TO
!!*!!!*!!!*!!!*!!!*!!!*!!!*!!
THEN FOLLOW THESE
INSTRUCTIONS
Go to your LAYER PALETTE
Open ALL layers
Go to LAYERS >>> MERGE
>>> MERGE VISIBLE
Select your SELECTION TOOL
Click on the Custom Selection Icon

and enter the following co-ordinates.
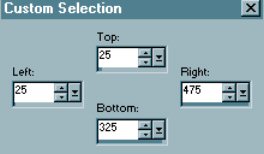
Click OK
Go to IMAGE >>> CROP TO
SELECTION
Go to LAYERS >>> MERGE
>>> MERGE ALL ( Flatten)
Save as a .jpg image
and you're done

~*~*~*~*~*~*~*~*~*~*~
Phew... that was a
long one!!!
Hope you're happy with the result
I would like to thank CINDY, CAROLYN
& TIGGER
from GRAFIXADDIX
for their assistance in testing this
tutorial *S*
You'll find their results on the next
page.
Testers results
MAIN TUTORIAL INDEX
Page designed by

for

http://www.artistrypsp.com/
Copyright © 2000-2004 Artistry In PSP / PSP Artistry
All rights reserved.
Unless specifically made available for download,
no graphics or text may be removed from this site for any reason
without written permission from Artistry In PSP / PSP Artistry
|