STEP 1
Open a new image 800 x 600
Transparent background
PSP9: Colour Depth = 16 Million Colors (24bit)
PSPX-PSP2020: Colour Depth RGB = 8bits/channel
SELECTIONS >>> SELECT ALL
Open up the spotlights image in your PSP workspace
Right click on the Title Bar and select COPY from the options
Right click on the Title Bar of your tag image
and select PASTE INTO SELECTION from the options.
DO NOT DESELECT
.
.
|
|
STEP 2
LAYERS >>> NEW RASTER LAYER
Open up the Black-dot-texture image in your PSP workspace
Right click on the Title Bar and select COPY from the options
Right click on the Title Bar of your tag image
and select PASTE INTO SELECTION from the options.
In your LAYER PALETTE change the
BLEND MODE to DIFFERENCE
DO NOT DESELECT
.
|
|
STEP 3
LAYERS >>> NEW RASTER LAYER
Open up the metal-honeycomb-pattern-13553 image in your PSP workspace
Right click on the Title Bar and select COPY from the options
Right click on the Title Bar of your tag image
and select PASTE INTO SELECTION from the options.
In your LAYER PALETTE change the
BLEND MODE to HARD LIGHT
DESELECT
SAVE YOUR WORK.
|
|
STEP 4
Open up the poppy-field-by-cecilia-brendel image in your PSP workspace
Right click on the Title Bar and select COPY from the options
Right click on the Title Bar of your tag image
and select PASTE AS NEW LAYER from the options.
IMAGE >>> RESIZE = 82%
Check "Lock aspect ratio."
Ensure "Resize all layers" is UNCHECKED
Resample using WEIGHTED AVERAGE
ADJUST >>> SHARPNESS >>> SHARPEN
In your LAYER PALETTE change the
BLEND MODE to LUMINANCE (L) .
|
|
STEP 5
Open up the Transparent_Grass image in your PSP workspace
Right click on the Title Bar and select COPY from the options
Right click on the Title Bar of your tag image
and select PASTE AS NEW LAYER from the options.
EFFECTS >>> IMAGE EFFECTS >>> OFFSET
Horizontal Offset = 0
Vertical Offset = - ( minus ) 180
Edge Mode = Transparent
In your LAYER PALETTE change the BLEND MODE to MULTIPLY

,
|
STEP 6
VIEW >>> RULERS
Select your RASTER DEFORM tool
Mode = SCALE
use default settings
PSPX - PSP2020:Select your PICK tool
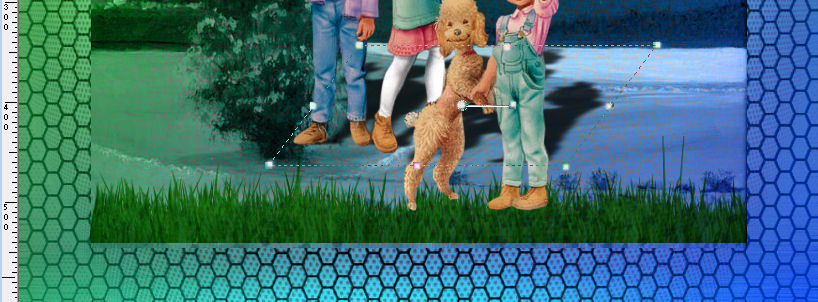
Move the centre left node level with the 75 pixel mark on your top ruler
Move the centre right node level with the 725 pixel mark on your top ruler
Move the lower centre node down level with the 540 pixel mark on your left ruler

Click the RESET RECTANGLE arrow
Select the MOVER tool to disengage the DEFORMATION tool (PICK tool)
SAVE YOUR WORK.
|
STEP 7
Open up the ccc_hurryback image in your PSP workspace
Right click on the Title Bar and select COPY from the options
Right click on the Title Bar of your tag image
and select PASTE AS NEW LAYER from the options.
EFFECTS >>> 3D EFFECTS >>> DROP SHADOW
Vertical offset = 0
Horizontal offset = 6
Colour = Black
Opacity = 80
Blur = 10.00
Check "Shadow on new layer"
|
STEP 8
VIEW >>> RULERS
Select your RASTER DEFORM tool
Mode = SCALE
use default settings
PSPX - PSP2020:Select your PICK tool
Move the upper centre node down level with the 350 pixel mark on your left ruler
Move the lower centre node up level with the 470 pixel mark on your left ruler
Change the MODE to Shear (Shift)
Move the upper centre node level with the 500 pixel mark on your top ruler

Click the RESET RECTANGLE arrow
Select the MOVER tool to disengage the DEFORMATION tool (PICK tool)
|
STEP 9
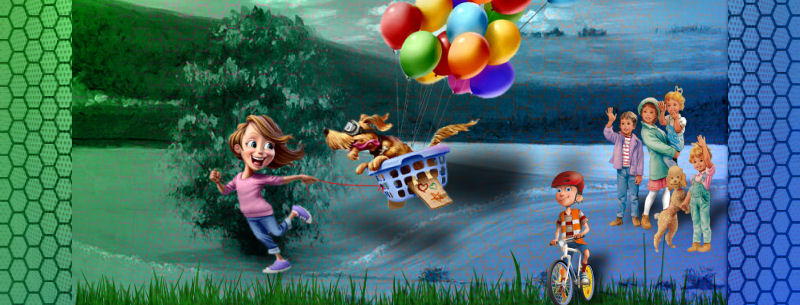
IMAGE >>> RESIZE = 40%
Check "Lock aspect ratio."
Ensure "Resize all layers" is UNCHECKED
Resample using WEIGHTED AVERAGE
ACTIVATE Raster 6
EDIT >>> Repeat Resize
ADJUST >>> SHARPNESS >>> SHARPEN
EFFECTS >>> IMAGE EFFECTS >>> OFFSET
Horizontal Offset = 260
Vertical Offset = - ( minus ) 70
Edge Mode = Transparent
ACTIVATE
Raster 6 Shadow 1
EDIT >>> Repeat Offset
ADJUST >>> BLUR >>> GAUSSIAN BLUR
Radius = 5.00
SAVE YOUR WORK
|
|
STEP 10
ACTIVATE Raster 6
Open up the family4 image in your PSP workspace
Right click on the Title Bar and select COPY from the options
Right click on the Title Bar of your tag image
and select PASTE AS NEW LAYER from the options.
EFFECTS >>> 3D EFFECTS >>> DROP SHADOW
Same settings
Select your RASTER DEFORM tool
Mode = SCALE
use default settings
PSPX - PSP2020:Select your PICK tool
Move the upper centre node down level with the 350 pixel mark on your left ruler
Change the MODE to Shear (Shift)
Move the upper centre node level with the 500 pixel mark on your top ruler |
|
STEP 11
Click the RESET RECTANGLE arrow
Select the MOVER tool to disengage the DEFORMATION tool (PICK tool)
IMAGE >>> RESIZE = 30%
Check "Lock aspect ratio."
Ensure "Resize all layers" is UNCHECKED
Resample using WEIGHTED AVERAGE
ACTIVATE Raster 7
EDIT >>> Repeat Resize
ADJUST >>> SHARPNESS >>> SHARPEN
EFFECTS >>> IMAGE EFFECTS >>> OFFSET
Horizontal Offset = 170
Vertical Offset = - ( minus ) 140
Edge Mode = Transparent
ACTIVATE Raster 7 Shadow 1
EDIT >>> Repeat Offset
ADJUST >>> BLUR >>> GAUSSIAN BLUR
Radius = 5.00
SAVE YOUR WORK |
|
STEP 12
ACTIVATE Raster 7
Open up the Oscar-Ramos image in your PSP workspace
Right click on the Title Bar and select COPY from the options
Right click on the Title Bar of your tag image
and select PASTE AS NEW LAYER from the options.
EFFECTS >>> 3D EFFECTS >>> DROP SHADOW
Same settings
Select your RASTER DEFORM tool
Mode = SCALE
use default settings
PSPX - PSP2020:Select your PICK tool
Move the upper centre node down level with the 350 pixel mark on your left ruler

Click the RESET RECTANGLE arrow
Select the MOVER tool to disengage the DEFORMATION tool (PICK tool)
, |
STEP 13
IMAGE >>> RESIZE = 80%
Check "Lock aspect ratio."
Ensure "Resize all layers" is UNCHECKED
Resample using WEIGHTED AVERAGE
ACTIVATE Raster 8
EDIT >>> Repeat Resize
ADJUST >>> SHARPNESS >>> SHARPEN
EFFECTS >>> IMAGE EFFECTS >>> OFFSET
Horizontal Offset = 0
Vertical Offset = - ( minus ) 10
Edge Mode = Transparent
ACTIVATE Raster 8 Shadow 1
EDIT >>> Repeat Offset
ADJUST >>> BLUR >>> GAUSSIAN BLUR
Radius = 10.00

SAVE YOUR WORK |
STEP 14
ACTIVATE Raster 8
Open up the main_749619 image in your PSP workspace
Right click on the Title Bar and select COPY from the options
Right click on the Title Bar of your tag image
and select PASTE AS NEW LAYER from the options.
EFFECTS >>> 3D EFFECTS >>> DROP SHADOW
Same settings
Select your RASTER DEFORM tool
Mode = SCALE
use default settings
PSPX - PSP2020:Select your PICK tool
Move the upper centre node down level with the 350 pixel mark on your left ruler , |
|
STEP 15
Click the RESET RECTANGLE arrow
Select the MOVER tool to disengage the DEFORMATION tool (PICK tool)
IMAGE >>> RESIZE = 60%
Check "Lock aspect ratio."
Ensure "Resize all layers" is UNCHECKED
Resample using WEIGHTED AVERAGE
ACTIVATE Raster 9
EDIT >>> Repeat Resize
ADJUST >>> SHARPNESS >>> SHARPEN
EFFECTS >>> IMAGE EFFECTS >>> OFFSET
Horizontal Offset = - ( minus ) 300
Vertical Offset = - ( minus ) 130
Edge Mode = Transparent
ACTIVATE Raster 9 Shadow 1
EDIT >>> Repeat Offset
ADJUST >>> BLUR >>> GAUSSIAN BLUR
Radius = 6.00
SAVE YOUR WORK |
|
STEP 16
ACTIVATE Raster 9
Open up the owlfly image in your PSP workspace
Right click on the Title Bar and select COPY from the options
Right click on the Title Bar of your tag image
and select PASTE AS NEW LAYER from the options
IMAGE >>> RESIZE = 20%
Check "Lock aspect ratio."
Ensure "Resize all layers" is UNCHECKED
Resample using WEIGHTED AVERAGE
ADJUST >>> SHARPNESS >>> SHARPEN
Reposition with your MOVER tool
SAVE YOUR WORK
|
|
STEP 17
ACTIVATE Raster 1
PSP9 - PSPX3: IMAGE >>> FLIP
PSPX4 - PSP2020: Use script available for download at top of page.
(Higher versions follow your version's method)
ACTIVATE Raster 4
EFFECTS >>> 3D EFFECTS >>> DROP SHADOW
Vertical & Horizontal offsets = 6
Colour = Black
Opacity = 65
Blur = 10.00
Uncheck "Shadow on New Layer"
Repeat Drop Shadow effect changing
Vertical & Horizontal Offsets to - ( minus ) 6
ACTIVATE Raster 5
EFFECTS >>> IMAGE EFFECTS >>> OFFSET
Horizontal Offset = 0
Vertical Offset = - ( minus ) 5
Edge Mode = Transparent
LAYERS >>> MERGE >>> MERGE VISIBLE
 ,
, |
STEP 18
In your MATERIALS PALETTE
Load GREEN " #1f8b3e " in your foreground
Load BLUE " #476f9b " in your background
LAYERS >>> NEW RASTER LAYER
SELECTIONS >>> SELECT ALL
Flood fill with BLUE
SELECTIONS >>> MODIFY >>> CONTRACT = 6
EDIT >>> CLEAR
EFFECTS >>> 3D EFFECTS >>> BUTTONIZE
Height = 6
Width = 6
Opacity = 100
Edge = Solid
COLOUR = GREEN #1f8b3e
SELECTIONS >>> MODIFY >>> CONTRACT = 6
Flood fill with BLUE
SELECTIONS >>> MODIFY >>> CONTRACT = 6
EDIT >>> CLEAR
DESELECT
, |
|
STEP 19
EFFECTS >>> PLUGINS >>> SIMPLE >>> TOP LEFT MIRROR
ADJUST >>> SHARPNESS >>> SHARPEN MORE
EDIT >>> Repeat Sharpen More
EFFECTS >>> 3D EFFECTS >>> DROP SHADOW
Vertical & Horizontal offsets = 6
Colour = Black
Opacity = 65
Blur = 10.00
Repeat Drop Shadow effect changing
Vertical & Horizontal Offsets to - ( minus ) 6 |
|
STEP 20
Open up the freedom image in your PSP workspace
Choose your SELECTION TOOL
Selection Type = Rectangle
Mode = Replace
Feather = 0
Antialias = UNChecked
Select the upper 2 lines of text
Right click on the Title Bar and select COPY from the options
Right click on the Title Bar of your tag image
and select PASTE AS NEW LAYER from the options.
ADJUST >>> COLOUR BALANCE >>> NEGATIVE IMAGE
PSPX - PSP2020: IMAGE >>> NEGATIVE IMAGE
, |
STEP 21
IMAGE >>> RESIZE = 70%
Check "Lock aspect ratio."
Ensure "Resize all layers" is UNCHECKED
Resample using WEIGHTED AVERAGE
EFFECTS >>> IMAGE EFFECTS >>> OFFSET
Horizontal Offset = - ( minus ) 195
Vertical Offset = 215
Edge Mode = Transparent |
|
STEP 22
Back to the freedom image in your PSP workspace
Choose your SELECTION TOOL
Select the lower 2 lines of text
Right click on the Title Bar and select COPY from the options
Right click on the Title Bar of your tag image
and select PASTE AS NEW LAYER from the options.
ADJUST >>> COLOUR BALANCE >>> NEGATIVE IMAGE
PSPX - PSP2020: IMAGE >>> NEGATIVE IMAGE
, |
STEP 23
IMAGE >>> RESIZE = 70%
Check "Lock aspect ratio."
Ensure "Resize all layers" is UNCHECKED
Resample using WEIGHTED AVERAGE
EFFECTS >>> IMAGE EFFECTS >>> OFFSET
Horizontal Offset = 205
Vertical Offset = - ( minus ) 220
Edge Mode = Transparent, |
|
STEP 24
LAYERS >>> MERGE >>> MERGE DOWN
EFFECTS >>> 3D EFFECTS >>> DROP SHADOW
Vertical & Horizontal offsets = 2
Colour = Black
Opacity = 100
Blur = 2.00
LAYERS >>> MERGE >>> MERGE VISIBLE
|
|
STEP 25
LAYERS >>> NEW RASTER LAYER
SELECT your TEXT tool
With a font of your choice add your name
, |
|
STEP 26
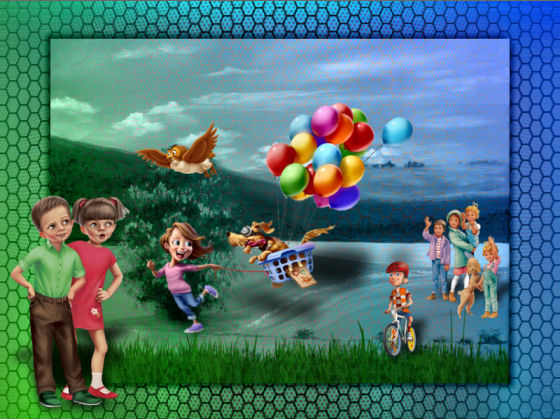
LAYERS >>> MERGE >>> MERGE ALL (Flatten)
Save as .jpg image
, |
| |
|
| |
|