STEP 1
Open up the 467-flames-wallpapers image in your PSP workspace
WINDOW >>> DUPLICATE
Close the original Image
LAYERS >>> Promote background layer
PSP9 - PSPX3: IMAGE >>> MIRROR
PSPX4 - PSPX8: Use script available for download at top of page.
(Higher versions follow your version's method)
EFFECTS >>> PLUGINS >>> SIMPLE >>> TOP LEFT MIRROR
|
|
STEP 2
ADJUST >>> BLUR >>> GAUSSIAN BLUR
Radius = 18
Open up the flames_abstract image in your PSP workspace
Right click on the Title Bar and select COPY from the options
Right click on the Title Bar of your frame image
and select PASTE AS NEW LAYER from the options.
IMAGE >>> RESIZE = 85%
Check "Lock aspect ratio."
Ensure "Resize all layers" is UNCHECKED
Resample using WEIGHTED AVERAGE
|
|
STEP 3
With your MAGIC WAND
Mode = Replace
Match Mode = RGB Value
Tolerance = 0
Feather = 0
Antialias = UNchecked
Sample Merged = CHECKED
PSP9 - PSP2020: Check CONTIGUOUS
PSPX - PSP2020: There is no " Sample Merged"
PSP9 - PSP2020: Use all layers = UNChecked
PSP9 - PSP2020: ANTIALIAS = Outside
Select the CENTRE of your image
SELECTIONS >>> MODIFY >>> EXPAND = 3
|
|
STEP 4
ACTIVATE Raster 1
EDIT >>> CLEAR
DESELECT
LAYERS >>> DUPLICATE
PSP9: IMAGE >>> ROTATE >>> FREE ROTATE = RIGHT 90
Ensure "All layers" is UNCHECKED
PSPX - PSP2020: IMAGE >>> FREE ROTATE = RIGHT 90
Ensure "All layers" is UNCHECKED
|
|
STEP 5
VIEW >>> RULERS
Select your RASTER DEFORM tool
Mode = SCALE
use default settings
PSPX - PSP2020:Select your PICK tool
Move the centre left node left level with the 0 pixel mark on your top ruler
Move the centre right node right level with the 800 pixel mark on your top ruler |
|
STEP 6
Click the RESET RECTANGLE arrow
Select another tool to disengage the MAGIC WAND
Same settings
ACTIVATE Raster 2
Select the CENTRE of your image
SELECTIONS >>> MODIFY >>> EXPAND = 3
, |
|
STEP 7
ACTIVATE Copy of Raster 1
EDIT >>> CLEAR
DESELECT
SAVE YOUR WORK |
|
STEP 8
Choose your SELECTION TOOL
then click on the CUSTOM SELECTION symbol
and enter these coordinates. |
|
STEP 9
SELECTIONS >>> INVERT
EDIT >>> CLEAR
DESELECT

, |
STEP 10
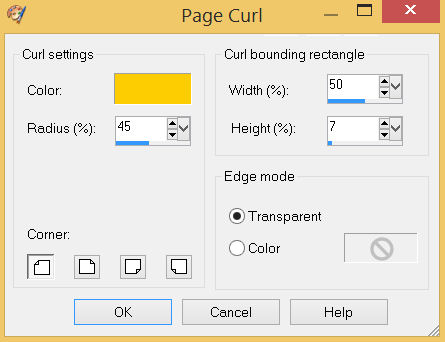
EFFECTS >>> IMAGE EFFECTS >>> PAGE CURL
Curl Settings Color = #fdcc01
Edge Mode = Transparent
Select upper left corner

Click "OK"

|
STEP 11
EFFECTS >>> IMAGE EFFECTS >>> PAGE CURL
Same settings
Select upper right corner
Click "OK"
EFFECTS >>> IMAGE EFFECTS >>> PAGE CURL
Same settings
Select lower right corner
Click "OK"
EFFECTS >>> IMAGE EFFECTS >>> PAGE CURL
Same settings
Select lower left corner
Click "OK"
LAYERS >>> MERGE >>> MERGE DOWN
SAVE YOUR WORK |
|
STEP 12
Open up the PT_70168 image in your PSP workspace
Right click on the Title Bar and select COPY from the options
Right click on the Title Bar of your frame image
and select PASTE AS NEW LAYER from the options.
EFFECTS >>> PLUGINS >>> SIMPLE >>> TOP LEFT MIRROR
ADJUST >>> COLOUR BALANCE >>> NEGATIVE IMAGE
PSPX - PSP2020: IMAGE >>> NEGATIVE IMAGE
PSP9: IMAGE >>> ROTATE >>> FREE ROTATE = RIGHT 90
Ensure "All layers" is UNCHECKED
PSPX - PSP2020: IMAGE >>> FREE ROTATE = RIGHT 90
Ensure "All layers" is UNCHECKED
EFFECTS >>> IMAGE EFFECTS >>> OFFSET
Horizontal Offset = - ( minus ) 363
Vertical Offset = 0
Edge Mode = Transparent
, |
|
STEP 13
LAYERS >>> DUPLICATE
PSP9 - PSPX3: IMAGE >>> MIRROR
PSPX4 - PSPX8: Use script available for download at top of page.
(Higher versions follow your version's method)
LAYERS >>> MERGE >>> MERGE DOWN
In your LAYER PALETTE change
the BLEND MODE to OVERLAY
EFFECTS >>> 3D EFFECTS >>> DROP SHADOW
Vertical & Horizontal offsets = 4
Colour = Black
Opacity = 70
Blur = 6.00
Repeat Drop Shadow effect changing
Vertical & Horizontal Offsets to - ( minus ) 4
ADJUST >>> SHARPNESS >>> SHARPEN MORE
LAYERS >>> MERGE >>> MERGE DOWN
SAVE YOUR WORK, |
|
STEP 14
In your MATERIALS PALETTE
Load YELLOW " #fdcc01 " in your foreground
Load ORANGE " #fe5701 " in your background
Then click on the GRADIENT option in your foreground palette
Select the Foreground-background option.
STYLE = Linear |
|
STEP 15
ACTIVATE Raster 2
Choose your SELECTION TOOL
On the top menu select 'Create selection from:

LAYERS >>> NEW RASTER LAYER
Flood fill with GRADIENT
SELECTIONS >>> MODIFY >>> CONTRACT = 5
EDIT >>> CLEAR
DESELECT
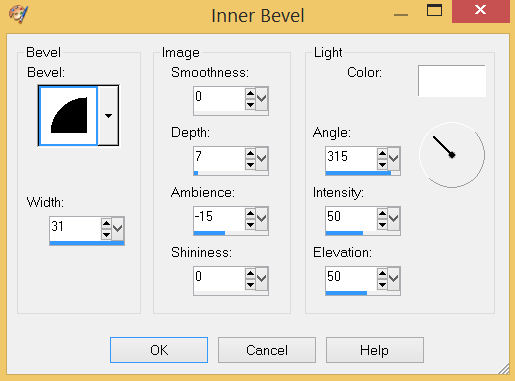
EFFECTS >>> 3D EFFECTS >>> INNER BEVEL

 , , |
STEP 16
LAYERS >>> DUPLICATE
IMAGE >>> RESIZE = 97%
Check "Lock aspect ratio."
Ensure "Resize all layers" is UNCHECKED
Resample using WEIGHTED AVERAGE
LAYERS >>> MERGE >>> MERGE DOWN
EFFECTS >>> 3D EFFECTS >>> DROP SHADOW
Vertical & Horizontal offsets = 4
Colour = Black
Opacity = 70
Blur = 6.00
Repeat Drop Shadow effect changing
Vertical & Horizontal Offsets to - ( minus ) 4
ADJUST >>> SHARPNESS >>> SHARPEN MORE
SAVE YOUR WORK
|
|
STEP 17
ACTIVATE Raster 2
EFFECTS >>> 3D EFFECTS >>> DROP SHADOW
Vertical & Horizontal offsets = 6
Colour = Black
Opacity = 70
Blur = 12.00
Repeat Drop Shadow effect changing
Vertical & Horizontal Offsets to - ( minus ) 6
LAYERS >>> MERGE >>> MERGE VISIBLE
|
|
STEP 18
In your MATERIALS PALETTE
change the "Repeats" to 7
|
|
STEP 19
LAYERS >>> NEW RASTER LAYER
SELECTIONS >>> SELECT ALL
Flood fill with GRADIENT
SELECTIONS >>> MODIFY >>> CONTRACT = 5
EDIT >>> CLEAR
DESELECT
EFFECTS >>> 3D EFFECTS >>> INNER BEVEL
Same settings
ADJUST >>> SHARPNESS >>> SHARPEN MORE |
|
STEP 20
LAYERS >>> NEW RASTER LAYER
SELECTIONS >>> SELECT ALL
SELECTIONS >>> MODIFY >>> CONTRACT = 8
Flood fill with GRADIENT
SELECTIONS >>> MODIFY >>> CONTRACT = 5
EDIT >>> CLEAR
DESELECT
EFFECTS >>> 3D EFFECTS >>> INNER BEVEL
Same settings
ADJUST >>> SHARPNESS >>> SHARPEN MORE
LAYERS >>> MERGE >>> MERGE DOWN |
|
STEP 21
EFFECTS >>> 3D EFFECTS >>> DROP SHADOW
Vertical & Horizontal offsets = 6
Colour = Black
Opacity = 80
Blur = 8.00
Repeat Drop Shadow effect changing
Vertical & Horizontal Offsets to - ( minus ) 6
LAYERS >>> MERGE >>> MERGE DOWN
Save as .pspimage image
, |
STEP 22
Open up the Hindu-krishna43 image in your PSP workspace
Right click on the Title Bar and select COPY from the options
Right click on the Title Bar of your frame image
and select PASTE AS NEW LAYER from the options.
IMAGE >>> RESIZE = 87%
Check "Lock aspect ratio."
Ensure "Resize all layers" is UNCHECKED
Resample using WEIGHTED AVERAGE
ADJUST >>> SHARPNESS >>> SHARPEN
EFFECTS >>> IMAGE EFFECTS >>> OFFSET
Horizontal Offset = 0
Vertical Offset = - ( minus ) 17
Edge Mode = Transparent
LAYERS >>> ARRANGE >>> MOVE DOWN
LAYERS >>> MERGE >>> MERGE VISIBLE,
|
|
STEP 23
LAYERS >>> NEW RASTER LAYER
Select your TEXT tool
and with a font of your choice add your name, |
|
STEP 24
LAYERS >>> MERGE >>> MERGE ALL (Flatten)
Save as .jpg image
, |
| |
|
| |
|