COLOURS USED

|
STEP 1
Open a new image 800 x 600
Transparent background
PSP9: Colour Depth = 16 Million Colors (24bit)
PSPX - PSP2020: Colour Depth RGB = 8bits/channel
Choose your SELECTION TOOL
then click on the CUSTOM SELECTION symbol
and enter these coordinates.
|
|
STEP 2
Open up the Wallpaper_31eb image in your PSP workspace
Right click on the Title Bar and select COPY from the options
Right click on the Title Bar of your frame image
and select PASTE INTO SELECTION from the options
DESELECT
LAYERS >>> DUPLICATE
PSP9 - PSPX3: IMAGE >>> MIRROR
PSPX4 - PSPX8: Use script available for download at top of page.
(Higher versions follow your version's method)
LAYERS >>> MERGE >>> MERGE DOWN
EFFECTS >>> PLUGINS >>> SIMPLE >>> TOP LEFT MIRROR,
|
|
STEP 3
EFFECTS >>> DISTORTION EFFECTS >>> PUNCH
Strength = 100%
LAYERS >>> DUPLICATE
EFFECTS >>> GEOMETRIC EFFECTS >>> CIRCLE
Edge Mode = Transparent
IMAGE >>> RESIZE = 85%
Check "Lock aspect ratio."
Ensure "Resize all layers" is UNCHECKED
Resample using WEIGHTED AVERAGE
With your MAGIC WAND
Mode = Replace
Match Mode = RGB Value
Tolerance = 10
Feather = 2
Antialias = Checked
Sample Merged = UNCHECKED
PSP9 - PSP2020: Check CONTIGUOUS
PSPX - PSP2020: There is no " Sample Merged"
PSP9 - PSP2020: Use all layers = UNChecked
PSP9 - PSP2020: ANTIALIAS = Outside
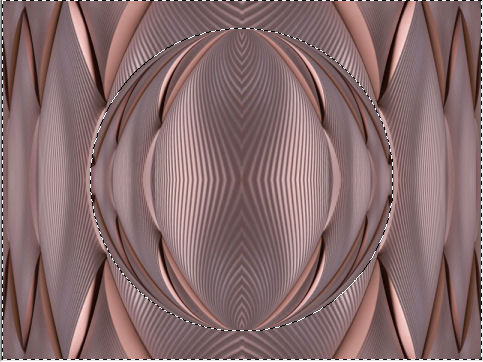
Select the outer area indicated

, |
STEP 4
SELECTIONS >>> INVERT
SELECTIONS >>> MODIFY >>> CONTRACT = 35
EDIT >>> CLEAR
DESELECT
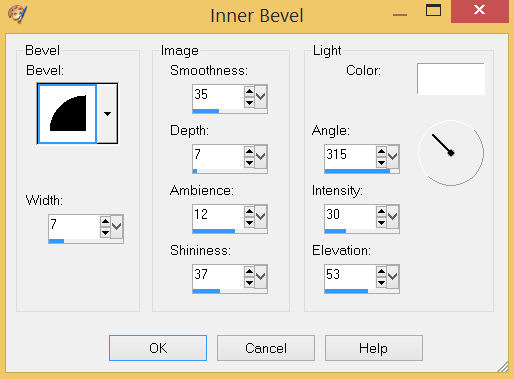
EFFECTS >>> 3D EFFECTS >>> INNER BEVEL


Rename the layer FRAME
SAVE YOUR WORK |
STEP 5
ACTIVATE Raster 1
LAYERS >>> DUPLICATE
PSP9: IMAGE >>> ROTATE >>> FREE ROTATE = RIGHT 90
Ensure "All layers" is UNCHECKED
PSPX - PSP2020: IMAGE >>> FREE ROTATE = RIGHT 90
Ensure "All layers" is UNCHECKED |
|
STEP 6
IMAGE >>> RESIZE = 75%
Check "Lock aspect ratio."
Ensure "Resize all layers" is UNCHECKED
Resample using WEIGHTED AVERAGE
VIEW >>> RULERS
Select your RASTER DEFORM tool
Mode = SCALE
use default settings
PSPX - PSP2020:Select your PICK tool
Move the centre left node level with the 100 pixel mark on your top ruler
Move the centre right node level with the 700 pixel mark on your top ruler |
|
STEP 7
Click the RESET RECTANGLE arrow
Select another tool to disengage the DEFORMATION / PICK TOOL
ACTIVATE the FRAME layer
With your MAGIC WAND.... Same settings.
Select the CENTRE of your image
SELECTIONS >>> MODIFY >>> EXPAND = 10
ACTIVATE Copy of Raster 1
EDIT >>> CLEAR
ACTIVATE Raster 1
EDIT >>> CLEAR
DESELECT
SAVE YOUR WORK |
|
STEP 8
ACTIVATE Copy of Raster 1
Choose your SELECTION TOOL
On the top menu select 'Create selection from:
 |
|
STEP 9
LAYERS >>> NEW RASTER LAYER,
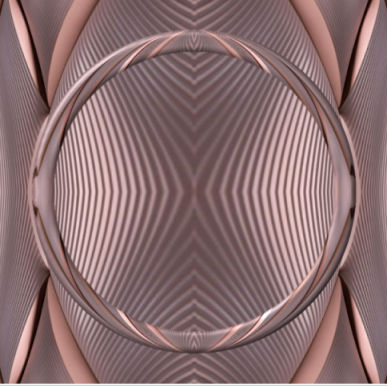
EFFECTS >>> 3D EFFECTS >>> BUTTONIZE
Colour = #bf8d86
Height = 8
Width = 8
Opacity = 100
Edge = Solid
SELECTIONS >>> MODIFY >>> CONTRACT = 8
EFFECTS >>> 3D EFFECTS >>> BUTTONIZE
Same settings
Colour = #a28990
SELECTIONS >>> MODIFY >>> CONTRACT = 8
EFFECTS >>> 3D EFFECTS >>> BUTTONIZE
Same settings
Colour = #bf8d86
DESELECT
EFFECTS >>> PLUGINS >>> SIMPLE >>> TOP LEFT MIRROR
ADJUST >>> SHARPNESS >>> SHARPEN MORE
EDIT >>> Repeat Sharpen More
|
|
STEP 10
ACTIVATE the FRAME layer
ADJUST >>> SHARPNESS >>> SHARPEN
LAYERS >>> NEW RASTER LAYER,
SELECTIONS >>> SELECT ALL
EFFECTS >>> 3D EFFECTS >>> BUTTONIZE
Colour = #bf8d86
Height = 8
Width = 8
Opacity = 100
Edge = Solid
SELECTIONS >>> MODIFY >>> CONTRACT = 8
EFFECTS >>> 3D EFFECTS >>> BUTTONIZE
Same settings
Colour = #a28990
SELECTIONS >>> MODIFY >>> CONTRACT = 8
EFFECTS >>> 3D EFFECTS >>> BUTTONIZE
Same settings
Colour = #bf8d86
DESELECT
EFFECTS >>> PLUGINS >>> SIMPLE >>> TOP LEFT MIRROR
ADJUST >>> SHARPNESS >>> SHARPEN MORE
EDIT >>> Repeat Sharpen More
SAVE YOUR WORK
|
|
STEP 11
ACTIVATE Raster 1
ADJUST >>> SHARPNESS >>> SHARPEN MORE
EDIT >>> Repeat Sharpen More
ACTIVATE
Copy of Raster 1
EDIT >>> Repeat Sharpen More
, |
STEP 12
ACTIVATE Raster 3
EFFECTS >>> 3D EFFECTS >>> DROP SHADOW
Vertical & Horizontal offsets = 6
Colour = Black
Opacity = 65
Blur = 10.00
ACTIVATE the FRAME layer
EDIT >>> Repeat Drop Shadow
ACTIVATE Raster 2
EDIT >>> Repeat Drop Shadow
Repeat Drop Shadow effect changing
Vertical & Horizontal Offsets to - ( minus ) 6
ACTIVATE the FRAME layer
EDIT >>> Repeat Drop Shadow
ACTIVATE Raster 3
EDIT >>> Repeat Drop Shadow
SAVE YOUR WORK |
|
STEP 13
Open up the Deco-FCF3 image in your PSP workspace
Right click on the Title Bar and select COPY from the options
Right click on the Title Bar of your frame image
and select PASTE AS NEW LAYER from the options.
PSP9: IMAGE >>> ROTATE >>> FREE ROTATE = RIGHT 90
Ensure "All layers" is UNCHECKED
PSPX - PSP2020: IMAGE >>> FREE ROTATE = RIGHT 90
Ensure "All layers" is UNCHECKED
EFFECTS >>> IMAGE EFFECTS >>> OFFSET
Horizontal Offset = - ( minus ) 320
Vertical Offset = 0
Edge Mode = Transparent
ADJUST >>> SHARPNESS >>> SHARPEN MORE, |
|
STEP 14
LAYERS >>> DUPLICATE
PSP9 - PSPX3: IMAGE >>> MIRROR
PSPX4 - PSPX8: Use script available for download at top of page.
(Higher versions follow your version's method)
LAYERS >>> MERGE >>> MERGE VISIBLE
Save as .pspimage image |
|
STEP 15
LAYERS >>> NEW RASTER LAYER
Flood fill with #bf8d86
LAYERS >>> ARRANGE >>> MOVE DOWN
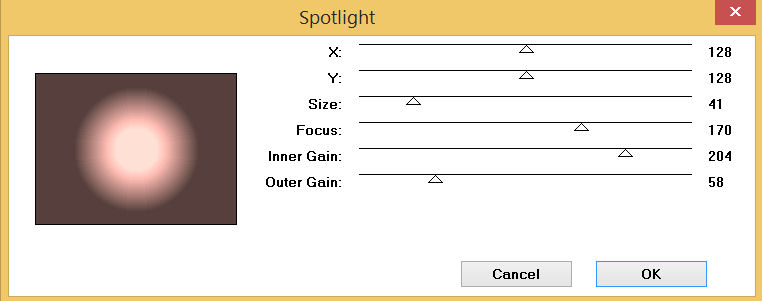
EFFECTS >>> PLUGINS >>> Greg's Factory Output Vol II >>> Spotlight

, |
STEP 16
Open up the girl_amanda_mocci4 image in your PSP workspace
Right click on the Title Bar and select COPY from the options
Right click on the Title Bar of your frame image
and select PASTE AS NEW LAYER from the options.
IMAGE >>> RESIZE = 65%
Check "Lock aspect ratio."
Ensure "Resize all layers" is UNCHECKED
Resample using WEIGHTED AVERAGE
ADJUST >>> SHARPNESS >>> SHARPEN
Reposition down a little with your MOVER tool |
|
STEP 17
EFFECTS >>> 3D EFFECTS >>> DROP SHADOW
Vertical & Horizontal offsets = - ( minus ) 6
Colour = Black
Opacity = 65
Blur = 20.00
, |
|
STEP 18
LAYERS >>> MERGE >>> MERGE VISIBLE
LAYERS >>> NEW RASTER LAYER
Select your TEXT tool
and with a font of your choice add your name
, |
|
STEP 19
LAYERS >>> MERGE >>> MERGE ALL (Flatten)
Save as .jpg image
, |
| |
|
| |
|