STEP 1
Open a new image 800 x 600
Transparent background
PSP9: Colour Depth = 16 Million Colors (24bit)
PSPX - PSP2020: Colour Depth RGB = 8bits/channel
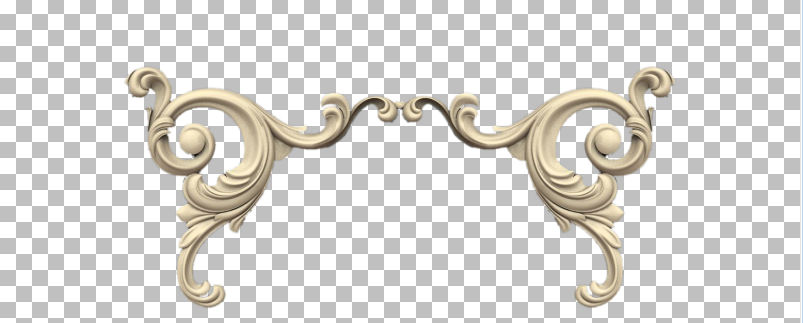
Open up the CNC-3b25 image in your PSP workspace
Choose your SELECTION TOOL
Selection Type = Rectangle
Mode = Replace
Feather = 0
Antialias = UNChecked
Select the corner
image
Right click on the Title Bar and select COPY from the options
Right click on the Title Bar of your frame image
and select PASTE AS NEW LAYER from the options.
. .
|
STEP 2
IMAGE >>> RESIZE = 55%
Check "Lock aspect ratio."
Ensure "Resize all layers" is UNCHECKED
Resample using WEIGHTED AVERAGE
ADJUST >>> SHARPNESS >>> SHARPEN
EFFECTS >>> IMAGE EFFECTS >>> OFFSET
Horizontal Offset = - ( minus ) 136
Vertical Offset = 110
Edge Mode = Transparent
LAYERS >>> DUPLICATE
PSP9 - PSPX3: IMAGE >>> MIRROR
PSPX4 - PSPX8: Use script available for download at top of page.
(Higher versions follow your version's method)
LAYERS >>> MERGE >>> MERGE DOWN

, |
STEP 3
LAYERS >>> DUPLICATE
PSP9 - PSPX3: IMAGE >>> FLIP
PSPX4 - PSPX8: Use script available for download at top of page.
(Higher versions follow your version's method)
EFFECTS >>> IMAGE EFFECTS >>> OFFSET
Horizontal Offset = 0
Vertical Offset = 10
Edge Mode = Transparent
LAYERS >>> MERGE >>> MERGE DOWN |
|
STEP 4
We need to centre the frame......
Right click on the Title Bar and select COPY from the options
Right click on the Title Bar of your frame image
and select PASTE AS NEW LAYER from the options.
DELETE Raster 2
|
STEP 5
ACTIVATE Raster 3
ADJUST >>> HUE & SATURATION >>> COLORIZE
Hue = 157
Saturation = 56
SAVE YOUR WORK |
|
STEP 6
Open up the CNC-d21d image in your PSP workspace
Right click on the Title Bar and select COPY from the options
Right click on the Title Bar of your frame image
and select PASTE AS NEW LAYER from the options.
PSP9: IMAGE >>> ROTATE >>> FREE ROTATE = LEFT 90
Ensure "All layers" is UNCHECKED
PSPX - PSP2020: IMAGE >>> FREE ROTATE = LEFT 90
Ensure "All layers" is UNCHECKED
IMAGE >>> RESIZE = 50%
Check "Lock aspect ratio."
Ensure "Resize all layers" is UNCHECKED
Resample using WEIGHTED AVERAGE
ADJUST >>> SHARPNESS >>> SHARPEN
, |
STEP 7
EFFECTS >>> IMAGE EFFECTS >>> OFFSET
Horizontal Offset = - ( minus ) 310
Vertical Offset = 130
Edge Mode = Transparent
ADJUST >>> HUE & SATURATION >>> COLORIZE
Same settings
|
|
STEP 8
EFFECTS >>> PLUGINS >>> SIMPLE >>> TOP LEFT MIRROR
SAVE YOUR WORK
, |
|
STEP 9
Open up the flora-465f image in your PSP workspace
Choose your SELECTION TOOL
Select the lower right flower
Right click on the Title Bar and select COPY from the options
Right click on the Title Bar of your frame image
and select PASTE AS NEW LAYER from the options.
IMAGE >>> RESIZE = 50%
Check "Lock aspect ratio."
Ensure "Resize all layers" is UNCHECKED
Resample using WEIGHTED AVERAGE
ADJUST >>> SHARPNESS >>> SHARPEN
EFFECTS >>> IMAGE EFFECTS >>> OFFSET
Horizontal Offset = - ( minus ) 250
Vertical Offset = 90
Edge Mode = Transparent
, |
|
STEP 10
EFFECTS >>> PLUGINS >>> SIMPLE >>> TOP LEFT MIRROR
SAVE YOUR WORK |
|
STEP 11
Back to the flora-465f image in your PSP workspace
Choose your FREEHAND SELECTION TOOL
Selection Type = Point to Point
Mode = Replace
Feather = 0
Smoothing = 5
Antialias = UNChecked
Select the lower left flower
Right click on the Title Bar and select COPY from the options
Right click on the Title Bar of your frame image
and select PASTE AS NEW LAYER from the options.
, |
STEP 12
IMAGE >>> RESIZE = 60%
Check "Lock aspect ratio."
Ensure "Resize all layers" is UNCHECKED
Resample using WEIGHTED AVERAGE
ADJUST >>> SHARPNESS >>> SHARPEN
EFFECTS >>> IMAGE EFFECTS >>> OFFSET
Horizontal Offset = - ( minus ) 80
Vertical Offset = 210
Edge Mode = Transparent |
|
STEP 13
EFFECTS >>> PLUGINS >>> SIMPLE >>> TOP LEFT MIRROR
SAVE YOUR WORK |
|
STEP 14
ACTIVATE Raster 1
SELECTIONS >>> SELECT ALL
Open up the blue-abstract-wallpaper-7 image in your PSP workspace
Right click on the Title Bar and select COPY from the options
Right click on the Title Bar of your frame image
and select PASTE INTO SELECTION from the options.
DESELECT
, |
STEP 15
PSP9 - PSPX3: IMAGE >>> MIRROR
PSPX4 - PSPX8: Use script available for download at top of page.
(Higher versions follow your version's method)
EFFECTS >>> PLUGINS >>> SIMPLE >>> TOP LEFT MIRROR
SAVE YOUR WORK |
|
STEP 16
ACTIVATE Raster 3
With your MAGIC WAND
Mode = Replace
Match Mode = RGB Value
Tolerance = 0
Feather = 0
Antialias = Checked
Sample Merged = UNCHECKED
PSP9 - PSP2020: Check CONTIGUOUS
PSPX - PSP2020: There is no " Sample Merged"
PSP9 - PSP2020: Use all layers = UNChecked
PSP9 - PSP2020: ANTIALIAS = Outside
Select the CENTRE of your image
SELECTIONS >>> MODIFY >>> EXPAND = 3 |
|
STEP 17
ACTIVATE Raster 1
EDIT >>> CLEAR
DESELECT
SAVE YOUR WORK
|
|
STEP 18
ACTIVATE Raster 5
EFFECTS >>> 3D EFFECTS >>> DROP SHADOW
Vertical & Horizontal offsets = 5
Colour = Black
Opacity = 70
Blur = 6.00
ACTIVATE Raster 4
EDIT >>> Repeat Drop Shadow
ACTIVATE Raster 2
EDIT >>> Repeat Drop Shadow
Repeat Drop Shadow effect changing
Vertical & Horizontal Offsets to - ( minus ) 5
ACTIVATE Raster 4
EDIT >>> Repeat Drop Shadow
ACTIVATE Raster 5
EDIT >>> Repeat Drop Shadow
, |
|
STEP 19
ACTIVATE Raster 3
EFFECTS >>> 3D EFFECTS >>> DROP SHADOW
Vertical & Horizontal offsets = 6
Colour = Black
Opacity = 70
Blur = 15.00
Repeat Drop Shadow effect changing
Vertical & Horizontal Offsets to - ( minus ) 6
LAYERS >>> MERGE >>> MERGE VISIBLE
SAVE YOUR WORK |
|
STEP 20
In your MATERIALS PALETTE
Load MID BLUE " #688fc8 " in your foreground
Load LIGHT BLUE " #bfd0ec " in your background
LAYERS >>> NEW RASTER LAYER
SELECTIONS >>> SELECT ALL
Flood fill with MID BLUE
SELECTIONS >>> MODIFY >>> CONTRACT = 3
EDIT >>> CLEAR
Flood fill with LIGHT BLUE
SELECTIONS >>> MODIFY >>> CONTRACT = 5
EDIT >>> CLEAR
Flood fill with MID BLUE
SELECTIONS >>> MODIFY >>> CONTRACT = 3
EDIT >>> CLEAR
DESELECT, |
|
STEP 21
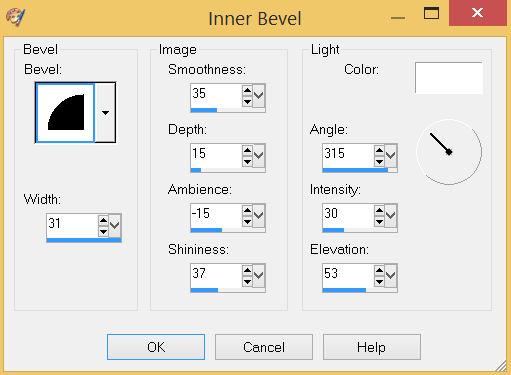
EFFECTS >>> 3D EFFECTS >>> INNER BEVEL

ADJUST >>> SHARPNESS >>> SHARPEN MORE, |
STEP 22
LAYERS >>> DUPLICATE
IMAGE >>> RESIZE = 98%
Check "Lock aspect ratio."
Ensure "Resize all layers" is UNCHECKED
Resample using WEIGHTED AVERAGE
LAYERS >>> MERGE >>> MERGE DOWN
Repeat BOTH Drop Shadows
LAYERS >>> MERGE >>> MERGE VISIBLE
Save as .pspimage image
|
|
STEP 23
Open up the 544Papp image in your PSP workspace
Right click on the Title Bar and select COPY from the options
Right click on the Title Bar of your frame image
and select PASTE AS NEW LAYER from the options.
LAYERS >>> ARRANGE >>> MOVE DOWN
LAYERS >>> MERGE >>> MERGE VISIBLE |
|
STEP 24
LAYERS >>> NEW RASTER LAYER
Select your TEXT tool
and with a font of your choice add your name, |
|
STEP 25
LAYERS >>> MERGE >>> MERGE ALL (Flatten)
Save as .jpg image
, |
| |
|
| |
|