.
|
STEP 1
Open a new image 800 x 600
Transparent background
PSPX - X2: Colour Depth RGB = 8bits/channel
PSPX3-PSP2019: Colour Depth RGB = 8bits/channel
SELECTIONS >>> SELECT ALL
Open up the abstract-pixels-background image in your PSP workspace
Right click on the Title Bar and select COPY from the options
Right click on the Title Bar of your tag image
and select PASTE INTO SELECTION from the options.
DESELECT
,
|
STEP 2
EFFECTS >>> REFLECTION EFFECTS >>> ROTATING MIRROR
Horizontal Offset = 0
Vertical Offset = n/a
Rotation angle = 0
Edge Mode = Reflect
SAVE YOUR WORK
|
|
|
|
STEP 4
Open up the cartoon-scene-02 image in your PSP workspace
Right click on the Title Bar and select COPY from the options
Right click on the Title Bar of your tag image
and select PASTE AS NEW LAYER from the options
IMAGE >>> RESIZE = 80%
Ensure "Resize all layers" is UNCHECKED
Resample using WEIGHTED AVERAGE
Check "Lock aspect ratio"
. |
|
STEP 5
VIEW >>> RULERS
Select your RASTER DEFORM tool
Mode = SCALE
use default settings
PSPX-PSP2019: Select your PICK tool
Move the centre top node up to the 0 pixel mark
on your left ruler

Click the RESET RECTANGLE arrow
Select your MOVER tool to disengage
the Deformation / Pick tool
, |
STEP 6
In your LAYER PALETTE change the
BLEND MODE to MULTIPLY
SAVE YOUR WORK
|
|
STEP 7
Open up the shelf image in your PSP workspace
Choose your SELECTION TOOL
Selection Type = Rectangle
Mode = Replace
Feather = 0
Antialias = UNChecked
Select the top shelf
,
|
STEP 8
Right click on the Title Bar and select COPY from the options
Right click on the Title Bar of your tag image
and select PASTE AS NEW LAYER from the options.
EFFECTS >>> IMAGE EFFECTS >>> OFFSET
Horizontal Offset = 0
Vertical Offset = - ( minus ) 230
Edge Mode = Transparent
Select your RASTER DEFORM tool
Mode = SCALE
use default settings
PSPX-PSP2019: Select your PICK tool
Move the centre left node level with the 50 pixel mark on your top ruler
Move the centre right node level with the 750 pixel mark on your top ruler

Click the RESET RECTANGLE arrow
Select your MOVER tool to disengage
the Deformation / Pick tool
SAVE YOUR WORK
, |
STEP 9
Open up the hammock image in your PSP workspace
Right click on the Title Bar and select COPY from the options
Right click on the Title Bar of your tag image
and select PASTE AS NEW LAYER from the options
PSP9 - PSP2019: ADJUST >>> BRIGHTNESS and CONTRAST >>> BRIGHTNESS/CONTRAST
Brightness = 45
Contrast = 15
PSPX6 - PSP2019: Linear Mode checked
EFFECTS >>> IMAGE EFFECTS >>> OFFSET
Horizontal Offset = 0
Vertical Offset = 130
Edge Mode = Transparent |
|
STEP 10
Open up the floored-ii-poster image in your PSP workspace
Choose your SELECTION TOOL... Same setting
Select the girl second from the left
Right click on the Title Bar and select COPY from the options
Right click on the Title Bar of your tag image
and select PASTE AS NEW LAYER from the options
IMAGE >>> RESIZE = 70%
Ensure "Resize all layers" is UNCHECKED
Resample using WEIGHTED AVERAGE
Check "Lock aspect ratio"
ADJUST >>> SHARPNESS >>> SHARPEN
EFFECTS >>> IMAGE EFFECTS >>> OFFSET
Horizontal Offset = 40
Vertical Offset = 105
Edge Mode = Transparent
SAVE YOUR WORK
|
|
STEP 11
LAYERS >>> NEW RASTER LAYER
SELECTIONS >>> SELECT ALL
Flood fill with PURPLE #0000ff
SELECTIONS >>> MODIFY >>> CONTRACT = 4
EDIT >>> CLEAR
Flood fill with BLUE #80a4ff
SELECTIONS >>> MODIFY >>> CONTRACT = 8
EDIT >>> CLEAR
Flood fill with PURPLE #0000ff
SELECTIONS >>> MODIFY >>> CONTRACT = 4
EDIT >>> CLEAR
DESELECT |
|
STEP 12
With your MAGIC WAND
Mode = Replace
Match Mode = RGB Value
Tolerance = 0
Feather = 0
Anti-alias = UNchecked
Sample Merged = UNCHECKED
PSP9 - PSP2019: Check CONTIGUOUS
PSPX - PSP2019: There is no " Sample Merged"
PSP9 - PSP2019: Use all layers = UNChecked
Select the BLUE border
EFFECTS >>> 3D EFFECTS >>> INNER BEVEL
COLOUR = #ece6dc
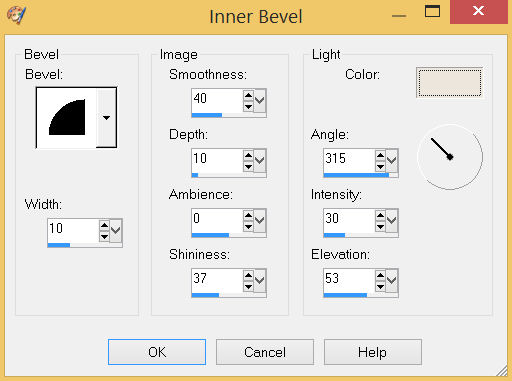
ADJUST >>> SHARPNESS >>> SHARPEN MORE
DESELECT
LAYERS >>> DUPLICATE
IMAGE >>> RESIZE = 97%
Ensure "Resize all layers" is UNCHECKED
Resample using WEIGHTED AVERAGE
Check "Lock aspect ratio"
LAYERS >>> MERGE >>> MERGE DOWN

, |
STEP 13
EFFECTS >>> 3D EFFECTS >>> DROP SHADOW
Vertical & Horizontal offsets = 4
Colour = Black
Opacity = 75
Blur = 10.00
Repeat Drop Shadow effect changing
Vertical & Horizontal Offsets to - ( minus ) 4
LAYERS >> NEW RASTER LAYER
Select your TEXT TOOL
with font and settings of your choice
add your name
LAYERS >>> MERGE >>> MERGE VISIBLE
SAVE YOUR WORK
|
|
NOTE
The next instructions are to show you how to place the following images when doing the animation.
. |
STEP 14
Open up the Time-Machines image in your PSP workspace
Activate the YELLOW layer
Right click on the Title Bar and select COPY from the options
Right click on the Title Bar of your tag image
and select PASTE AS NEW LAYER from the options.
Reposition with your MOVER tool
Rename this layer YELLOW
|
|
STEP 15
Back to the Time-Machines image in your PSP workspace
Activate the BLACK layer
Right click on the Title Bar and select COPY from the options
Right click on the Title Bar of your tag image
and select PASTE AS NEW LAYER from the options.
Reposition with your MOVER tool
Rename this layer BLACK |
|
STEP 16
Back to the Time-Machines image in your PSP workspace
Activate the RED layer
Right click on the Title Bar and select COPY from the options
Right click on the Title Bar of your tag image
and select PASTE AS NEW LAYER from the options.
Reposition with your MOVER tool
Rename this layer RED |
|
STEP 17
Back to the Time-Machines image in your PSP workspace
Activate the BLUE layer
Right click on the Title Bar and select COPY from the options
Right click on the Title Bar of your tag image
and select PASTE AS NEW LAYER from the options.
Reposition with your MOVER tool
Rename this layer BLUE |
|
STEP 18
Back to the Time-Machines image in your PSP workspace
Activate the GREEN layer
Right click on the Title Bar and select COPY from the options
Right click on the Title Bar of your tag image
and select PASTE AS NEW LAYER from the options.
Reposition with your MOVER tool
Rename this layer GREEN
SAVE YOUR WORK |
|
|
TIP
Right click on Title Bar and select Copy Merged from the options
In ANIMATION SHOP
Right click the workspace and select 'Paste As New Animation' from the options
and minimize until it is time to place the whirligigs into your background frames
so you can check placement
.
|
STEP 19
In PSP
ACTIVATE the Merged layer
Right click on Title Bar and select
Copy from the options
In ANIMATION SHOP
Right click the workspace and select
'Paste As New Animation' from the options.
Select >>>
'Paste After Current' icon on top menu

Click 9 times so you have 10 frames in total.

Minimize Background frames for now. |
STEP 20
Back to PSP
ACTIVATE the YELLOW layer on your tag image
Right click on Title Bar and select Copy from the options
In ANIMATION SHOP
Right click the workspace and select 'Paste As New Animation' from the options.
Select >>>
'Paste After Current' icon on top menu

Click 1 time so you have 2 frames in total.
Click on frame 1 (F:1) to activate
Effects >> Insert Image Effect >>> ROTATE
Click the CUSTOMIZE button and enter these settings
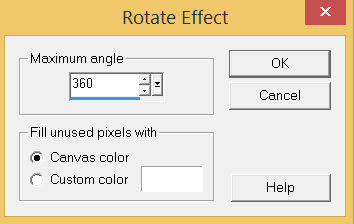
Click OK
ENTER these settings
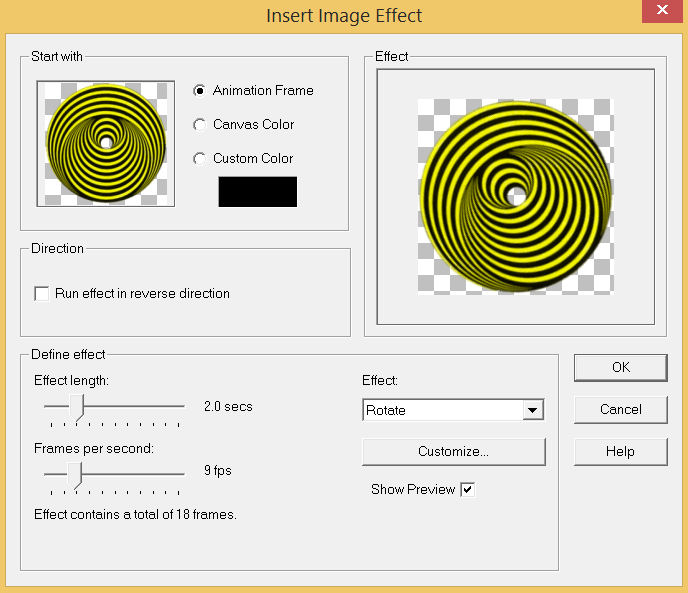
Click OK
Animation >> Cull Animation
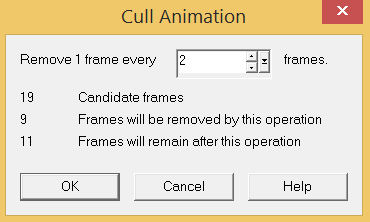
Right click inside the first frame
( F:1) and select DELETE from the options
Minimize for now.
|
STEP 21
Back to PSP
ACTIVATE the BLACK layer on your tag image
Right click on Title Bar and select Copy from the options
In ANIMATION SHOP
Right click the workspace and select 'Paste As New Animation' from the options.
Select >>> 'Paste After Current' icon on top menu,
Click 1 time so you have 2 frames in total.
Click on frame 1 (F:1) to activate
Effects >> Insert Image Effect >>> ROTATE
Same settings
Click OK
Animation >> Cull Animation >>> Same settings
Right click inside the first frame ( F:1) and select DELETE from the options
Minimize for now. |
STEP 22
Repeat STEP 21 for the remaining RED, BLUE and GREEN layers,
|
STEP 23
Maximize Background frames
Edit >> Select All
Maximize YELLOW frames
Edit >> Select All
Edit >> Copy
Edit >> Propagate Paste
ACTIVATE Background frames
ZOOM IN on frame 1 (F:1)
Edit >> Paste into selected frame
Place at right hand side as shown below an click your mouse to set the image.
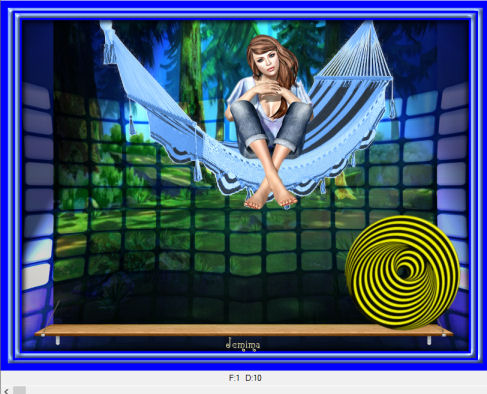
Minimize YELLOW frames |
STEP 24
Maximize BLACK frames
Edit >> Select All
Edit >> Copy
Edit >> Propagate Paste
ACTIVATE Background frames
ZOOM IN on frame 1 (F:1)
Edit >> Paste into selected frame
Place at right hand side as shown below and click your mouse to set the image,
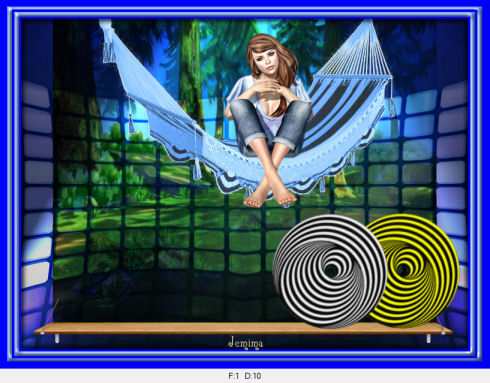
Minimize BLACK frames |
STEP 25
Maximize RED frames
Edit >> Select All
Edit >> Copy
Edit >> Propagate Paste
ACTIVATE Background frames
ZOOM IN on frame 1 (F:1)
Edit >> Paste into selected frame
Place at right hand side as shown below and click your mouse to set the image,
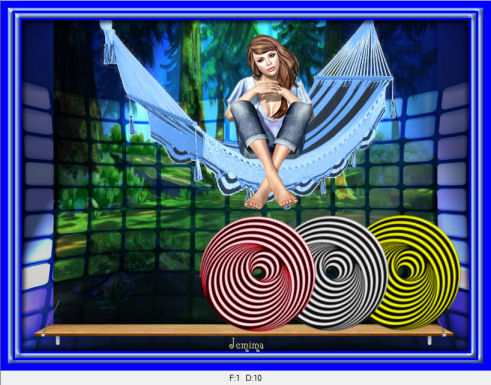
Minimize RED frames |
STEP 26
Maximize BLUE frames
Edit >> Select All
Edit >> Copy
Edit >> Propagate Paste
ACTIVATE Background frames
ZOOM IN on frame 1 (F:1)
Edit >> Paste into selected frame
Place at right hand side as shown below and click your mouse to set the image,
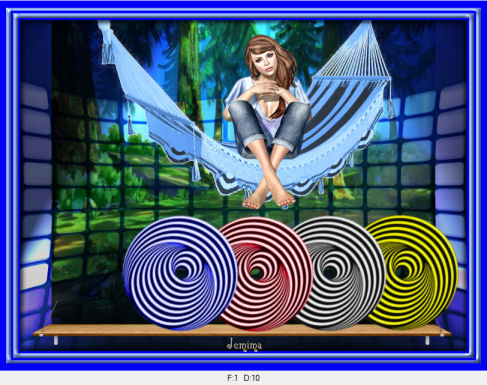
Minimize BLUE frames |
STEP 27
Maximize GREEN frames
Edit >> Select All
Edit >> Copy
Edit >> Propagate Paste
ACTIVATE Background frames
ZOOM IN on frame 1 (F:1)
Edit >> Paste into selected frame
Place at right hand side as shown below and click your mouse to set the image,
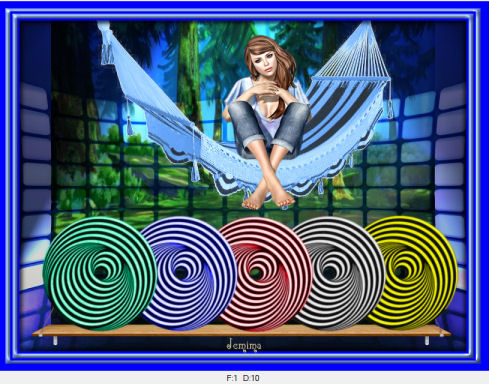
Minimize GREEN frames, |
STEP 28
View >> Animation
and while it is still running,
File >> Save As
Locate the folder in which you wish to save it.
Name your animation.
With the Gif Optimiser keep pressing NEXT
until you get to the last one... click FINISH
Close the Animation
Close ALL the frames.
Close Animation Shop, |
| |
|
| |
|