COLOURS USED

|
STEP 1
Open up the wallpaper361c image in your PSP workspace.
WINDOW >>> DUPLICATE
Close the original Image
LAYERS >>> Promote background layer
ADJUST >>> BRIGHTNESS and CONTRAST >>> BRIGHTNESS/CONTRAST
Brightness = 80
Contrast = 64
PSPX6-PSP2019: Linear Mode checked
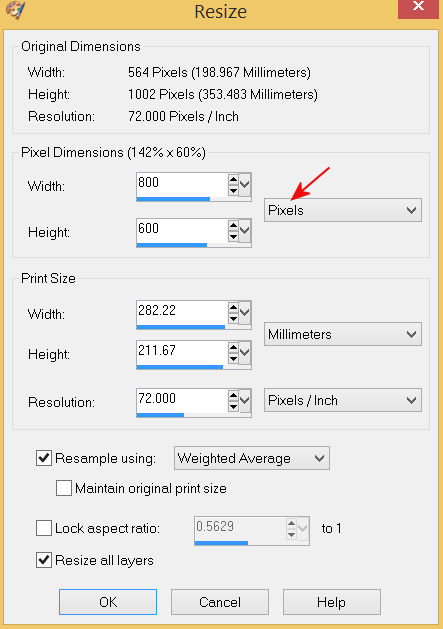
IMAGE >>> RESIZE

|
STEP 2
PSP9 - PSPX3: IMAGE >>> FLIP
PSPX4 - PSPX8: Use script available for download at top of page.
(Higher versions follow your version's method) .
EFFECTS >>> PLUGINS >>> Mirror Rave >>> Quadrant Flip
|
|
STEP 3
LAYERS >>> DUPLICATE
IMAGE >>> RESIZE = 85%
Check "Lock aspect ratio."
Ensure "Resize all layers" is UNCHECKED
Resample using WEIGHTED AVERAGE
ADJUST >>> SHARPNESS >>> SHARPEN
LAYERS >>> DUPLICATE
PSP9: IMAGE >>> ROTATE >>> FREE ROTATE = RIGHT 90
Ensure "All layers" is UNCHECKED
PSPX - PSP2019: IMAGE >>> FREE ROTATE = RIGHT 90
Ensure "All layers" is UNCHECKED
|
|
STEP 4
IMAGE >>> RESIZE = 75%
Check "Lock aspect ratio."
Ensure "Resize all layers" is UNCHECKED
Resample using WEIGHTED AVERAGE
EFFECTS >>> DISTORTION EFFECTS >>> PUNCH
Strength = 100%
|
|
STEP 5
VIEW >>> RULERS
Select your RASTER DEFORM tool
Mode = SCALE
use default settings
PSPX - PSP2019:Select your PICK tool
Move the centre top node down level with the 45 pixel mark on your left ruler
Move the centre left node level with the 110 pixel mark on your top ruler
Move the centre right node level with the 690 pixel mark on your top ruler

Move the centre bottom node up level with the 555 pixel mark on your left ruler

SAVE YOUR WORK
|
STEP 6
ACTIVATE Copy of Raster 1
EFFECTS >>> DISTORTION EFFECTS >>> PIXELATE
Block Width = 10
Block Height = 10
Symmetric = Checked
EFFECTS >>> EDGE EFFECTS >>> ENHANCE
|
|
STEP 7
EFFECTS >>> 3D EFFECTS >>> DROP SHADOW
Vertical & Horizontal offsets = 6
Colour = Black
Opacity = 85
Blur = 15.00
ACTIVATE Copy (2) of Raster 1
EDIT >>> Repeat Drop Shadow
Repeat Drop Shadow effect changing
Vertical & Horizontal Offsets to - ( minus ) 6
ACTIVATE Copy of Raster 1
EDIT >>> Repeat Drop Shadow
SAVE YOUR WORK
|
|
STEP 8
LAYERS >>> NEW RASTER LAYER
SELECTIONS >>> SELECT ALL
Flood fill with DARK GREY #4a4a4a
SELECTIONS >>> MODIFY >>> CONTRACT = 5
EDIT >>> CLEAR
Flood fill with RED #ed0f0f
SELECTIONS >>> MODIFY >>> CONTRACT = 8
EDIT >>> CLEAR
Flood fill with DARK GREY #4a4a4a
SELECTIONS >>> MODIFY >>> CONTRACT = 5
EDIT >>> CLEAR
DESELECT
With your MAGIC WAND
Mode = Replace
Match Mode = RGB Value
Tolerance = 0
Feather = 0
Antialias = UNchecked
Sample Merged = UNCHECKED
PSP9 - PSP2019: Check CONTIGUOUS
PSPX - PSP2019: There is no " Sample Merged"
PSP9 - PSP2019: Use all layers = UNChecked
Select the RED area indicated |
|
STEP 9
EFFECTS >>> 3D EFFECTS >>> INNER BEVEL

EFFECTS >>> EDGE EFFECTS >>> ENHANCE,
|
STEP 10
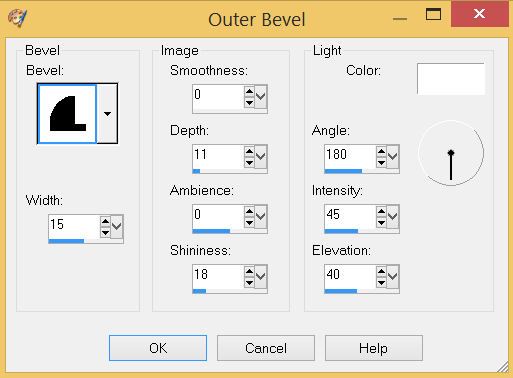
EFFECTS >>> 3D EFFECTS >>> OUTER BEVEL
 , ,
ADJUST >>> SHARPNESS >>> SHARPEN MORE
EDIT >>> Repeat Sharpen More
DESELECT

SAVE YOUR WORK
|
STEP 11
EFFECTS >>> 3D EFFECTS >>> DROP SHADOW
Vertical & Horizontal offsets = 6
Colour = Black
Opacity = 85
Blur = 15.00
Repeat Drop Shadow effect changing
Vertical & Horizontal Offsets to - ( minus ) 6
LAYERS >>> MERGE >>> MERGE VISIBLE
ADJUST >>> SHARPNESS >>> SHARPEN
|
|
STEP 12
Open up the ScrollCorner image in your PSP workspace
Right click on the Title Bar and select COPY from the options
Right click on the Title Bar of your tag image
and select PASTE AS NEW LAYER from the options.
PSP9 - PSPX3: IMAGE >>> FLIP
PSPX4 - PSPX8: Use script available for download at top of page.
(Higher versions follow your version's method)
IMAGE >>> RESIZE = 60%
Check "Lock aspect ratio."
Ensure "Resize all layers" is UNCHECKED
Resample using WEIGHTED AVERAGE
ADJUST >>> SHARPNESS >>> SHARPEN
EFFECTS >>> IMAGE EFFECTS >>> OFFSET
Horizontal Offset = - ( minus ) 280
Vertical Offset = 190
Edge Mode = Transparent |
|
STEP 13
EFFECTS >>> PLUGINS >>> SIMPLE >>> TOP LEFT MIRROR
, |
|
STEP 14
EFFECTS >>> 3D EFFECTS >>> DROP SHADOW
Vertical & Horizontal offsets = 4
Colour = WHITE
Opacity = 100
Blur = 0.00
LAYERS >>> MERGE >>> MERGE VISIBLE
SAVE YOUR WORK
, |
|
STEP 15
Open up the naivete-183 image in your PSP workspace
WINDOW >>> DUPLICATE
Close the original Image
LAYERS >>> Promote background layer
Open up the JF_Element_66 image in your PSP workspace
Right click on the Title Bar and select COPY from the options
Right click on the Title Bar of your tag image
and select PASTE AS NEW LAYER from the options.
With your MAGIC WAND
Mode = Replace
Match Mode = RGB Value
Tolerance = 10
Feather = 4
Antialias = Checked
Sample Merged = UNCHECKED
PSP9 - PSP2019: Check CONTIGUOUS
PSPX - PSP2019: There is no " Sample Merged"
PSP9 - PSP2019: Use all layers = UNChecked
PSP9 - PSP2019: ANTIALIAS = Outside
Select the OUTER area indicated |
|
STEP 16
SELECTIONS >>> MODIFY >>> EXPAND = 8
SELECTIONS >>> INVERT
ACTIVATE Raster 1
Right click on the Title Bar and select COPY from the options
Right click on the Title Bar of your tag image
and select PASTE AS NEW LAYER from the options.
LAYERS >>> MERGE >>> MERGE VISIBLE |
|
STEP 17
LAYERS >>> NEW RASTER LAYER
SELECT your TEXT tool
With a font of your choice add your name
, |
|
STEP 18
LAYERS >>> MERGE >>> MERGE ALL (Flatten)
Save as .jpg image
, |
| |
|
| |
|