STEP 1
In your MATERIALS PALETTE
Load LIGHT GREEN ' #b1ccbd ' in your foreground
Load MID GREEN ' #8ca28c ' in your background
Select the 'gradient' option on your foreground,
locate the 'Foreground-background' gradient
and use these settings. .
|
|
STEP 2
Open a new image 800 x 600
Transparent background
PSP9: Colour Depth = 16 Million Colors (24bit)
PSPX - PSP2019: Colour Depth RGB = 8bits/channel
Flood fill with GRADIENT
EFFECTS >>> PLUGINS >>> Filter Factory Gallery Q >>> Mosaic
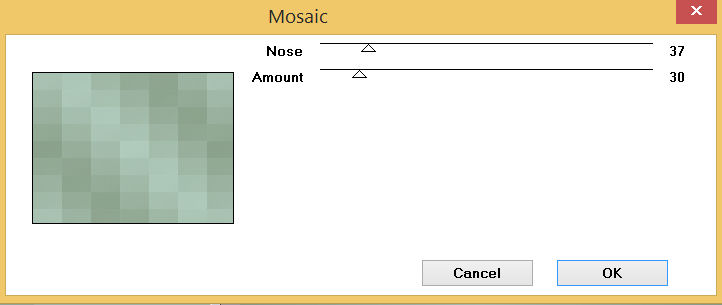
, |
STEP 3
EFFECTS >>> EDGE EFFECTS >>> ENHANCE MORE
EFFECTS >>> REFLECTION EFFECTS >>> ROTATING MIRROR
Horizontal Offset = 0
Vertical Offset = n/a
Rotation Angle = 180
Edge Mode = Reflect
ADJUST >>> BRIGHTNESS and CONTRAST >>> BRIGHTNESS/CONTRAST
Brightness = - (minus) 30
Contrast = 15
PSPX6-PSP2019: Linear mode checked
EFFECTS >>> ARTISTIC EFFECTS >>> ENAMEL
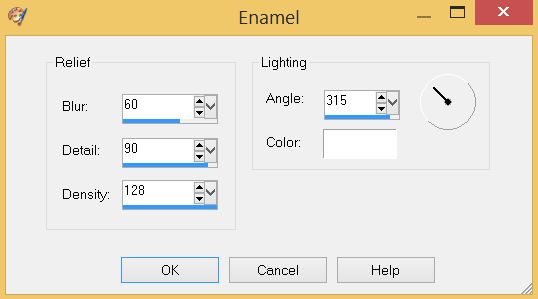
SAVE YOUR WORK |
STEP 4
EFFECTS >>> PLUGINS >>> Mirror Rave >>> Quadrant Flip |
|
STEP 5
LAYERS >>> DUPLICATE
EFFECTS >>> DISTORTION EFFECTS >>> PIXELATE
Block width = 50
Block height = 50
Symmetric = Checked
IMAGE >>> RESIZE = 90%
Check "Lock aspect ratio."
Ensure "Resize all layers" is UNCHECKED
Resample using WEIGHTED AVERAGE
CLOSE Raster 1 |
|
STEP 6
With your MAGIC WAND
Mode = Replace
Match Mode = RGB Value
Tolerance = 0
Feather = 0
Antialias = UNchecked
Sample Merged = UNCHECKED
PSP9 - PSP2019: Check CONTIGUOUS
PSPX - PSP2019: There is no " Sample Merged"
PSP9 - PSP2019: Use all layers = UNChecked
Select the OUTER transparent area
SELECTIONS >>> INVERT
LAYERS >>> NEW RASTER LAYER
, |
|
STEP 7
EFFECTS >>> 3D EFFECTS >>> BUTTONIZE
Colour = #8ca28c
Height = 7
Width = 7
Opacity = 100
Edge = Solid
SELECTIONS >>> MODIFY >>> CONTRACT = 7
EFFECTS >>> 3D EFFECTS >>> BUTTONIZE
Same settings
DESELECT
EFFECTS >>> PLUGINS >>> Mirror Rave >>> Quadrant Flip
Same settings
ADJUST >>> SHARPNESS >>> SHARPEN MORE
SAVE YOUR WORK
|
|
STEP 8
EFFECTS >>> GEOMETRIC EFFECTS >>> Perspective Vertical
Distortion - 40
Edge Mode = Transparent
LAYERS >>> DUPLICATE
PSP9 - PSPX3: IMAGE >>> FLIP
PSPX4 - PSPX8: Use script available for download at top of page.
(Higher versions follow your version's method) |
|
STEP 9
ACTIVATE Copy of Raster 1
EFFECTS >>> GEOMETRIC EFFECTS >>> Perspective Vertical
Same settings
LAYERS >>> DUPLICATE
PSP9 - PSPX3: IMAGE >>> FLIP
PSPX4 - PSPX8: Use script available for download at top of page.
(Higher versions follow your version's method)
LAYERS >>> ARRANGE >>> MOVE UP
|
|
STEP 10
EFFECTS >>> 3D EFFECTS >>> DROP SHADOW
Vertical & Horizontal offsets = 5
Colour = Black
Opacity = 75
Blur = 15.00
ACTIVATE Copy of Raster 1
EDIT >>> Repeat Drop Shadow
EFFECTS >>> 3D EFFECTS >>> DROP SHADOW
Vertical & Horizontal offsets = - ( minus ) 5
Colour = Black
Opacity = 75
Blur = 15.00
ACTIVATE Copy (2) of Raster 1
EDIT >>> Repeat Drop Shadow
OPEN Raster 1 |
|
STEP 11
ACTIVATE Copy of Raster 2
IMAGE >>> RESIZE = 97%
Check "Lock aspect ratio."
Ensure "Resize all layers" is UNCHECKED
Resample using WEIGHTED AVERAGE
ACTIVATE Copy (2) of Raster 1
EDIT >>> Repeat Resize
ACTIVATE Raster 2
EDIT >>> Repeat Resize
ACTIVATE Copy of Raster 1
EDIT >>> Repeat Resize
SAVE YOUR WORK |
|
STEP 12
EFFECTS >>> EDGE EFFECTS >>> ENHANCE
EDIT >>> Repeat Enhance Edges
ACTIVATE Copy (2) of Raster 1
EDIT >>> Repeat Enhance Edges
EDIT >>> Repeat Enhance Edges
ACTIVATE Raster 1
EFFECTS >>> ARTISTIC EFFECTS >>> HALF TONE
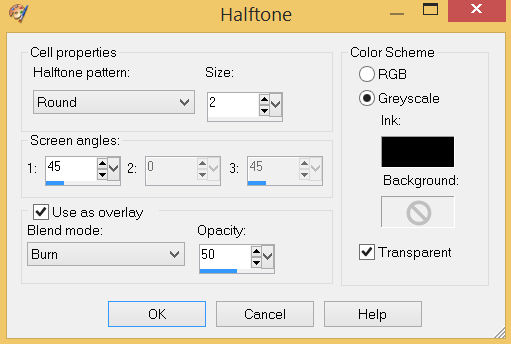
 , , |
STEP 13
CLOSE Copy of Raster 2 and Copy (2) of Raster 1
ACTIVATE Raster 2
Open up the pearl elements image in your PSP workspace
Activate Layer 3
Right click on the Title Bar and select COPY from the options
Right click on the Title Bar of your frame image
and select PASTE AS NEW LAYER from the options.
EFFECTS >>> IMAGE EFFECTS >>> OFFSET
Horizontal Offset = 280
Vertical Offset = 185
Edge Mode = Transparent
LAYERS >>> DUPLICATE
PSP9 - PSPX3: IMAGE >>> MIRROR
PSPX4 - PSPX8: Use script available for download at top of page.
(Higher versions follow your version's method)
LAYERS >>> MERGE >>> MERGE DOWN
EFFECTS >>> 3D EFFECTS >>> DROP SHADOW
Vertical & Horizontal offsets = 5
Colour = Black
Opacity = 75
Blur = 15.00

,
|
STEP 14
OPEN Copy (2) of Raster 1
OPEN & ACTIVATE Copy of Raster 2
Back to the pearl elements image in your PSP workspace
Activate Layer 1
Right click on the Title Bar and select COPY from the options
Right click on the Title Bar of your frame image
and select PASTE AS NEW LAYER from the options.
EFFECTS >>> IMAGE EFFECTS >>> OFFSET
Horizontal Offset = 220
Vertical Offset = - ( minus ) 114
Edge Mode = Transparent
LAYERS >>> DUPLICATE
PSP9 - PSPX3: IMAGE >>> MIRROR
PSPX4 - PSPX8: Use script available for download at top of page.
(Higher versions follow your version's method)
LAYERS >>> MERGE >>> MERGE DOWN
EFFECTS >>> 3D EFFECTS >>> DROP SHADOW
Same settings
SAVE YOUR WORK

, |
STEP 15
Back to the pearl elements image in your PSP workspace
Activate Layer 2
Right click on the Title Bar and select COPY from the options
Right click on the Title Bar of your frame image
and select PASTE AS NEW LAYER from the options.
EFFECTS >>> IMAGE EFFECTS >>> OFFSET
Horizontal Offset = 163
Vertical Offset = 207
Edge Mode = Transparent
LAYERS >>> DUPLICATE
PSP9 - PSPX3: IMAGE >>> MIRROR
PSPX4 - PSPX8: Use script available for download at top of page.
(Higher versions follow your version's method)
LAYERS >>> MERGE >>> MERGE DOWN
EFFECTS >>> 3D EFFECTS >>> DROP SHADOW
Same settings
SAVE YOUR WORK

.
|
STEP 16
Back to the pearl elements image in your PSP workspace
Activate Layer 4
Right click on the Title Bar and select COPY from the options
Right click on the Title Bar of your frame image
and select PASTE AS NEW LAYER from the options.
EFFECTS >>> IMAGE EFFECTS >>> OFFSET
Horizontal Offset = 330
Vertical Offset = - ( minus ) 20
Edge Mode = Transparent
LAYERS >>> DUPLICATE
LAYERS >>> MERGE >>> MERGE DOWN
LAYERS >>> DUPLICATE
PSP9 - PSPX3: IMAGE >>> MIRROR
PSPX4 - PSPX8: Use script available for download at top of page.
(Higher versions follow your version's method)
LAYERS >>> MERGE >>> MERGE DOWN
EFFECTS >>> 3D EFFECTS >>> DROP SHADOW
Same settings
LAYERS >>> ARRANGE >>> SEND TO BOTTOM
LAYERS >>> ARRANGE >>> MOVE UP
SAVE YOUR WORK
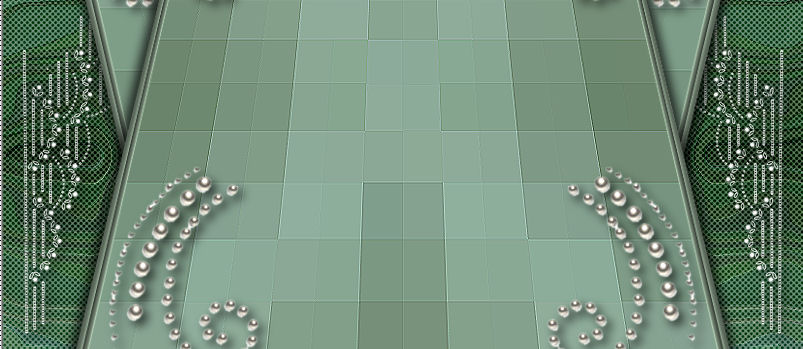
, |
STEP 17
LAYERS >>> NEW RASTER LAYER
SELECTIONS >>> SELECT ALL
Flood fill with MID GREEN #8ca28c
SELECTIONS >>> MODIFY >>> CONTRACT = 5
EDIT >>> CLEAR
Flood fill with LIGHT GREEN #b1ccbd
SELECTIONS >>> MODIFY >>> CONTRACT = 5
EDIT >>> CLEAR
DESELECT
,
|
STEP 18
EFFECTS >>> 3D EFFECTS >>> INNER BEVEL,
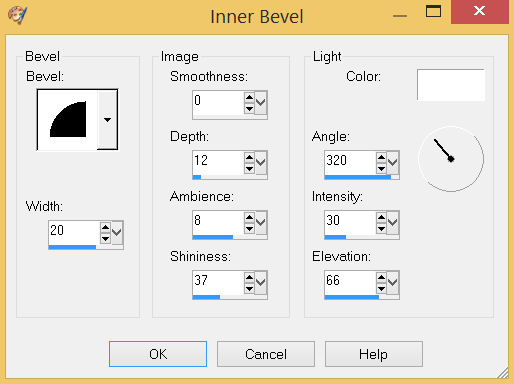
|
STEP 19
EFFECTS >>> 3D EFFECTS >>> DROP SHADOW
Vertical & Horizontal offsets = 5
Colour = Black
Opacity = 75
Blur = 15.00
Repeat Drop Shadow effect changing
Vertical & Horizontal Offsets to - ( minus ) 5
Click OK, |
|
STEP 20
LAYERS >>> MERGE >>> MERGE VISIBLE
Open up the circular frame image in your PSP workspace
Right click on the Title Bar and select COPY from the options
Right click on the Title Bar of your frame image
and select PASTE AS NEW LAYER from the options.
IMAGE >>> RESIZE = 82%
Check "Lock aspect ratio."
Ensure "Resize all layers" is UNCHECKED
Resample using WEIGHTED AVERAGE
ADJUST >>> SHARPNESS >>> SHARPEN
, |
STEP 21
EFFECTS >>> IMAGE EFFECTS >>> OFFSET
Horizontal Offset = 0
Vertical Offset = 20
Edge Mode = Transparent
With your MAGIC WAND.... Same settings.
Select the CENTRE of your image
SELECTIONS >>> MODIFY >>> EXPAND = 10 |
|
STEP 22
ACTIVATE the Merged layer
EDIT >>> CLEAR
DESELECT
ACTIVATE Raster 1
Repeat BOTH Drop Shadows,
|
|
STEP 23
LAYERS >>> MERGE >>> MERGE VISIBLE
Save as .pspimage image
,
|
STEP 24
Open up the day_spring_by_miavka_athens image in your PSP workspace
Right click on the Title Bar and select COPY from the options
Right click on the Title Bar of your frame image
and select PASTE AS NEW LAYER from the options.
IMAGE >>> RESIZE = 40%
Check "Lock aspect ratio."
Ensure "Resize all layers" is UNCHECKED
Resample using WEIGHTED AVERAGE
ADJUST >>> SHARPNESS >>> SHARPEN
LAYERS >>> ARRANGE >>> MOVE DOWN
LAYERS >>> MERGE >>> MERGE VISIBLE, |
|
STEP 25
LAYERS >>> NEW RASTER LAYER
Select your TEXT tool
and with a font of your choice add your name
, |
|
STEP 26
LAYERS >>> MERGE >>> MERGE ALL (Flatten)
Save as .jpg image
, |
| |
|
| |
|