STEP 1
Open a new image 800 x 600
Transparent background
PSP9: Colour Depth = 16 Million Colors (24bit)
PSPX - PSP2019: Colour Depth RGB = 8bits/channel
SELECTIONS >>> SELECT ALL
Open up the wallpaper-32ca image in your PSP workspace
Right click on the Title Bar and select COPY from the options
Right click on the Title Bar of your frame image
and select PASTE INTO SELECTION from the options.
DESELECT
.
|
STEP 2
EFFECTS >>> REFLECTION EFFECTS >>> ROTATING MIRROR
Horizontal Offset = 0
Vertical Offset = n/a
Rotation Angle = 0
Edge Mode = Reflect
LAYERS >>> DUPLICATE
EFFECTS >>> GEOMETRIC EFFECTS >>> CIRCLE
Edge Mode = Transparent
PSP9: IMAGE >>> ROTATE >>> FREE ROTATE = LEFT 90
Ensure "All layers" is UNCHECKED
PSPX - PSP2019: IMAGE >>> FREE ROTATE = LEFT 90
Ensure "All layers" is UNCHECKED, |
|
STEP 3
EFFECTS >>> PLUGINS >>> SIMPLE >>> TOP LEFT MIRROR
IMAGE >>> RESIZE = 90%
Check "Lock aspect ratio."
Ensure "Resize all layers" is UNCHECKED
Resample using WEIGHTED AVERAGE
ADJUST >>> SHARPNESS >>> SHARPEN
With your MAGIC WAND
Mode = Replace
Match Mode = RGB Value
Tolerance = 15
Feather = 2
Antialias = UNchecked
Sample Merged = CHECKED
PSP9 - PSP2019: Check CONTIGUOUS
PSPX - PSP2019: There is no " Sample Merged"
PSP9 - PSP2019: Use all layers = UNChecked
PSP9 - PSP2019: ANTIALIAS = Outside
Select the area indicated outside the circle |
|
STEP 4
SELECTIONS >>> INVERT
SELECTIONS >>> MODIFY >>> CONTRACT = 30
EDIT >>> CLEAR
DESELECT
SAVE YOUR WORK |
|
STEP 5
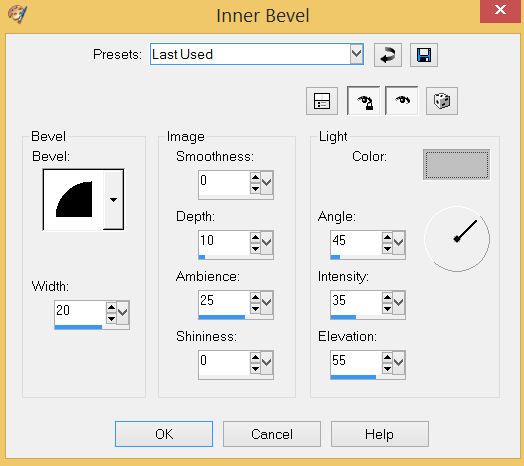
EFFECTS >>> 3D EFFECTS >>> INNER BEVEL
COLOUR = #c0c0c0

, |
STEP 6
LAYERS >>> DUPLICATE
IMAGE >>> RESIZE = 90%
Check "Lock aspect ratio."
Ensure "Resize all layers" is UNCHECKED
Resample using WEIGHTED AVERAGE
ADJUST >>> SHARPNESS >>> SHARPEN
LAYERS >>> MERGE >>> MERGE DOWN
SAVE YOUR WORK |
|
STEP 7
CLOSE Copy of Raster 1
ACTIVATE Raster 1
EFFECTS >>> PLUGINS >>> SIMPLE >>> TOP LEFT MIRROR
|
|
STEP 8
LAYERS >>> DUPLICATE
PSP9: IMAGE >>> ROTATE >>> FREE ROTATE = RIGHT 90
Ensure "All layers" is UNCHECKED
PSPX - PSP2019: IMAGE >>> FREE ROTATE = RIGHT 90
Ensure "All layers" is UNCHECKED
IMAGE >>> RESIZE = 85%
Check "Lock aspect ratio."
Ensure "Resize all layers" is UNCHECKED
Resample using WEIGHTED AVERAGE
ADJUST >>> SHARPNESS >>> SHARPEN |
|
STEP 9
VIEW >>> RULERS
Select your RASTER DEFORM tool
Mode = SCALE
use default settings
PSPX - PSP2019:Select your PICK tool
Pull the bottom edge of your image down
so the nodes are visible. |
|
STEP 10
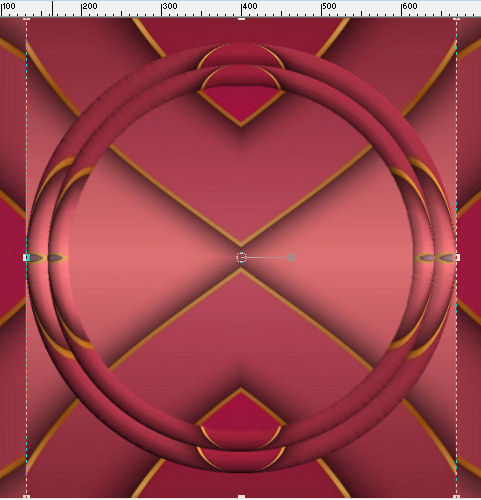
Move the centre top node level with the 0 pixel mark on your left ruler

Move the centre bottom node level with the 600 pixel mark on your left ruler

, |
STEP 11
Move the centre left node level with the 130 pixel mark on your top ruler
Move the centreright node level with the 670 pixel mark on your top ruler

Click the RESET RECTANGLE arrow
OPEN & ACTIVATE THE TOP LAYER (Circle)
Select another tool to disengage the DEFORMATION / PICK TOOL
Rename this layer Copy (2) of Raster 1 and close.(Circle)
SAVE YOUR WORK
,
|
STEP 12
CLOSE Copy of Raster 1
ACTIVATE Raster 1
LAYERS >>> DUPLICATE
Rename this layer Copy (3) of Raster 1
ADJUST >>> BLUR >>> GAUSSIAN BLUR
Radius = 10
IMAGE >>> RESIZE = 90%
Check "Lock aspect ratio."
Ensure "Resize all layers" is UNCHECKED
Resample using WEIGHTED AVERAGE |
|
STEP 13
OPEN ALL LAYERS
ACTIVATE Copy (2) of Raster 1
With your MAGIC WAND
Same settings
Select the CENTRE of your image
SELECTIONS >>> MODIFY >>> EXPAND = 5
, |
|
STEP 14
ACTIVATE Copy of Raster 1
EDIT >>> CLEAR
ACTIVATE Copy of (3) Raster 1
EDIT >>> Repeat Clear
ACTIVATE Raster 1
EDIT >>> Repeat Clear
DESELECT
ACTIVATE Copy of (3) Raster 1
EFFECTS >>> PLUGINS >>> SIMPLE >>> DIAMONDS,
IMAGE >>> RESIZE = 90%
Check "Lock aspect ratio."
Ensure "Resize all layers" is UNCHECKED
Resample using WEIGHTED AVERAGE
|
|
STEP 15
ACTIVATE Copy of Raster 1
With your MAGIC WAND
Same settings
Select the CENTRE of your image
SELECTIONS >>> MODIFY >>> EXPAND = 5
ACTIVATE Copy of (3) Raster 1
EDIT >>> CLEAR
DESELECT
Choose your SELECTION TOOL
On the top menu select 'Create selection from:

SAVE YOUR WORK |
|
STEP 16
In your MATERIALS PALETTE load
ESP Pumpkin gradient in the foreground using these settings
|
|
STEP 17
LAYERS >>> NEW RASTER LAYER,
Flood fill with GRADIENT
SELECTIONS >>> MODIFY >>> CONTRACT = 4
EDIT >>> CLEAR
DESELECT
EFFECTS >>> 3D EFFECTS >>> INNER BEVEL
Same settings
EFFECTS >>> 3D EFFECTS >>> DROP SHADOW
Vertical & Horizontal offsets = 6
Colour = Black
Opacity = 75
Blur = 8.00
Repeat Drop Shadow effect changing
Vertical & Horizontal Offsets to - ( minus ) 6 |
|
STEP 18
ACTIVATE Copy of Raster 1
Choose your SELECTION TOOL
On the top menu select 'Create selection from:
LAYERS >>> NEW RASTER LAYER,
Flood fill with GRADIENT
SELECTIONS >>> MODIFY >>> CONTRACT = 4
EDIT >>> CLEAR
DESELECT
EFFECTS >>> 3D EFFECTS >>> INNER BEVEL
Same settings
Repeat BOTH Drop Shadows
SAVE YOUR WORK
|
|
STEP 19
ACTIVATE Raster 1
LAYERS >>> NEW RASTER LAYER
SELECTIONS >>> SELECT ALL
Flood fill with GRADIENT
SELECTIONS >>> MODIFY >>> CONTRACT = 4
EDIT >>> CLEAR
DESELECT
EFFECTS >>> 3D EFFECTS >>> INNER BEVEL
Same settings
Repeat BOTH Drop Shadows
|
|
STEP 20
ACTIVATE Copy (2) of Raster 1
EFFECTS >>> 3D EFFECTS >>> DROP SHADOW
Vertical & Horizontal offsets = 6
Colour = Black
Opacity = 75
Blur = 8.00
Repeat Drop Shadow effect changing
Vertical & Horizontal Offsets to - ( minus ) 6
LAYERS >>> MERGE >>> MERGE VISIBLE
SAVE YOUR WORK
, |
|
STEP 21
Open up the bells-2980 image in your PSP workspace
Choose your SELECTION TOOL
Selection Type = Rectangle
Mode = Replace
Feather = 0
Antialias = UNChecked
Select one of the bells
Right click on the Title Bar and select COPY from the options
Right click on the Title Bar of your frame image
and select PASTE AS NEW LAYER from the options.
IMAGE >>> RESIZE = 60%
Check "Lock aspect ratio."
Ensure "Resize all layers" is UNCHECKED
Resample using WEIGHTED AVERAGE
ADJUST >>> SHARPNESS >>> SHARPEN
, |
STEP 22
EFFECTS >>> IMAGE EFFECTS >>> OFFSET
Horizontal Offset = 313
Vertical Offset = 50
Edge Mode = Transparent
LAYERS >>> DUPLICATE
PSP9 - PSPX3: IMAGE >>> MIRROR
PSPX4 - PSPX8: Use script available for download at top of page.
(Higher versions follow your version's method)
LAYERS >>> MERGE >>> MERGE DOWN
EFFECTS >>> 3D EFFECTS >>> DROP SHADOW
Vertical & Horizontal offsets = 6
Colour = Black
Opacity = 75
Blur = 8.00
LAYERS >>> MERGE >>> MERGE VISIBLE
Save as .pspimage image |
|
STEP 23
LAYERS >>> NEW RASTER LAYER
Flood fill with GRADIENT
ADJUST >>> HUE & SATURATION >>> COLORIZE
Hue = 164
Saturation = 80
LAYERS >>> ARRANGE >>> MOVE DOWN
|
|
STEP 24
Open up the Tree-3ff76 image in your PSP workspace
Right click on the Title Bar and select COPY from the options
Right click on the Title Bar of your frame image
and select PASTE AS NEW LAYER from the options.
EFFECTS >>> IMAGE EFFECTS >>> OFFSET
Horizontal Offset = - ( minus ) 30
Vertical Offset = 65
Edge Mode = Transparent, |
|
STEP 25
Open up the cover-small image in your PSP workspace
Right click on the Title Bar and select COPY from the options
Right click on the Title Bar of your frame image
and select PASTE AS NEW LAYER from the options.
EFFECTS >>> IMAGE EFFECTS >>> OFFSET
Horizontal Offset = - ( minus ) 25
Vertical Offset = - ( minus ) 35
Edge Mode = Transparent
LAYERS >>> MERGE >>> MERGE VISIBLE |
|
STEP 26
LAYERS >>> NEW RASTER LAYER
Select your TEXT tool
and with a font of your choice add your name
LAYERS >>> MERGE >>> MERGE ALL (Flatten)
Save as .jpg image
, |
| |
|
| |
|