STEP 1
Open a new image 800 x 600
Transparent background
PSP9: Colour Depth = 16 Million Colors (24bit)
PSPX - PSP2019: Colour Depth RGB = 8bits/channel
SELECTIONS >>> SELECT ALL
Open up the abstract-blue-17 image in your PSP workspace
Right click on the Title Bar and select COPY from the options
ight click on the Title Bar of your frame image
and select PASTE INTO SELECTION from the options.
DESELECT
VIEW >>> RULERS
.
|
STEP 2
EFFECTS >>> REFLECTION EFFECTS >>> ROTATING MIRROR
Horizontal Offset = 0
Vertical Offset = n/a
Rotation Angle = 180
Edge Mode = Reflect
LAYERS >>> DUPLICATE
EFFECTS >>> GEOMETRIC EFFECTS >>> CIRCLE
Edge Mode = Transparent
IMAGE >>> RESIZE = 85%
Check "Lock aspect ratio."
Ensure "Resize all layers" is UNCHECKED
Resample using WEIGHTED AVERAGE |
|
STEP 3
ACTIVATE Raster 1
EFFECTS >>> PLUGINS >>> Mirror Rave >>> Quadrant Flip
|
|
STEP 4
ACTIVATE Copy of Raster 1
With your MAGIC WAND
Mode = Replace
Match Mode = RGB Value
Tolerance = 0
Feather = 2
Antialias = Checked
Sample Merged = UNCHECKED
PSP9 - PSP2019: Check CONTIGUOUS
PSPX - PSP2019: There is no " Sample Merged"
PSP9 - PSP2019: Use all layers = UNChecked
PSP9 - PSP2019: ANTIALIAS = Outside
Select the OUTER CIRCLE area
SELECTIONS >>> INVERT |
|
STEP 5
SELECTIONS >>> MODIFY >>> CONTRACT = 25
EDIT >>> CLEAR
DESELECT
SAVE YOUR WORK |
|
STEP 6
ACTIVATE Raster 1
LAYERS >>> DUPLICATE
PSP9: IMAGE >>> ROTATE >>> FREE ROTATE = RIGHT 90
Ensure "All layers" is UNCHECKED
PSPX - PSP2019: IMAGE >>> FREE ROTATE = RIGHT 90
Ensure "All layers" is UNCHECKED
Select your RASTER DEFORM tool
Mode = SCALE
use default settings
PSPX - PSP2019:Select your PICK tool
ZOOM out, then pull the bottom edge of your image down
to reveal the nodes.
, |
|
STEP 7
Move the centre top node down level with the edge of your image.
,Move the centre bottom node up level with the edge of your image. |
|
STEP 8
Click the RESET RECTANGLE arrow
Select another tool to disengage the DEFORMATION / PICK TOOL
CLOSE top Copy of Raster 1 layer
With lower
Copy of Raster 1 layer active
With your MAGIC WAND
Mode = ADD (Shift)
Match Mode = RGB Value
Tolerance = 37 (or higher if necessary for your version of PSP)
Feather = 2
Antialias = Checked
Sample Merged = UNCHECKED
PSP9 - PSP2019: Check CONTIGUOUS
PSPX - PSP2019: There is no " Sample Merged"
PSP9 - PSP2019: Use all layers = UNChecked
PSP9 - PSP2019: ANTIALIAS = Outside
Select the areas indicated |
|
STEP 9
EDIT >>> CLEAR
DESELECT
Choose your FREEHAND SELECTION TOOL
Selection Type = Point to Point
Mode = Replace
Feather = 2
Smoothing = 5
Antialias = Checked
Select the area indicated |
|
STEP 10
EDIT >>> CLEAR
DESELECT
EFFECTS >>> REFLECTION EFFECTS >>> ROTATING MIRROR
Horizontal Offset = 0
Vertical Offset = n/a
Rotation Angle = 180
Edge Mode = Reflect
SAVE YOUR WORK |
|
STEP 11
LAYERS >>> NEW RASTER LAYER
SELECTIONS >>> SELECT ALL
Flood fill with DARK BLUE #0639b7
SELECTIONS >>> MODIFY >>> CONTRACT = 2
EDIT >>> CLEAR
Flood fill with LIGHT BLUE #73d4f5
SELECTIONS >>> MODIFY >>> CONTRACT = 5
EDIT >>> CLEAR
Flood fill with DARK BLUE #0639b7
SELECTIONS >>> MODIFY >>> CONTRACT = 2
EDIT >>> CLEAR
Flood fill with LIGHT BLUE #73d4f5
SELECTIONS >>> MODIFY >>> CONTRACT = 5
EDIT >>> CLEAR
Flood fill with DARK BLUE #0639b7
SELECTIONS >>> MODIFY >>> CONTRACT = 2
EDIT >>> CLEAR
DESELECT
SAVE YOUR WORK |
|
STEP 12
EFFECTS >>> 3D EFFECTS >>> INNER BEVEL
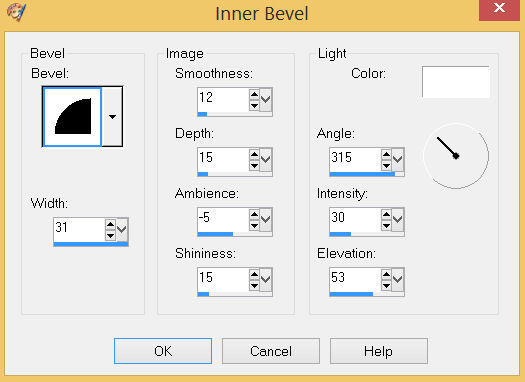

, |
STEP 13
EFFECTS >>> 3D EFFECTS >>> DROP SHADOW
Vertical & Horizontal offsets = 5
Colour = Black
Opacity = 75
Blur = 15.00
ACTIVATE Lower
Copy of Raster 1
EDIT >>> Repeat Drop Shadow
Repeat Drop Shadow effect changing
Vertical & Horizontal Offsets to - ( minus ) 5
ACTIVATE Raster 2
EDIT >>> Repeat Drop Shadow
SAVE YOUR WORK |
|
STEP 14
OPEN & ACTIVATE Upper
Copy of Raster 1
EFFECTS >>> 3D EFFECTS >>> INNER BEVEL
COLOUR = #eeecec
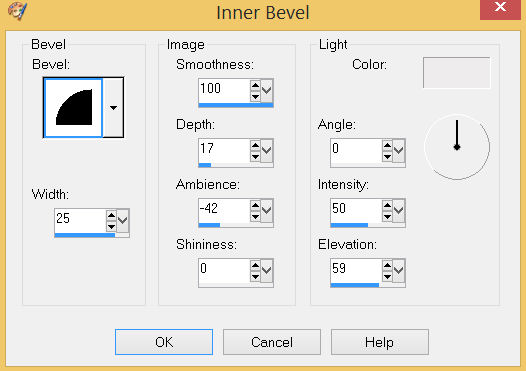
ADJUST >>> BRIGHTNESS and CONTRAST >>> BRIGHTNESS/CONTRAST
Brightness = 50
Contrast = 25
PSPX6-PSP2019: Linear mode checked
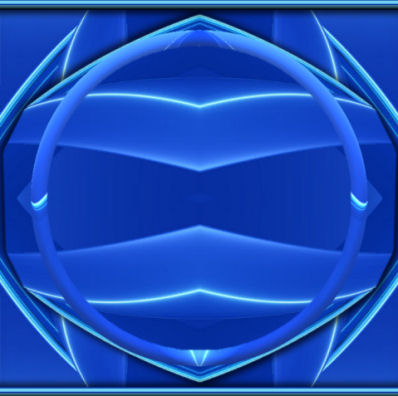 , , |
STEP 15
Select your RASTER DEFORM tool
Mode = SCALE
use default settings
PSPX - PSP2019:Select your PICK tool
Move the centre top node down level with the 100 pixel mark
on your left ruler.
Move the centre bottom node up level with the 500 pixel mark
on your left ruler.
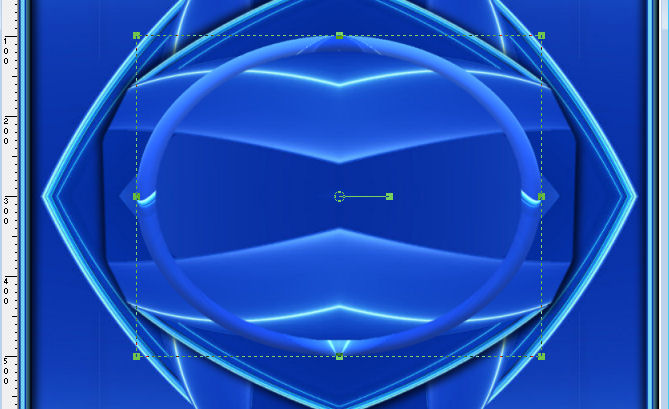
Click the RESET RECTANGLE arrow
Select another tool to disengage the DEFORMATION / PICK TOOL
, |
STEP 16
With your MAGIC WAND.... Same settings.
Select the CENTRE of your image
SELECTIONS >>> MODIFY >>> EXPAND = 8
ACTIVATE Lower Copy of Raster 1
EDIT >>> CLEAR
ACTIVATE Raster 1
EDIT >>> CLEAR
DESELECT
ACTIVATE Upper Copy of Raster 1
Repeat BOTH Drop Shadows
|
|
STEP 17
ADJUST >>> BRIGHTNESS and CONTRAST >>> BRIGHTNESS/CONTRAST
Brightness = 30
Contrast = 25
PSPX6-PSP2019: Linear mode checked
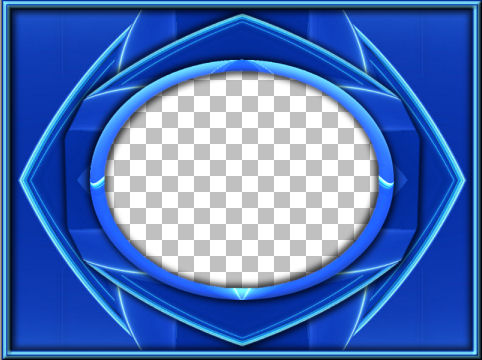
LAYERS >>> MERGE >>> MERGE VISIBLE
SAVE YOUR WORK,
|
STEP 18
Open up the 2-Colorful-Balls image in your PSP workspace
Choose your SELECTION TOOL
Selection Type = Rectangle
Mode = Replace
Feather = 0
Antialias = UNChecked
Select the Upper Ball
, |
STEP 19
Right click on the Title Bar and select COPY from the options
Right click on the Title Bar of your tag image
and select PASTE AS NEW LAYER from the options.
IMAGE >>> RESIZE = 40%
Check "Lock aspect ratio."
Ensure "Resize all layers" is UNCHECKED
Resample using WEIGHTED AVERAGE
ADJUST >>> SHARPNESS >>> SHARPEN
EFFECTS >>> IMAGE EFFECTS >>> OFFSET
Horizontal Offset = - ( minus ) 317
Vertical Offset = 213
Edge Mode = Transparent
In your LAYER PALETTE change
the BLEND MODE to LUMINANCE |
|
STEP 20
EFFECTS >>> PLUGINS >>> SIMPLE >>> TOP LEFT MIRROR, |
|
STEP 21
EFFECTS >>> 3D EFFECTS >>> DROP SHADOW
Vertical & Horizontal offsets = 5
Colour = Black
Opacity = 75
Blur = 10.00
LAYERS >>> MERGE >>> MERGE VISIBLE
Save as .pspimage image |
|
STEP 22
LAYERS >>> NEW RASTER LAYER
Flood fill with PALE BLUE #d4ecf9
LAYERS >>> ARRANGE >>> MOVE DOWN
Open up the anity image in your PSP workspace
Right click on the Title Bar and select COPY from the options
Right click on the Title Bar of your frame image
and select PASTE AS NEW LAYER from the options.
IMAGE >>> RESIZE = 85%
Check "Lock aspect ratio."
Ensure "Resize all layers" is UNCHECKED
Resample using WEIGHTED AVERAGE
ADJUST >>> SHARPNESS >>> SHARPEN
.
|
STEP 23
EFFECTS >>> 3D EFFECTS >>> DROP SHADOW
Vertical & Horizontal offsets = 2
Colour = Black
Opacity = 75
Blur = 5.00
EFFECTS >>> IMAGE EFFECTS >>> OFFSET
Horizontal Offset = - ( minus ) 16
Vertical Offset = 0
Edge Mode = Transparent
LAYERS >>> MERGE >>> MERGE VISIBLE, |
|
STEP 24
LAYERS >>> NEW RASTER LAYER
Select your TEXT tool
and with a font of your choice add your name, |
|
STEP 25
LAYERS >>> MERGE >>> MERGE ALL (Flatten)
Save as .jpg image
, |
| |
|
| |
|