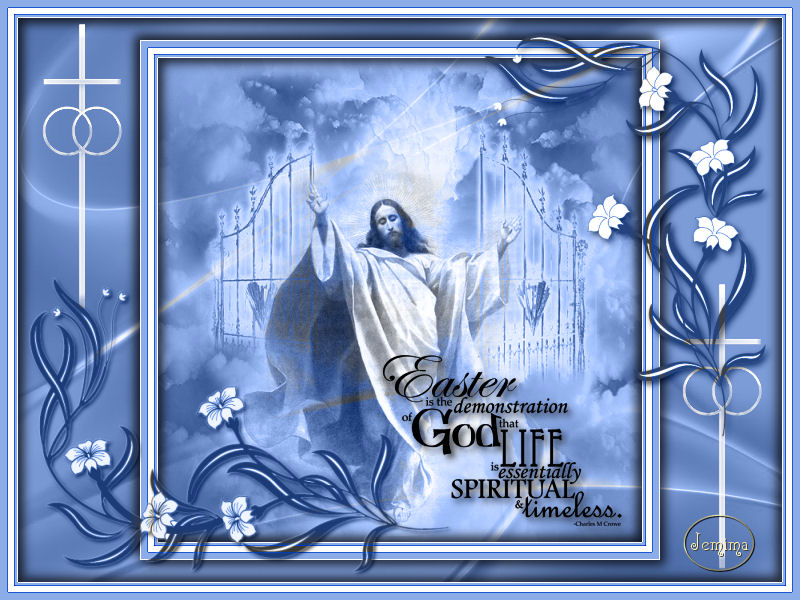
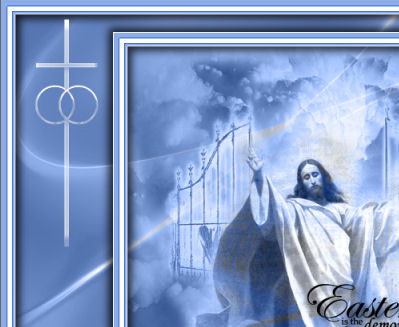
STEP 1
Open a new image 800 x 600
Transparent background
PSPX - X2: Colour Depth = 8bits/channel
PSPX3-PSP2018: Colour Depth RGB = 8bits/channel
Flood fill with PALE BLUE #8cace8.
|
STEP 2
Open up the Abstract-768 image in your PSP workspace
Right click on the Title Bar and select COPY from the options
Right click on the Title Bar of your tag image
and select PASTE AS NEW LAYER from the options.
In your LAYER PALETTE change the
BLEND MODE to LUMINANCE (L)
|
|
STEP 3
LAYERS >>> NEW RASTER LAYER
SELECTIONS >>> SELECT ALL
Flood fill with PALE BLUE #8cace8.
SELECTIONS >>> MODIFY >>> CONTRACT = 8
EDIT >>> CLEAR
Flood fill with WHITE
SELECTIONS >>> MODIFY >>> CONTRACT = 6
EDIT >>> CLEAR
Flood fill with PALE BLUE #8cace8.
SELECTIONS >>> MODIFY >>> CONTRACT = 4
EDIT >>> CLEAR.
DESELECT
EFFECTS >>> EDGE EFFECTS >>> ENHANCE
|
|
STEP 4
EFFECTS >>> 3D EFFECTS >>> DROP SHADOW
Vertical & Horizontal offsets = 5
Colour = Black
Opacity = 75
Blur = 15.00
Repeat Drop Shadow effect changing
Vertical & Horizontal Offsets to - ( minus ) 5
Click OK.
LAYERS >>> MERGE >>> MERGE VISIBLE
|
|
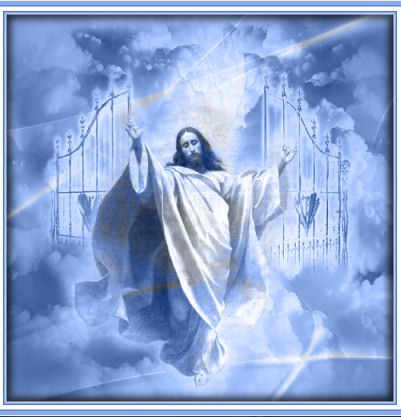
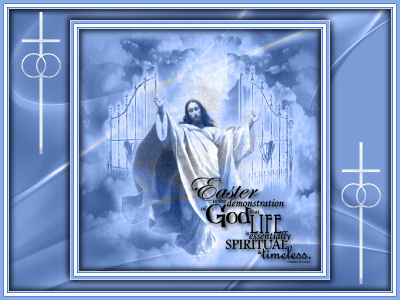
STEP 5
Open up the heavens gates image in your PSP workspace
Right click on the Title Bar and select COPY from the options
Right click on the Title Bar of your tag image
and select PASTE AS NEW LAYER from the options.
IMAGE >>> RESIZE = 80%
Ensure "Resize all layers" is UNCHECKED
Resample using WEIGHTED AVERAGE
Check "Lock aspect ratio"
ADJUST >>> SHARPNESS >>> SHARPEN
In your LAYER PALETTE change the
BLEND MODE to LUMINANCE (L)
SAVE YOUR WORK,
|
|
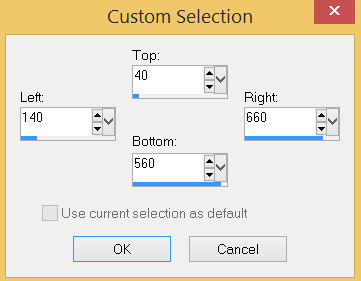
STEP 6
Choose your SELECTION TOOL then click on the
CUSTOM SELECTION symbol
and enter these coordinates.
|
|
STEP 7
LAYERS >>> NEW RASTER LAYER
Flood fill with PALE BLUE #8cace8.
SELECTIONS >>> MODIFY >>> CONTRACT = 8
EDIT >>> CLEAR
Flood fill with WHITE
SELECTIONS >>> MODIFY >>> CONTRACT = 6
EDIT >>> CLEAR
Flood fill with PALE BLUE #8cace8.
SELECTIONS >>> MODIFY >>> CONTRACT = 4
EDIT >>> CLEAR.
DESELECT
,
|
STEP 8
Repeat both Drop Shadows
EFFECTS >>> EDGE EFFECTS >>> ENHANCE,
SAVE YOUR WORK
|
|
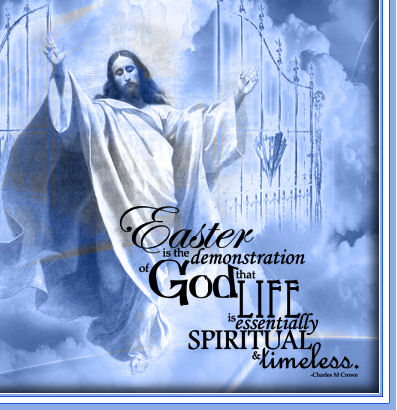
STEP 9
Open up the heisrisen image in your PSP workspace
Right click on the Title Bar and select COPY from the options
Right click on the Title Bar of your tag image
and select PASTE AS NEW LAYER from the options.
IMAGE >>> RESIZE = 80%
Ensure "Resize all layers" is UNCHECKED
Resample using WEIGHTED AVERAGE
Check "Lock aspect ratio"
Reposition with your MOVER tool
In your LAYER PALETTE change the
BLEND MODE to LUMINANCE (L)
|
|
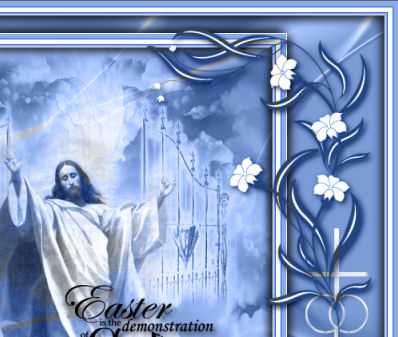
STEP 10
Open up the LDD_wordart_0057s image in your PSP workspace
Right click on the Title Bar and select COPY from the options
Right click on the Title Bar of your tag image
and select PASTE AS NEW LAYER from the options.
IMAGE >>> RESIZE = 60%
Ensure "Resize all layers" is UNCHECKED
Resample using WEIGHTED AVERAGE
Check "Lock aspect ratio"
Reposition with your MOVER tool
LAYERS >>> DUPLICATE
LAYERS >>> MERGE >>> MERGE DOWN
,
|
|
STEP 11
EFFECTS >>> 3D EFFECTS >>> DROP SHADOW
Vertical & Horizontal offsets = 4
Colour = Black
Opacity = 75
Blur = 10.00
SAVE YOUR WORK
,
|
STEP 12
Open up the Christian_Cross_Two_Rings image
in your PSP workspace
Right click on the Title Bar and select COPY from the options
Right click on the Title Bar of your tag image
and select PASTE AS NEW LAYER from the options.
IMAGE >>> RESIZE = 35%
Ensure "Resize all layers" is UNCHECKED
Resample using WEIGHTED AVERAGE
Check "Lock aspect ratio"
ADJUST >>> SHARPNESS >>> SHARPEN
, |
STEP 13
EFFECTS >>> IMAGE EFFECTS >>> OFFSET
Horizontal Offset = - ( minus ) 315
Vertical Offset = 130
Edge Mode = Transparent
In your LAYER PALETTE change the
BLEND MODE to SCREEN
, |
|
STEP 14
LAYERS >>> DUPLICATE
EFFECTS >>> IMAGE EFFECTS >>> OFFSET
Horizontal Offset = 640
Vertical Offset = - ( minus ) 260
Edge Mode = Transparent
LAYERS >>> MERGE >>> MERGE DOWN
LAYERS >>> DUPLICATE
LAYERS >>> MERGE >>> MERGE DOWN
SAVE YOUR WORK , |
|
STEP 15
Open up the flowers-23 image in your PSP workspace
Right click on the Title Bar and select COPY from the options
Right click on the Title Bar of your tag image
and select PASTE AS NEW LAYER from the options.
IMAGE >>> RESIZE = 60%
Ensure "Resize all layers" is UNCHECKED
Resample using WEIGHTED AVERAGE
Check "Lock aspect ratio"
ADJUST >>> SHARPNESS >>> SHARPEN
, |
STEP 16
EFFECTS >>> IMAGE EFFECTS >>> OFFSET
Horizontal Offset = 225
Vertical Offset = 65
Edge Mode = Transparent
EFFECTS >>> 3D EFFECTS >>> DROP SHADOW
Vertical & Horizontal offsets = 3
Colour = Black
Opacity = 75
Blur = 10.00
In your LAYER PALETTE change the
BLEND MODE to LUMINANCE (L) , |
|
STEP 17
Open up the vintage-borders-5m image in your PSP workspace
Right click on the Title Bar and select COPY from the options
Right click on the Title Bar of your tag image
and select PASTE AS NEW LAYER from the options.
IMAGE >>> RESIZE = 80%
Ensure "Resize all layers" is UNCHECKED
Resample using WEIGHTED AVERAGE
Check "Lock aspect ratio"
ADJUST >>> SHARPNESS >>> SHARPEN
, |
STEP 18
EFFECTS >>> IMAGE EFFECTS >>> OFFSET
Horizontal Offset = - ( minus ) 160
Vertical Offset = - ( minus ) 125
Edge Mode = Transparent
EFFECTS >>> 3D EFFECTS >>> DROP SHADOW
Vertical & Horizontal offsets = 2
Colour = Black
Opacity = 75
Blur = 5.00
In your LAYER PALETTE change the
BLEND MODE to LUMINANCE (L)
LAYERS >>> MERGE >>> MERGE VISIBLE
SAVE YOUR WORK
|
|
STEP 19
LAYERS >> NEW RASTER LAYER
Select your TEXT TOOL
with font and settings of your choice
add your name |
|
STEP 20
LAYERS >>> MERGE >>> MERGE ALL (Flatten)
Save as .jpg image
, |
| |
|
| |
|