STEP 1
Open up the black-and-gold-abstract image in your PSP workspace
WINDOW >>> DUPLICATE
Close the original Image
LAYERS >>> Promote background Layer
.
LAYERS >>> DUPLICATE
CLOSE Copy of Raster 1
ACTIVATE Raster 1
.
.
|
STEP 2
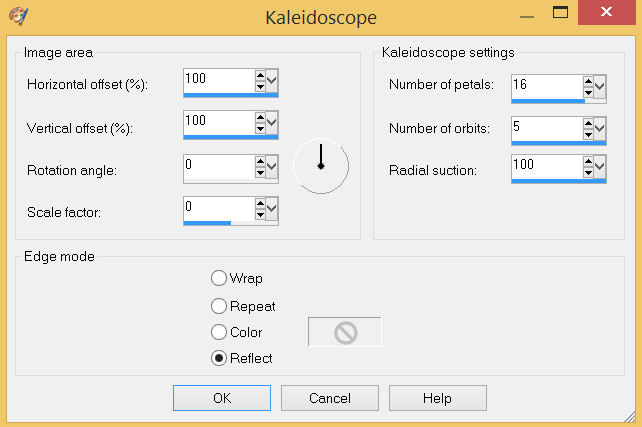
EFFECTS >>> REFLECTION EFFECTS >>> KALEIDOSCOPE .

SAVE YOUR WORK .
|
STEP 3
CLOSE Raster 1
ACTIVATE
Copy of Raster 1
PSP9 - PSPX3: IMAGE >>> FLIP
PSPX4 - PSPX7: Use script available for download at top of page.
(Higher versions follow your version's method)
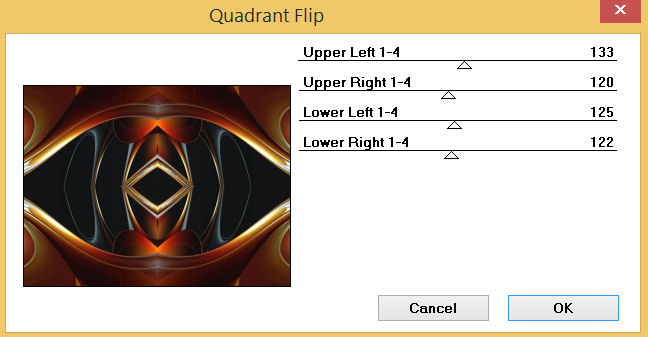
EFFECTS >>> PLUGINS >>> Mirror Rave >>> Quadrant Flip

. |
STEP 4
With your MAGIC WAND
Mode = ADD (Shift)
Match Mode = RGB Value
Tolerance = 16
Feather = 2
Antialias = Checked
Sample Merged = UNCHECKED
PSP9 - PSP2018: Check CONTIGUOUS
PSPX - PSP2018: There is no " Sample Merged"
PSPX - PSP2018: Use all layers = UNChecked
PSP9 - PSP2018: ANTIALIAS = Outside
Select the areas indicated
.
|
|
STEP 5
EDIT >>> CLEAR
DESELECT
With your MAGIC WAND
Mode = ADD (Shift)
Match Mode = RGB Value
Tolerance = 20
Feather = 2
Antialias = Checked
Sample Merged = UNCHECKED
PSP9 - PSP2018: Check CONTIGUOUS
PSPX - PSP2018: There is no " Sample Merged"
PSPX - PSP2018: Use all layers = UNChecked
PSP9 - PSP2018: ANTIALIAS = Outside
Select the area indicated .
,
|
|
STEP 6
EDIT >>> CLEAR
DESELECT
SAVE YOUR WORK
|
|
STEP 7
EFFECTS >>> DISTORTION EFFECTS >>> PUNCH
Strength = 100%
EDIT >>> Repeat Punch
,
|
|
STEP 8
IMAGE >>> RESIZE = 85%
Ensure "Resize all layers" is UNCHECKED
Resample using WEIGHTED AVERAGE
Check "Lock aspect ratio"
With your MAGIC WAND
Mode = Replace
Match Mode = RGB Value
Tolerance = 0
Feather = 0
Antialias = UNchecked
Sample Merged = UNCHECKED
PSP9 - PSP2018: Check CONTIGUOUS
PSPX - PSP2018: There is no " Sample Merged"
PSPX - PSP2018: Use all layers = UNChecked
Select the OUTER transparent area
SELECTIONS >>> INVERT |
|
STEP 9
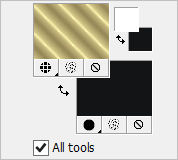
In your MATERIALS PALETTE load
goldpattern pattern in the foreground using these settings
Load BLACK " #000000 " in your background
 ,
,
|
|
STEP 10
LAYERS >>> NEW RASTER LAYER
Flood fill with goldpattern
SELECTIONS >>> MODIFY >>> CONTRACT = 5
EDIT >>> CLEAR
Flood fill with BLACK
SELECTIONS >>> MODIFY >>> CONTRACT = 5
EDIT >>> CLEAR
Flood fill with goldpattern
SELECTIONS >>> MODIFY >>> CONTRACT = 2
EDIT >>> CLEAR
DESELECT
SAVE YOUR WORK |
|
STEP 11
CLOSE Raster 2 and Copy of Raster 1
OPEN & ACTIVATE Raster 1
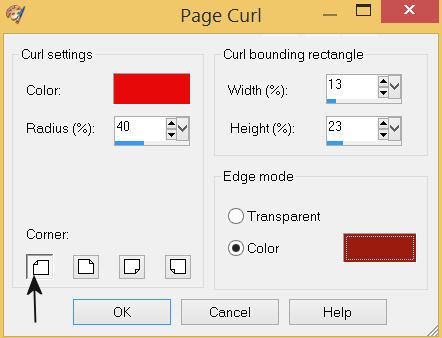
EFFECTS >>> IMAGE EFFECTS >>> PAGE CURL
Curl Setting Colour = #e70909
Edge Mode Colour =
#9b1c0e
 , ,
|
STEP 12
EFFECTS >>> IMAGE EFFECTS >>> PAGE CURL
Same settings
BUT check 'Top Right Hand " corner

EFFECTS >>> IMAGE EFFECTS >>> PAGE CURL
Same settings
BUT check ' Lower Right Hand " corner

EFFECTS >>> IMAGE EFFECTS >>> PAGE CURL
Same settings
BUT check ' Lower Left Hand " corner
 , , |
|
STEP 13
CLOSE Raster 1
OPEN & ACTIVATE Copy of Raster 1
With your MAGIC WAND
Mode = ADD (Shift)
Match Mode = RGB Value
Tolerance = 0
Feather = 0
Antialias = UNChecked
Sample Merged = UNCHECKED
PSP9 - PSP2018: Check CONTIGUOUS
PSPX - PSP2018: There is no " Sample Merged"
PSPX - PSP2018: Use all layers = UNChecked
Select the areas indicated. |
|
STEP 14
SELECTIONS >>> MODIFY >>> EXPAND = 4
OPEN & ACTIVATE Raster 1
EDIT >>> CLEAR
DESELECT
SAVE YOUR WORK |
|
STEP 15
ACTIVATE Copy of Raster 1
With your MAGIC WAND ... Same settings
Select the CENTRE transparent area
SELECTIONS >>> MODIFY >>> EXPAND = 6
ACTIVATE Raster 1
EDIT >>> CLEAR
DESELECT
SAVE YOUR WORK |
|
STEP 16
LAYERS >>> NEW RASTER LAYER
SELECTIONS >>> SELECT ALL
Flood fill with goldpattern
SELECTIONS >>> MODIFY >>> CONTRACT = 5
EDIT >>> CLEAR
Flood fill with BLACK
SELECTIONS >>> MODIFY >>> CONTRACT = 5
EDIT >>> CLEAR
Flood fill with goldpattern
SELECTIONS >>> MODIFY >>> CONTRACT = 2
EDIT >>> CLEAR
DESELECT
|
|
STEP 17
OPEN & Activate Raster 2
With your MAGIC WAND ... Same settings
Select the CENTRE transparent area
ACTIVATE Raster 1
LAYERS >>> NEW RASTER LAYER
LAYERS >>> ARRANGE >>> MOVE DOWN
Open up the night sky image in your PSP workspace
Right click on the Title Bar and select COPY from the options
Right click on the Title Bar of your tag image
and select PASTE INTO SELECTION from the options.
DESELECT
SAVE YOUR WORK |
|
STEP 18
ACTIVATE Raster 1
EFFECTS >>> 3D EFFECTS >>> DROP SHADOW
Vertical & Horizontal offsets = 5
Colour = Black
Opacity = 80
Blur = 10.00
ACTIVATE Raster 3
EDIT >>> Repeat Drop Shadow
ACTIVATE Copy of Raster 1
EDIT >>> Repeat Drop Shadow
ACTIVATE Raster 2
EDIT >>> Repeat Drop Shadow
, |
STEP 19
Still on Raster 2
EFFECTS >>> 3D EFFECTS >>> DROP SHADOW
Vertical & Horizontal offsets = - (minus) 5
Colour = Black
Opacity = 80
Blur = 10.00
ACTIVATE Copy of Raster 1
EDIT >>> Repeat Drop Shadow
ACTIVATE Raster 3
EDIT >>> Repeat Drop Shadow
ACTIVATE Raster 1
EDIT >>> Repeat Drop Shadow
|
|
STEP 20
LAYERS >>> MERGE >>> MERGE VISIBLE
ADJUST >>> SHARPNESS >>> SHARPEN MORE
SAVE YOUR WORK
, |
STEP 21
Open up the white owl image in your PSP workspace
Right click on the Title Bar and select COPY from the options
Right click on the Title Bar of your tag image
and select PASTE AS NEW LAYER from the options.
IMAGE >>> RESIZE = 55%
Ensure "Resize all layers" is UNCHECKED
Resample using WEIGHTED AVERAGE
Check "Lock aspect ratio"
ADJUST >>> SHARPNESS >>> SHARPEN
, |
STEP 22
EFFECTS >>> 3D EFFECTS >>> DROP SHADOW
Vertical & Horizontal offsets = - (minus) 5
Colour = Black
Opacity = 80
Blur = 10.00
Reposition the owl with your MOVER tool
LAYERS >>> MERGE >>> MERGE VISIBLE
SAVE YOUR WORK
|
|
STEP 23
LAYERS >> NEW RASTER LAYER
Select your TEXT TOOL
with font and settings of your choice
add your name
, |
|
STEP 24
LAYERS >>> MERGE >>> MERGE ALL (Flatten)
Save as .jpg image
, |
| |
|
| |
|