COLOURS USED

|
STEP 1
Open a new image 800 x 600
Transparent background
PSP9: Colour Depth = 16 Million Colors (24bit)
PSPX-PSP2018: Colour Depth RGB = 8bits/channel
Flood fill with DARK BLUE #132f3d .
.
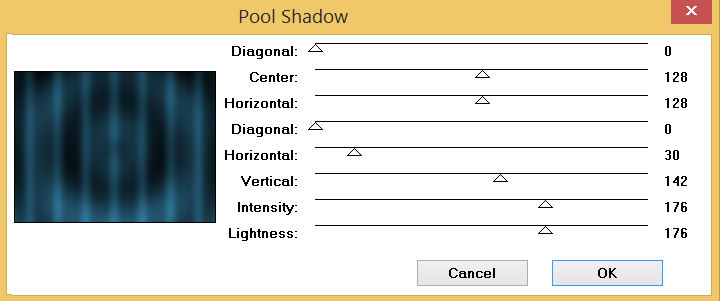
EFFECTS >>> PLUGINS >>> GREG'S FACTORY OUTPUT VOL2 >>> POOL SHADOW

|
STEP 2
LAYERS >>> DUPLICATE
CLOSE Copy of Raster 1
ACTIVATE Raster 1
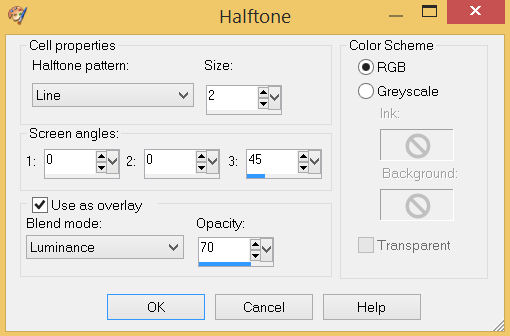
EFFECTS >>> ARTISTIC EFFECTS >>> HALF TONE

ADJUST >>> SHARPNESS >>> SHARPEN MORE
.
|
STEP 3
OPEN & ACTIVATE Copy of Raster 1
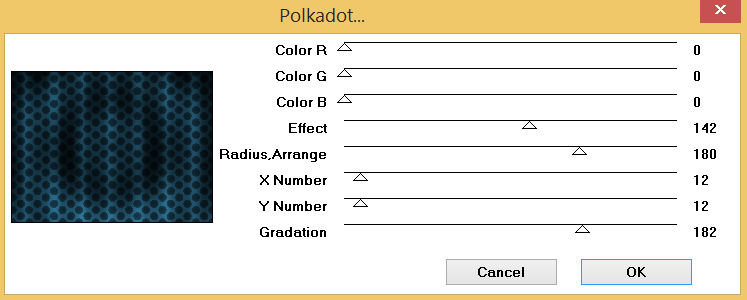
EFFECTS >>> PLUGINS >>> MuRa's Seamless >>> Polkadot

.
|
STEP 4
EFFECTS >>> EDGE EFFECTS >>> ENHANCE MORE
ADJUST >>> SHARPNESS >>> SHARPEN MORE
IMAGE >>> RESIZE = 95 %
Check "Lock aspect ratio."
Ensure "Resize all layers" is UNCHECKED
Resample using WEIGHTED AVERAGE
|
|
STEP 5
SELECTIONS >>> SELECT ALL
SELECTIONS >>> FLOAT
SELECTIONS >>> DEFLOAT
LAYERS >>> NEW RASTER LAYER
Flood fill with LIGHT BLUE #669bd2
SELECTIONS >>> MODIFY >>> CONTRACT = 3
EDIT >>> CLEAR
Flood fill with ORANGE #efb252
SELECTIONS >>> MODIFY >>> CONTRACT = 3
EDIT >>> CLEAR
Flood fill with LIGHT BLUE #669bd2
SELECTIONS >>> MODIFY >>> CONTRACT = 3
EDIT >>> CLEAR
DESELECT
ADJUST >>> SHARPNESS >>> SHARPEN MORE
SAVE YOUR WORK
|
|
STEP 6
LAYERS >>> NEW RASTER LAYER
Flood fill with DARK BLUE #132f3d
EFFECTS >>> PLUGINS >>> GREG'S FACTORY OUTPUT VOL2 >>> POOL SHADOW
Same settings
ADJUST >>> BRIGHTNESS and CONTRAST >>> BRIGHTNESS/CONTRAST
Brightness = 50
Contrast = 40
PSPX6-PSP2018: Linear Mode checked
IMAGE >>> RESIZE = 85%
Check "Lock aspect ratio."
Ensure "Resize all layers" is UNCHECKED
Resample using WEIGHTED AVERAGE
|
|
STEP 7
SELECTIONS >>> SELECT ALL
SELECTIONS >>> FLOAT
SELECTIONS >>> DEFLOAT
LAYERS >>> NEW RASTER LAYER
Flood fill with LIGHT BLUE #669bd2
SELECTIONS >>> MODIFY >>> CONTRACT = 4
EDIT >>> CLEAR
Flood fill with ORANGE #efb252
SELECTIONS >>> MODIFY >>> CONTRACT = 4
EDIT >>> CLEAR
Flood fill with LIGHT BLUE #669bd2
SELECTIONS >>> MODIFY >>> CONTRACT = 4
EDIT >>> CLEAR
DESELECT
ADJUST >>> SHARPNESS >>> SHARPEN MORE
SAVE YOUR WORK
|
|
STEP 8
ACTIVATE Raster 3
Open up the August Series Native American 2 - 5 image
in your PSP workspace
Right click on the Title Bar and select COPY from the options
Right click on the Title Bar of your tag image
and select PASTE AS NEW LAYER from the options.
VIEW >>> RULERS
.
|
STEP 9
Select your RASTER DEFORM tool
Mode = SCALE
use default settings
PSPX - PSP2018:Select your PICK tool
Move the centre top node up level with the 20 pixel mark
on your left ruler.
Move the centre lower node down level with the 580 pixel mark
on your left ruler.
Move the centre left node left, level with the 25 pixel mark
on your top ruler
Move the centre right node right, level with the 775 pixel mark
on your top ruler
,
|
|
STEP 10
Click the RESET RECTANGLE arrow
Select the MOVER tool to disengage the
DEFORMATION tool (PICK tool)
In your LAYER PALETTE change the
BLEND MODE to LUMINANCE (L)
. |
STEP 11
ACTIVATE Raster 4
With your MAGIC WAND
Mode = Replace
Match Mode = RGB Value
Tolerance = 0
Feather = 0
Antialias = UNchecked
Sample Merged = UNCHECKED
PSP9 - PSP2018: Check CONTIGUOUS
PSPX - PSP2018: There is no " Sample Merged"
PSPX - PSP2018: Use all layers = UNChecked
Select the CENTRE area of your image
,
|
|
STEP 12
ACTIVATE Raster 5
SELECTIONS >>> INVERT
EDIT >>> CLEAR
DESELECT
SAVE YOUR WORK
|
STEP 13
ACTIVATE Raster 4
EFFECTS >>> 3D EFFECTS >>> DROP SHADOW
Vertical & Horizontal offsets = 5
Colour = Black
Opacity = 80
Blur = 10.00
ACTIVATE Raster 2
EDIT >>> Repeat Drop Shadow
EFFECTS >>> 3D EFFECTS >>> DROP SHADOW
Vertical & Horizontal offsets =- ( minus ) 5
Colour = Black
Opacity = 80
Blur = 10.00
ACTIVATE Raster 4
EDIT >>> Repeat Drop Shadow |
|
STEP 14
ACTIVATE Raster 5
Open up the August Series Wolves II 2 - 1 image
in your PSP workspace
Right click on the Title Bar and select COPY from the options
Right click on the Title Bar of your tag image
and select PASTE AS NEW LAYER from the options
IMAGE >>> RESIZE = 55%
Check "Lock aspect ratio."
Ensure "Resize all layers" is UNCHECKED
Resample using WEIGHTED AVERAGE
, |
STEP 15
EFFECTS >>> IMAGE EFFECTS >>> OFFSET
Horizontal Offset = 30
Vertical Offset = 125
Edge Mode = Transparent
In your LAYER PALETTE change the
BLEND MODE to LUMINANCE (L)
SAVE YOUR WORK |
|
STEP 16
ACTIVATE Raster 4
Open up the 7-native-american-woman image
in your PSP workspace
Right click on the Title Bar and select COPY from the options
Right click on the Title Bar of your tag image
and select PASTE AS NEW LAYER from the options
PSP9 - PSPX3: IMAGE >>> MIRROR
PSPX4 - PSPX7: Use script available for download at top of page.
(Higher versions follow your version's method)
IMAGE >>> RESIZE = 75%
Check "Lock aspect ratio."
Ensure "Resize all layers" is UNCHECKED
Resample using WEIGHTED AVERAGE
ADJUST >>> SHARPNESS >>> SHARPEN
, |
STEP 17
EFFECTS >>> IMAGE EFFECTS >>> OFFSET
Horizontal Offset = - ( minus ) 135
Vertical Offset = - ( minus ) 100
Edge Mode = Transparent
|
|
STEP 18
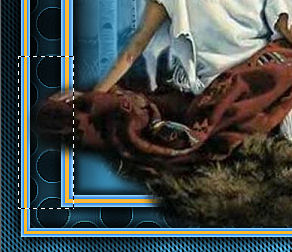
Choose your SELECTION TOOL
Selection Type = Rectangle
Mode = Replace
Feather = 0
Antialias = UNChecked
Select the area indicated

EDIT >>> CLEAR
DESELECT
With your SELECTION TOOL.... Select the area indicated

EDIT >>> CLEAR
DESELECT
SAVE YOUR WORK |
STEP 19
ACTIVATE Raster 6
Open up the Indian child image
in your PSP workspace
Right click on the Title Bar and select COPY from the options
Right click on the Title Bar of your tag image
and select PASTE AS NEW LAYER from the options
IMAGE >>> RESIZE = 40%
Check "Lock aspect ratio."
Ensure "Resize all layers" is UNCHECKED
Resample using WEIGHTED AVERAGE
EFFECTS >>> IMAGE EFFECTS >>> OFFSET
Horizontal Offset = 70
Vertical Offset = - ( minus ) 85
Edge Mode = Transparent
EFFECTS >>> 3D EFFECTS >>> DROP SHADOW
Vertical & Horizontal offsets = 5
Colour = Black
Opacity = 80
Blur = 10.00
|
|
STEP 20
ACTIVATE Raster 4
Open up the dream-catcher image in your PSP workspace
Right click on the Title Bar and select COPY from the options
Right click on the Title Bar of your tag image
and select PASTE AS NEW LAYER from the options
IMAGE >>> RESIZE = 50%
Check "Lock aspect ratio."
Ensure "Resize all layers" is UNCHECKED
Resample using WEIGHTED AVERAGE
ADJUST >>> SHARPNESS >>> SHARPEN
Reposition with your MOVER tool |
|
STEP 21
LAYERS >>> DUPLICATE
Reposition with your MOVER tool |
|
STEP 22
LAYERS >>> ARRANGE >>> MOVE DOWN
ACTIVATE Raster 9
LAYERS >>> MERGE >>> MERGE DOWN
EFFECTS >>> 3D EFFECTS >>> DROP SHADOW
Vertical & Horizontal offsets = 5
Colour = Black
Opacity = 80
Blur = 10.00
, |
|
STEP 23
With your SELECTION TOOL..Same settings
Select the area indicated
, |
|
STEP 24
EDIT >>> CLEAR
DESELECT
ACTIVATE Raster 4
LAYERS >>> ARRANGE >>> MOVE UP
LAYERS >>> MERGE >>> MERGE VISIBLE, |
|
STEP 25
LAYERS >>> NEW RASTER LAYER
SELECTIONS >>> SELECT ALL
Flood fill with LIGHT BLUE #669bd2
SELECTIONS >>> MODIFY >>> CONTRACT = 3
EDIT >>> CLEAR
DESELECT
ADJUST >>> SHARPNESS >>> SHARPEN MORE, |
|
STEP 26
LAYERS >>> NEW RASTER LAYER
SELECT your TEXT tool
With a font of your choice add your name
, |
STEP 27
LAYERS >>> MERGE >>> MERGE ALL (Flatten)
Save as .jpg image
, |
| |
|
| |
|
| |
|