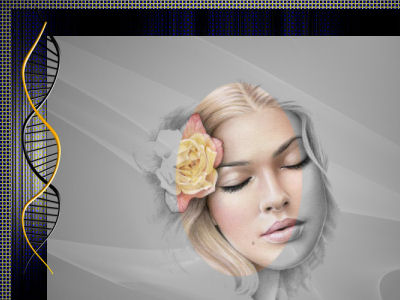
STEP 1
Open up the dreaming image in your PSP workspace
WINDOW >>> DUPLICATE
MINIMIZE the original Image
LAYERS >>> Promote background layer
IMAGE >>> GREYSCALE
PSP9: IMAGE >>> INCREASE COLOUR DEPTH >>> 16 MILLION COLOURS (24Bit)
PSPX- PSP2018: IMAGE >>> INCREASE COLOUR DEPTH >>>
RGB -16 Bits/channel
Minimize for now.
|
|
STEP 2
In your MATERIALS PALETTE
Load WHITE " #ffffff " in your foreground
Load GREY " #808080 " in your background
Then click on the GRADIENT option in your foreground palette
Select the "Foreground-background" option
using these settings.
|
|
STEP 3
Open a new image 800 x 600
Transparent background
PSP9: Colour Depth = 16 Million Colors (24bit)
PSPX-PSP2018: Colour Depth RGB = 8bits/channel
Flood fill with GRADIENT
Maximize the original dreaming image
Right click on the Title Bar and select COPY from the options
Right click on the Title Bar of your tag image
and select PASTE AS NEW LAYER from the options.
|
|
STEP 4
VIEW >>> RULERS
Choose your SELECTION TOOL
Selection Type = Ellipse
Mode = Replace
Feather = 2
Antialias = Checked
Place your cursor at 400 pixels across and 300 pixels down
Drag down to 500 pixels on left ruler
and across to 530 pixels on top ruler
then release.
.
|
|
STEP 5
SELECTIONS >>> INVERT
EDIT >>> CLEAR
ACTIVATE Raster 1
SELECTIONS >>> INVERT
EDIT >>> CLEAR
DESELECT
SAVE YOUR WORK
|
|
STEP 6
Maximize the DUPLICATED (Greyscaled) dreaming image
Right click on the Title Bar and select COPY from the options
Right click on the Title Bar of your tag image
and select PASTE AS NEW LAYER from the options.
In your LAYER PALETTE change the
BLEND MODE to DARKEN
|
|
STEP 7
CLOSE Raster 2 & Raster 3
ACTIVATE Raster 1
With your MAGIC WAND
Mode = Replace
Match Mode = RGB Value
Tolerance = 0
Feather = 2
Antialias = Checked
Sample Merged = UNCHECKED
PSP9 - PSP2018: Check CONTIGUOUS
PSPX - PSP2018: There is no " Sample Merged"
PSP9 - PSP2018: Use all layers = UNChecked
PSP9 - PSP2018: ANTIALIAS = Outside
Select the CENTRE transparent area
SELECTIONS >>> INVERT
|
|
STEP 8
LAYERS >>> NEW RASTER LAYER
Open up the WAVE11 (2) image in your PSP workspace
Right click on the Title Bar and select COPY from the options
Right click on the Title Bar of your tag image
and select PASTE INTO SELECTION from the options.
DESELECT
In your LAYER PALETTE change the OPACITY to 25%
|
|
STEP 9
OPEN ALL LAYERS
LAYERS >>> MERGE >>> MERGE VISIBLE
IMAGE >>> RESIZE = 80%
Check "Lock aspect ratio."
Ensure "Resize all layers" is UNCHECKED
Resample using WEIGHTED AVERAGE
SAVE YOUR WORK |
|
STEP 10
LAYERS >>> NEW RASTER LAYER
Flood fill with GRADIENT
LAYERS >>> NEW RASTER LAYER
SELECTIONS >>> SELECT ALL
Open up the yellow-and-gray image in your PSP workspace
Right click on the Title Bar and select COPY from the options
Right click on the Title Bar of your tag image
and select PASTE INTO SELECTION from the options
In your LAYER PALETTE change the
BLEND MODE to LUMINANCE (L)
EFFECTS >>> REFLECTION EFFECTS >>> ROTATING MIRROR
Horizontal Offset = 0
Vertical Offset = n/a
Rotation Angle = 0
Edge Mode = Reflect
EFFECTS >>> EDGE EFFECTS >>> ENHANCE
DESELCT |
|
STEP 11
IMAGE >>> RESIZE = 95%
Check "Lock aspect ratio."
Ensure "Resize all layers" is UNCHECKED
Resample using WEIGHTED AVERAGE
ACTIVATE Raster 1
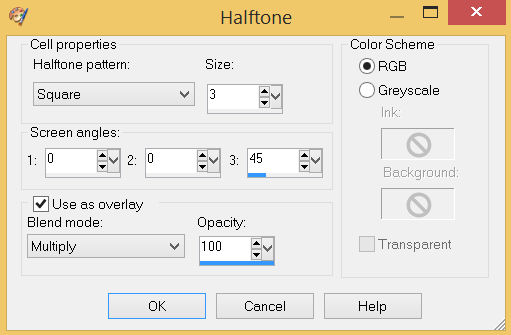
EFFECTS >>> ARTISTIC EFFECTS >>> HALF TONE

,
|
STEP 12
ACTIVATE the Merged layer
LAYERS >>> ARRANGE >>> BRING TO TOP
SAVE YOUR WORK |
|
STEP 13
Open up the deoxyribonucleic-acid image in your PSP workspace
Right click on the Title Bar and select COPY from the options
Right click on the Title Bar of your tag image
and select PASTE AS NEW LAYER from the options.
PSP9 - PSPX3: IMAGE >>> FLIP
PSPX4 - PSP2018: Use script available for download at top of page.
(Higher versions follow your version's method)
PSP9 - PSPX3: IMAGE >>> MIRROR
PSPX4 - PSP2018: Use script available for download at top of page.
(Higher versions follow your version's method)
IMAGE >>> RESIZE = 65%
Check "Lock aspect ratio."
Ensure "Resize all layers" is UNCHECKED
Resample using WEIGHTED AVERAGE
ADJUST >>> SHARPNESS >>> SHARPEN
, |
STEP 14
EFFECTS >>> IMAGE EFFECTS >>> OFFSET
Horizontal Offset = - ( minus ) 330
Vertical Offset = 65
Edge Mode = Transparent

LAYERS >>> DUPLICATE
PSP9: IMAGE >>> ROTATE >>> FREE ROTATE = RIGHT 90
Ensure "All layers" is UNCHECKED
PSPX - PSP2018: IMAGE >>> FREE ROTATE = RIGHT 90
Ensure "All layers" is UNCHECKED
PSP9 - PSPX3: IMAGE >>> FLIP
PSPX4 - PSP2018: Use script available for download at top of page.
(Higher versions follow your version's method)
PSP9 - PSPX3: IMAGE >>> MIRROR
PSPX4 - PSP2018: Use script available for download at top of page.
(Higher versions follow your version's method)
,
|
STEP 15
EFFECTS >>> IMAGE EFFECTS >>> OFFSET
Horizontal Offset = - ( minus ) 480
Vertical Offset = 310
Edge Mode = Transparent
LAYERS >>> MERGE >>> MERGE DOWN |
|
STEP 16
LAYERS >>> DUPLICATE
PSP9 - PSPX3: IMAGE >>> FLIP
PSPX4 - PSP2018: Use script available for download at top of page.
(Higher versions follow your version's method)
PSP9 - PSPX3: IMAGE >>> MIRROR
PSPX4 - PSP2018: Use script available for download at top of page.
(Higher versions follow your version's method)
LAYERS >>> MERGE >>> MERGE DOWN
SAVE YOUR WORK
|
|
STEP 17
ACTIVATE the Merged layer
Open up the sketch_by_ngaladel image in your PSP workspace
Right click on the Title Bar and select COPY from the options
Right click on the Title Bar of your tag image
and select PASTE AS NEW LAYER from the options.
IMAGE >>> RESIZE = 45%
Check "Lock aspect ratio."
Ensure "Resize all layers" is UNCHECKED
Resample using WEIGHTED AVERAGE
EFFECTS >>> IMAGE EFFECTS >>> OFFSET
Horizontal Offset = - ( minus ) 230
Vertical Offset = 110
Edge Mode = Transparent
In your LAYER PALETTE change the
BLEND MODE to SOFT LIGHT |
|
STEP 18
ACTIVATE the TOP layer
Open up the peony-flower image in your PSP workspace
Right click on the Title Bar and select COPY from the options
Right click on the Title Bar of your tag image
and select PASTE AS NEW LAYER from the options.
IMAGE >>> RESIZE = 50%
Check "Lock aspect ratio."
Ensure "Resize all layers" is UNCHECKED
Resample using WEIGHTED AVERAGE
ADJUST >>> SHARPNESS >>> SHARPEN
EFFECTS >>> IMAGE EFFECTS >>> OFFSET
Horizontal Offset = - ( minus ) 200
Vertical Offset = - ( minus ) 180
Edge Mode = Transparent |
|
STEP 19
Open up the dream a little dream image in your PSP workspace
Right click on the Title Bar and select COPY from the options
Right click on the Title Bar of your tag image
and select PASTE AS NEW LAYER from the options.
IMAGE >>> RESIZE = 50%
Check "Lock aspect ratio."
Ensure "Resize all layers" is UNCHECKED
Resample using WEIGHTED AVERAGE
EFFECTS >>> IMAGE EFFECTS >>> OFFSET
Horizontal Offset = 170
Vertical Offset = 150
Edge Mode = Transparent
SAVE YOUR WORK |
|
STEP 20
EFFECTS >>> 3D EFFECTS >>> DROP SHADOW
Vertical & Horizontal offsets = 4
Colour = Black
Opacity = 80
Blur = 10.00
ACTIVATE Raster 5
EDIT >>> Repeat Drop Shadow
ACTIVATE Raster 3
EDIT >>> Repeat Drop Shadow
ACTIVATEthe Merged layer
EDIT >>> Repeat Drop Shadow
ACTIVATE Raster 2
EDIT >>> Repeat Drop Shadow
|
|
STEP 21
EFFECTS >>> 3D EFFECTS >>> DROP SHADOW
Vertical & Horizontal offsets = - (minus) 4
Colour = Black
Opacity = 80
Blur = 10.00
ACTIVATEthe Merged layer
EDIT >>> Repeat Drop Shadow |
|
STEP 22
LAYERS >>> MERGE >>> MERGE VISIBLE
LAYERS >>> NEW RASTER LAYER
Flood fill with BLACK
SELECTIONS >>> SELECT ALL
SELECTIONS >>> MODIFY >>> CONTRACT = 2
EDIT >>> CLEAR
DESELECT
LAYERS >>> MERGE >>> MERGE VISIBLE
, |
STEP 23
LAYERS >>> NEW RASTER LAYER
SELECT your TEXT tool
With a font of your choice add your name
LAYERS >>> MERGE >>> MERGE ALL (Flatten)
Save as .jpg image |
|
| |
|
| |
|