COLOURS USED...

|
STEP 1
Open a new image 800 x 600
Transparent background
PSP9: Colour Depth = 16 Million Colors (24bit)
PSPX - PSP2018: Colour Depth RGB = 8bits/channel
Flood fill with BLUE #0c74ab
Open up the 4 COLOR BGD image in your PSP workspace
Right click on the Title Bar and select COPY from the options
Right click on the Title Bar of your frame image
and select PASTE AS NEW LAYER from the options.
.
|
STEP 2
LAYERS >>> DUPLICATE
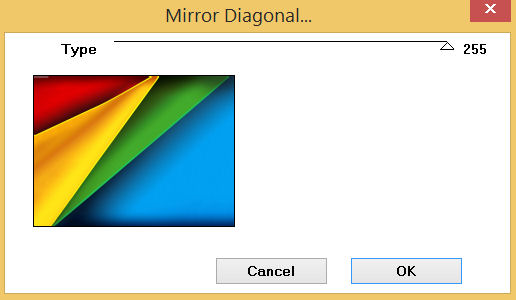
EFFECTS >>> PLUGINS >>> MuRa's Seamless >>> Mirror Diagonal
 , , |
STEP 3
EFFECTS >>> GEOMETRIC EFFECTS >>> CIRCLE
Edge Mode = Transparent
IMAGE >>> RESIZE = 85%
Check "Lock aspect ratio."
Ensure "Resize all layers" is UNCHECKED
Resample using WEIGHTED AVERAGE
|
|
STEP 4
With your MAGIC WAND
Mode = Replace
Match Mode = RGB Value
Tolerance = 0
Feather = 0
Antialias = Checked
Sample Merged = UNCHECKED
PSP9 - X9: Check CONTIGUOUS
PSPX - PSP2018: There is no " Sample Merged"
PSP9 - X9: ANTIALIAS = Outside
Select the area outside the circle
SELECTIONS >>> INVERT
SELECTIONS >>> MODIFY >>> CONTRACT = 50
EDIT >>> CLEAR
DESELECT |
|
STEP 5
ACTIVATE Raster 2
LAYERS >>> DUPLICATE
EFFECTS >>> PLUGINS >>> MuRa's Seamless >>> Mirror Diagonal
Same settings
LAYERS >>> ARRANGE >>> MOVE DOWN
CLOSE TOP LAYER Copy of Raster 2
ACTIVATE Raster 2
. |
STEP 6
With your MAGIC WAND
Mode = ADD (Shift)
Match Mode = RGB Value
Tolerance = 33
Feather = 0
Antialias = Checked
Sample Merged = UNCHECKED
PSP9 - X9: Check CONTIGUOUS
PSPX - PSP2018: There is no " Sample Merged"
PSP9 - X9: ANTIALIAS = Outside
Select the BLUE area indicated |
|
STEP 7
EDIT >>> CLEAR
DESELECT
SAVE YOUR WORK |
|
STEP 8
OPEN & ACTIVATE TOP LAYER Copy of Raster 2
With your MAGIC WAND
Mode = Replace
Match Mode = RGB Value
Tolerance = 0
Feather = 0
Antialias = UNChecked
Sample Merged = UNCHECKED
PSP9 - X9: Check CONTIGUOUS
PSPX - PSP2018: There is no " Sample Merged"
Select the area inside the circle
SELECTIONS >>> MODIFY >>> EXPAND = 15 |
|
STEP 9
ACTIVATE Raster 2
EDIT >>> CLEAR
ACTIVATE LOWER Copy of Raster 2
EDIT >>> CLEAR
DESELECT
ACTIVATE Raster 2
LAYERS >>> MERGE >>> MERGE DOWN
Rename this layer Raster 3
SAVE YOUR WORK
|
|
STEP 10
EFFECTS >>> REFLECTION EFFECTS >>>
ROTATING MIRROR
Horizontal Offset = 0
Vertical Offset = n/a
Rotation Angle = 180
Edge Mode = Reflect |
|
STEP 11
IMAGE >>> RESIZE = 90%
Check "Lock aspect ratio."
Ensure "Resize all layers" is UNCHECKED
Resample using WEIGHTED AVERAGE
ACTIVATE Raster 1
LAYERS >>> DUPLICATE
IMAGE >>> RESIZE = 85%
Check "Lock aspect ratio."
Ensure "Resize all layers" is UNCHECKED
Resample using WEIGHTED AVERAGE
LAYERS >>> ARRANGE >>> MOVE UP |
|
STEP 12
ACTIVATE Raster 3
LAYERS >>> DUPLICATE
LAYERS >>> ARRANGE >>> MOVE UP
IMAGE >>> RESIZE = 90%
Check "Lock aspect ratio."
Ensure "Resize all layers" is UNCHECKED
Resample using WEIGHTED AVERAGE
(Looks messy BUT we will fix that soon)
SAVE YOUR WORK
|
|
STEP 13
ACTIVATE Raster 3
SELECTIONS >>> SELECT ALL
SELECTIONS >>> FLOAT
SELECTIONS >>> DEFLOAT
EFFECTS >>> 3D EFFECTS >>> BUTTONIZE
COLOR = #c31111
DESELECT
ADJUST >>> SHARPNESS >>> SHARPEN
|
|
STEP 14
ACTIVATE Copy of Raster 1
SELECTIONS >>> SELECT ALL
SELECTIONS >>> FLOAT
SELECTIONS >>> DEFLOAT
EFFECTS >>> 3D EFFECTS >>> BUTTONIZE
Same settings
DESELECT
ADJUST >>> SHARPNESS >>> SHARPEN
~~~~~~~~~~~~~~~~~~~~~~~~~~~~~~
ACTIVATE Copy of Raster 3
SELECTIONS >>> SELECT ALL
SELECTIONS >>> FLOAT
SELECTIONS >>> DEFLOAT
EFFECTS >>> 3D EFFECTS >>> BUTTONIZE
Same settings
DESELECT
ADJUST >>> SHARPNESS >>> SHARPEN
|
|
STEP 15
ACTIVATE Raster 3
EFFECTS >>> 3D EFFECTS >>> DROP SHADOW
Vertical & Horizontal offsets = 4
Colour = Black
Opacity = 65
Blur = 10.00
ACTIVATE Copy of Raster 1
EDIT >>> Repeat Drop Shadow
ACTIVATE Copy of Raster 3
EDIT >>> Repeat Drop Shadow
EFFECTS >>> 3D EFFECTS >>> DROP SHADOW
Vertical & Horizontal offsets = - ( minus ) 4
Colour = Black
Opacity = 65
Blur = 10.00
ACTIVATE Copy of Raster 1
EDIT >>> Repeat Drop Shadow
ACTIVATE Raster 3
EDIT >>> Repeat Drop Shadow
SAVE YOUR WORK
|
|
STEP 16
ACTIVATE Copy of Raster 2
With your MAGIC WAND
Same settings
Select the area inside the circle
SELECTIONS >>> MODIFY >>> EXPAND = 15
ACTIVATE Copy of Raster 3
EDIT >>> CLEAR
ACTIVATE Copy of Raster 1
EDIT >>> CLEAR
ACTIVATE Raster 3
EDIT >>> CLEAR
DESELECT |
|
STEP 17
ACTIVATE Copy of Raster 2
With your MAGIC WAND
Same settings
Select the area inside the circle
SELECTIONS >>> INVERT
EFFECTS >>> 3D EFFECTS >>> DROP SHADOW
Vertical & Horizontal offsets = 4
Colour = Black
Opacity = 65
Blur = 15.00
Repeat Drop Shadow effect changing
Vertical & Horizontal Offsets to - ( minus ) 4
Click OK
DESELECT |
|
STEP 18
LAYERS >>> NEW RASTER LAYER
Flood fill with RED #c31111
SELECTIONS >>> SELECT ALL
SELECTIONS >>> MODIFY >>> CONTRACT = 5
EDIT >>> CLEAR
Flood fill with BLUE #0c74ab
SELECTIONS >>> MODIFY >>> CONTRACT = 5
EDIT >>> CLEAR
Flood fill with YELLOW #f0c869
SELECTIONS >>> MODIFY >>> CONTRACT = 5
EDIT >>> CLEAR
Flood fill with GREEN #368a24
SELECTIONS >>> MODIFY >>> CONTRACT = 5
EDIT >>> CLEAR
Flood fill with BLACK
SELECTIONS >>> MODIFY >>> CONTRACT = 1
EDIT >>> CLEAR |
|
STEP 19
SELECTIONS >>> INVERT
EFFECTS >>> 3D EFFECTS >>> DROP SHADOW
Vertical & Horizontal offsets = 4
Colour = Black
Opacity = 65
Blur = 15.00
Repeat Drop Shadow effect changing
Vertical & Horizontal Offsets to - ( minus ) 4
Click OK
DESELECT
SAVE YOUR WORK |
|
STEP 20
Open up the Flowers (1) image in your PSP workspace
Right click on the Title Bar and select COPY from the options
Right click on the Title Bar of your frame image
and select PASTE AS NEW LAYER from the options.
IMAGE >>> RESIZE = 90%
Check "Lock aspect ratio."
Ensure "Resize all layers" is UNCHECKED
Resample using WEIGHTED AVERAGE
Reposition with your MOVER tool |
|
STEP 21
LAYERS >>> DUPLICATE
PSP9 - PSPX3: IMAGE >>> MIRROR
PSPX4 - PSPX7: Use script available for download at top of page.
(Higher versions follow your version's method)
LAYERS >>> MERGE >>> MERGE DOWN
EFFECTS >>> 3D EFFECTS >>> DROP SHADOW
Vertical & Horizontal offsets = 4
Colour = Black
Opacity = 65
Blur = 15.00
Repeat Drop Shadow effect changing
Vertical & Horizontal Offsets to - ( minus ) 4
Click OK

,
|
STEP 22
Open up the Vector-Free-2 image in your PSP workspace
Right click on the Title Bar and select COPY from the options
Right click on the Title Bar of your frame image
and select PASTE AS NEW LAYER from the options.
PSP9 - PSPX3: IMAGE >>> FLIP
PSPX4 - PSPX7: Use script available for download at top of page.
(Higher versions follow your version's method)
Reposition with your MOVER tool

,
|
STEP 23
Repeat both Drop Shadows
CLOSE Raster 1
LAYERS >>> MERGE >>> MERGE VISIBLE
OPEN Raster 1
Save as .pspimage image
, |
|
STEP 24
ACTIVATE Raster 1
Open up the port_collective_1 image in your PSP workspace
Right click on the Title Bar and select COPY from the options
Right click on the Title Bar of your frame image
and select PASTE AS NEW LAYER from the options.
IMAGE >>> RESIZE = 80%
Check "Lock aspect ratio."
Ensure "Resize all layers" is UNCHECKED
Resample using WEIGHTED AVERAGE
ADJUST >>> SHARPNESS >>> SHARPEN
Reposition with your MOVER tool
, |
|
STEP 25
EFFECTS >>> 3D EFFECTS >>> DROP SHADOW
Vertical & Horizontal offsets = 4
Colour = Black
Opacity = 65
Blur = 15.00
Repeat Drop Shadow effect changing
Vertical & Horizontal Offsets to - ( minus ) 4
Click OK
LAYERS >>> MERGE >>> MERGE VISIBLE
, |
STEP 26
LAYERS >>> NEW RASTER LAYER
Select your TEXT tool
and with a font of your choice add your name
, |
|
STEP 27
LAYERS >>> MERGE >>> MERGE ALL (Flatten)
Save as .jpg image
, |
| |
|
| |
|
| |
|