STEP 1
Open a new image 800 x 600
Transparent background
PSP9: Colour Depth = 16 Million Colors (24bit)
PSPX-PSP2018: Colour Depth RGB = 8bits/channel
VIEW >>> RULERS
Open up the chains-4349b image in your PSP workspace
Right click on the Title Bar and select COPY from the options
Right click on the Title Bar of your tag image
and select PASTE AS NEW LAYER from the options.
EFFECTS >>> REFLECTION EFFECTS >>> ROTATING MIRROR
Horizontal Offset = 0
Vertical Offset = n/a
Rotation Angle = 180
Edge Mode = Reflect |
|
STEP 2
EFFECTS >>> IMAGE EFFECTS >>> OFFSET
Horizontal Offset = 0
Vertical Offset = 90
Edge Mode = Transparent
Select your RASTER DEFORM tool
Mode = SCALE
use default settings
PSPX - PSP2018:Select your PICK tool
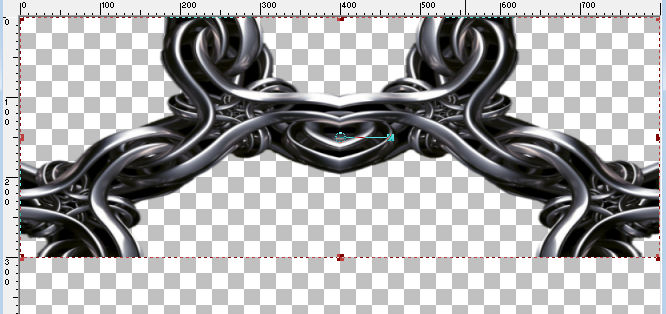
Move the centre right node level with the 800 pixel mark
on your top ruler
Move the centre left node level with the 0 pixel mark
on your top ruler
Move the centre bottom node UP level with the 305 pixel mark on your left ruler
 ,
, |
STEP 3
Click the RESET RECTANGLE arrow
Select the MOVER tool to disengage the DEFORMATION tool (PICK tool)
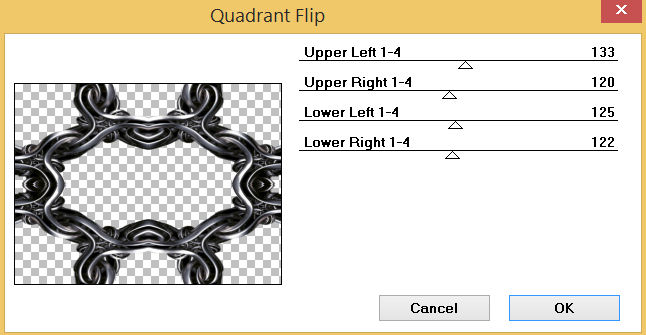
EFFECTS >>> PLUGINS >>> Mirror Rave >>> Quadrant Flip
, |
STEP 4
EFFECTS >>> DISTORTION EFFECTS >>> PUNCH
Strength = 100%
IMAGE >>> RESIZE = 80%
Check "Lock aspect ratio."
Ensure "Resize all layers" is UNCHECKED
Resample using WEIGHTED AVERAGE
ADJUST >>> SHARPNESS >>> SHARPEN
SAVE YOUR WORK |
|
STEP 5
LAYERS >>> NEW RASTER LAYER
Flood fill with BLACK
SELECTIONS >>> SELECT ALL
SELECTIONS >>> MODIFY >>> CONTRACT = 5
EDIT >>> CLEAR
SELECTIONS >>> MODIFY >>> CONTRACT = 4
Flood fill with BLACK
SELECTIONS >>> MODIFY >>> CONTRACT = 5
EDIT >>> CLEAR
SELECTIONS >>> MODIFY >>> CONTRACT = 4
Flood fill with BLACK
SELECTIONS >>> MODIFY >>> CONTRACT = 5
EDIT >>> CLEAR
DESELECT |
|
STEP 6
LAYERS >>> DUPLICATE
IMAGE >>> RESIZE = 85%
Check "Lock aspect ratio."
Ensure "Resize all layers" is UNCHECKED
Resample using WEIGHTED AVERAGE |
|
STEP 7
ACTIVATE Raster 2
ADJUST >>> HUE & SATURATION >>> COLORIZE
Hue = 28
Saturation = 220 |
|
STEP 8
In your MATERIALS PALETTE
Load BROWN " #815b19 " in your foreground
Load LIGHT TAN " #d5bb91 " in your background
Then click on the GRADIENT option in your foreground palette
Select the "Foreground-background" option
using these settings. |
|
STEP 9
ACTIVATE Raster 3
SELECTIONS >>> SELECT ALL
SELECTIONS >>> FLOAT
SELECTIONS >>> DEFLOAT
Flood Fill the selections with the GRADIENT
EFFECTS >>> 3D EFFECTS >>> DROP SHADOW
Vertical & Horizontal offsets = 1
Colour = Black
Opacity = 100
Blur = 0.00
Repeat Drop Shadow effect changing
Vertical & Horizontal Offsets to - ( minus ) 1
Click OK
DESELECT |
|
STEP 10
EFFECTS >>> 3D EFFECTS >>> INNER BEVEL
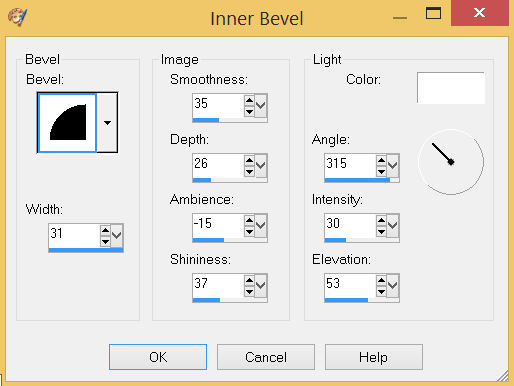
SAVE YOUR WORK
, |
STEP 11
ADJUST >>> BRIGHTNESS and CONTRAST >>> BRIGHTNESS/CONTRAST
Brightness = - (minus) 33
Contrast = 35
PSPX6-PSP2018: Linear Mode checked
EFFECTS >>> EDGE EFFECTS >>> ENHANCE
ACTIVATE Copy of Raster 3
SELECTIONS >>> SELECT ALL
SELECTIONS >>> FLOAT
SELECTIONS >>> DEFLOAT
Flood Fill the selections with the GRADIENT
EFFECTS >>> 3D EFFECTS >>> DROP SHADOW
Vertical & Horizontal offsets = 1
Colour = Black
Opacity = 100
Blur = 0.00
Repeat Drop Shadow effect changing
Vertical & Horizontal Offsets to - ( minus ) 1
Click OK
DESELECT |
|
STEP 12
EFFECTS >>> 3D EFFECTS >>> INNER BEVEL
Same settings
EFFECTS >>> EDGE EFFECTS >>> ENHANCE
ADJUST >>> BRIGHTNESS and CONTRAST >>> BRIGHTNESS/CONTRAST
Brightness = - (minus) 33
Contrast = 35
PSPX6-PSP2018: Linear Mode checked
SAVE YOUR WORK |
|
STEP 13
ACTIVATE Raster 1
Flood Fill with the GRADIENT
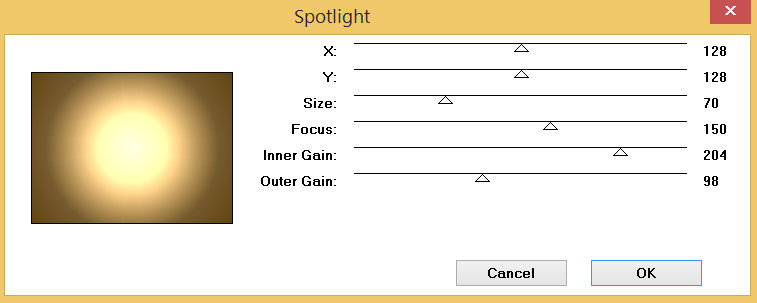
EFFECTS >>> PLUGINS >>> GREG'S FACTORY OUTPUT VOL2 >>> SPOTLIGHT
, |
STEP 14
With your MAGIC WAND
Mode = Replace
Match Mode = RGB Value
Tolerance = 0
Feather = 0
Antialias = UNchecked
Sample Merged = UNCHECKED
PSP9 - PSP2018: Check CONTIGUOUS
PSPX - PSP2018: There is no " Sample Merged"
PSP9 - PSP2018: Use all layers = UNChecked
ACTIVATE Raster 2
Select the CENTRE of your image
SELECTIONS >>> MODIFY >>> EXPAND = 10 |
|
STEP 15
ACTIVATE Raster 1
EDIT >>> CLEAR
DESELECT
ACTIVATE Copy of Raster 3
LAYERS >>> MERGE >>> MERGE DOWN
With your MAGIC WAND .. Same settings
Select the area indicated |
|
STEP 16
ACTIVATE Raster 1
EFFECTS >>> ARTISTIC EFFECTS >>> HALF TONE
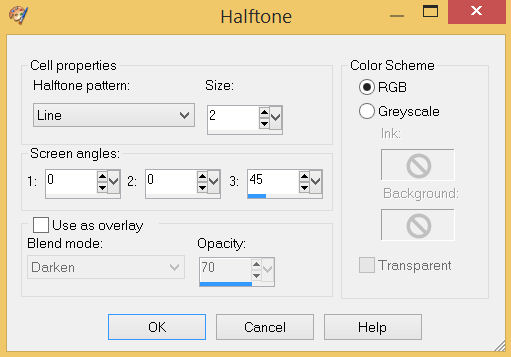
DESELECT |
STEP 17
ACTIVATE Raster 3
EFFECTS >>> 3D EFFECTS >>> DROP SHADOW
Vertical & Horizontal offsets = 5
Colour = Black
Opacity = 70
Blur = 10.00
Repeat Drop Shadow effect changing
Vertical & Horizontal Offsets to - ( minus ) 5
Click OK |
|
STEP 18
ACTIVATE Raster 2
Repeat BOTH Drop Shadows
SAVE YOUR WORK
, |
STEP 19
ACTIVATE Raster 1
LAYERS >>> DUPLICATE
EFFECTS >>> IMAGE EFFECTS >>> PAGE CURL
Curl settings color = #815b19
Edge mode color = #bd9653
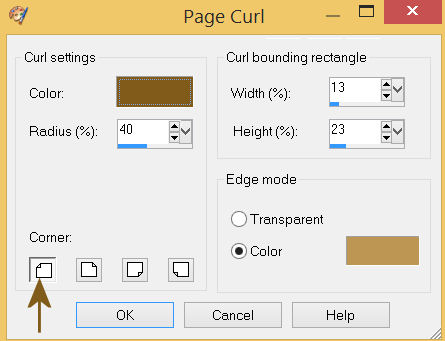
,
|
STEP 20
EFFECTS >>> IMAGE EFFECTS >>> PAGE CURL
Same settings
Check the Corner indicated

EFFECTS >>> IMAGE EFFECTS >>> PAGE CURL
Same settings
Check the Corner indicated

EFFECTS >>> IMAGE EFFECTS >>> PAGE CURL
Same settings
Check the Corner indicated

SAVE YOUR WORK
|
STEP 21
LAYERS >>> MERGE >>> MERGE VISIBLE
Save as .pspimage image
|
|
STEP 22
Open up the mashamaklaut_pogaday_na_schaste image
in your PSP workspace
Right click on the Title Bar and select COPY from the options
Right click on the Title Bar of your tag image
and select PASTE AS NEW LAYER from the options.
LAYERS >>> ARRANGE >>> MOVE DOWN
IMAGE >>> RESIZE = 85%
Check "Lock aspect ratio."
Ensure "Resize all layers" is UNCHECKED
Resample using WEIGHTED AVERAGE
ADJUST >>> SHARPNESS >>> SHARPEN
LAYERS >>> MERGE >>> MERGE VISIBLE |
|
STEP 23
LAYERS >>> NEW RASTER LAYER
SELECT your TEXT tool
With a font of your choice add your name
, |
|
STEP 24
LAYERS >>> MERGE >>> MERGE ALL (Flatten)
Save as .jpg image
, |
| |
|
| |
|