STEP 1
Open a new image 800 x 600
Transparent background
PSPX - X2: Colour Depth = 8bits/channel
PSPX3-PSP2018: Colour Depth RGB = 8bits/channel
Open up the Decorative-Frame-20 image in your PSP workspace
Right click on the Title Bar and select COPY from the options
Right click on the Title Bar of your tag image
and select PASTE AS NEW LAYER from the options.
|
|
STEP 2
Open up the Decorative-Frame-11 image in your PSP workspace
Right click on the Title Bar and select COPY from the options
Right click on the Title Bar of your tag image
and select PASTE AS NEW LAYER from the options.
IMAGE >>> RESIZE = 85%
Ensure "Resize all layers" is UNCHECKED
Resample using WEIGHTED AVERAGE
Check "Lock aspect ratio" |
|
STEP 3
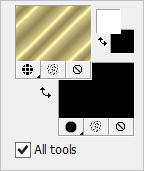
In your MATERIALS PALETTE load
goldfill1 pattern in the foreground using these settings
and load
BLACK in the background.

|
|
STEP 4
SELECTIONS >>> SELECT ALL
SELECTIONS >>> FLOAT
SELECTIONS >>> DEFLOAT
Flood fill with goldfill1 pattern
EFFECTS >>> 3D EFFECTS >>> DROP SHADOW
Vertical & Horizontal offsets = 1
Colour = Black
Opacity = 100
Blur = 0
Repeat Drop Shadow effect changing
Vertical & Horizontal Offsets to - ( minus ) 1
Click OK
DESELECT |
|
STEP 5
CLOSE Raster 3
ACTIVATE Raster 2
SELECTIONS >>> SELECT ALL
SELECTIONS >>> FLOAT
SELECTIONS >>> DEFLOAT
Flood fill with goldfill1 pattern
EFFECTS >>> 3D EFFECTS >>> DROP SHADOW
Vertical & Horizontal offsets = 1
Colour = Black
Opacity = 100
Blur = 0
Repeat Drop Shadow effect changing
Vertical & Horizontal Offsets to - ( minus ) 1
Click OK
DESELECT |
|
STEP 6
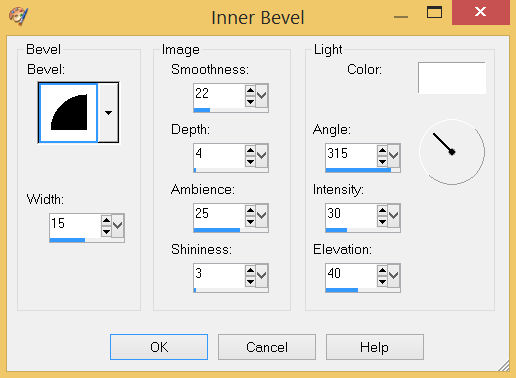
EFFECTS >>> 3D EFFECTS >>> INNER BEVEL
 |
STEP 7
OPEN & ACTIVATE Raster 3
EFFECTS >>> 3D EFFECTS >>> INNER BEVEL
Same settings
LAYERS >>> MERGE >>> MERGE DOWN
SAVE YOUR WORK |
|
STEP 8
Open up the decos-7 image in your PSP workspace
Activate Raster 3
Right click on the Title Bar and select COPY from the options
Right click on the Title Bar of your tag image
and select PASTE AS NEW LAYER from the options.
(Minimize the
decos-7 image )
EFFECTS >>> IMAGE EFFECTS >>> OFFSET
Horizontal Offset = 0
Vertical Offset = - ( minus ) 273
Edge Mode = Transparent
, |
|
STEP 9
SELECTIONS >>> SELECT ALL
SELECTIONS >>> FLOAT
SELECTIONS >>> DEFLOAT
SELECTIONS >>> MODIFY >>> CONTRACT = 2
Flood fill with goldfill1 pattern
EFFECTS >>> 3D EFFECTS >>> INNER BEVEL
Same settings
DESELECT, |
|
STEP 10
LAYERS >>> DUPLICATE
PSP9 - PSPX3: IMAGE >>> FLIP
PSPX4 - PSPX7: Use script available for download at top of page.
(Higher versions follow your version's method)
PSP9 - PSPX3: IMAGE >>> MIRROR
PSPX4 - PSPX7: Use script available for download at top of page.
(Higher versions follow your version's method) |
|
STEP 11
LAYERS >>> DUPLICATE
PSP9:IMAGE >>> ROTATE >>> FREE ROTATE = LEFT 90
Ensure "All layers" is UNCHECKED
PSPX - PSP2018: IMAGE >>> FREE ROTATE = LEFT 90
Ensure "All layers" is UNCHECKED
EFFECTS >>> IMAGE EFFECTS >>> OFFSET
Horizontal Offset = - ( minus ) 350
Vertical Offset = - ( minus ) 273
Edge Mode = Transparent, |
|
STEP 12
LAYERS >>> DUPLICATE
PSP9 - PSPX3: IMAGE >>> MIRROR
PSPX4 - PSPX7: Use script available for download at top of page.
(Higher versions follow your version's method)
PSP9 - PSPX3: IMAGE >>> FLIP
PSPX4 - PSPX7: Use script available for download at top of page.
(Higher versions follow your version's method)
LAYERS >>> MERGE >>> MERGE DOWN
EDIT >> Repeat Layer Merge Down
EDIT >> Repeat Layer Merge Down
PSP9 - PSP2018: ADJUST >>> BRIGHTNESS and CONTRAST >>> BRIGHTNESS/CONTRAST
Brightness = 25
Contrast = 15
PSPX6 - PSP2018: Linear Mode checked
SAVE YOUR WORK |
|
STEP 13
Back to the decos-7 image in your PSP workspace
Activate Raster 9
Right click on the Title Bar and select COPY from the options
Right click on the Title Bar of your tag image
and select PASTE AS NEW LAYER from the options.
PSP9:IMAGE >>> ROTATE >>> FREE ROTATE = LEFT 90
Ensure "All layers" is UNCHECKED
PSPX - PSP2018: IMAGE >>> FREE ROTATE = LEFT 90
Ensure "All layers" is UNCHECKED
,, |
STEP 14
EFFECTS >>> IMAGE EFFECTS >>> OFFSET
Horizontal Offset = - ( minus ) 295
Vertical Offset = 0
Edge Mode = Transparent
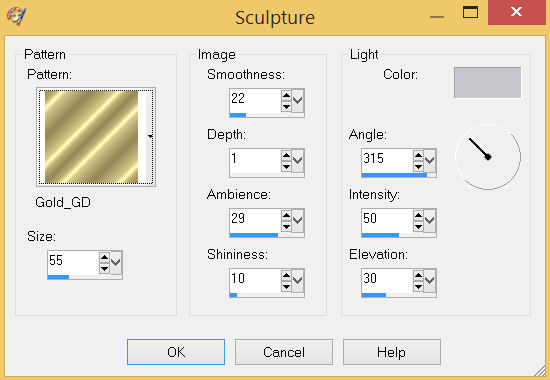
EFFECTS >>> TEXTURE EFFECTS >>> SCULPTURE
COLOUR = #c0c0c0
PATTERN = Gold_GD
 |
STEP 15
EFFECTS >>> 3D EFFECTS >>> DROP SHADOW
Vertical & Horizontal offsets = 1
Colour = Black
Opacity = 100
Blur = 0
Repeat Drop Shadow effect changing
Vertical & Horizontal Offsets to - ( minus ) 1
ADJUST >>> SHARPNESS >>> SHARPEN MORE |
|
STEP 16
LAYERS >>> DUPLICATE
PSP9 - PSPX3: IMAGE >>> MIRROR
PSPX4 - PSPX7: Use script available for download at top of page.
(Higher versions follow your version's method)
LAYERS >>> MERGE >>> MERGE DOWN
EDIT >> Repeat Layer Merge Down
EFFECTS >>> 3D EFFECTS >>> DROP SHADOW
Vertical & Horizontal offsets = 4
Colour = Black
Opacity = 85
Blur = 10.00
|
|
STEP 17
ACTIVATE Raster 1
Flood fill with BLACK
LAYERS >>> NEW RASTER LAYER
SELECTIONS >>> SELECT ALL
Open up the Black-dot-texture image in your PSP workspace
Right click on the Title Bar and select COPY from the options
Right click on the Title Bar of your tag image
and select PASTE INTO SELECTION from the options
DESELECT
ADJUST >>> COLOUR BALANCE >>> NEGATIVE IMAGE
PSPX - PSP2018: IMAGE >>> NEGATIVE IMAGE
EFFECTS >>> EDGE EFFECTS >>> ENHANCE MORE
EDIT >>> Repeat Enhance Edges More, |
|
STEP 18
LAYERS >>> DUPLICATE
LAYERS >>> MERGE >>> MERGE DOWN
PSP9 - PSP2018: ADJUST >>> BRIGHTNESS and CONTRAST >>> BRIGHTNESS/CONTRAST
Brightness = 25
Contrast = 15
PSPX6 - PSP2018: Linear Mode checked
SAVE YOUR WORK |
STEP 19
ACTIVATE Raster 2
With your MAGIC WAND
Mode = Replace
Match Mode = RGB Value
Tolerance = 0
Feather = 0
Antialias = UNchecked
Sample Merged = UNCHECKED
PSP9 - PSP2018: Check CONTIGUOUS
PSPX - PSP2018: There is no " Sample Merged"
PSPX - PSP2018: Use all layers = UNChecked
Select the CENTRE area of your image
SELECTIONS >>> MODIFY >>> EXPAND = 5 |
|
STEP 20
ACTIVATE Raster 4
EDIT >>> CLEAR
ACTIVATE Raster 1
EDIT >>> CLEAR
DESELECT
ACTIVATE Raster 2
With your MAGIC WAND ... Same settings
Select the area outside the frame.
SELECTIONS >>> INVERT
SELECTIONS >>> MODIFY >>> CONTRACT = 3 |
|
STEP 21
LAYERS >>> NEW RASTER LAYER
Flood fill with BLACK
LAYERS >>> ARRANGE >>> MOVE DOWN
DESELECT
ACTIVATE Raster 2
With your MAGIC WAND ... Same settings
Select the CENTRE area of your image
SELECTIONS >>> MODIFY >>> EXPAND = 5
ACTIVATE Raster 5
EDIT >>> CLEAR
DESELECT
ACTIVATE Raster 2
LAYERS >>> MERGE >>> MERGE DOWN
SAVE YOUR WORK |
|
STEP 22
EFFECTS >>> 3D EFFECTS >>> DROP SHADOW
Vertical & Horizontal offsets = 6
Colour = Black
Opacity = 85
Blur = 15.00
Repeat Drop Shadow effect changing
Vertical & Horizontal Offsets to - ( minus ) 6
Click OK
LAYERS >>> MERGE >>> MERGE VISIBLE
SAVE YOUR WORK |
|
STEP 23
LAYERS >>> NEW RASTER LAYER
SELECTIONS >>> SELECT ALL
SELECTIONS >>> MODIFY >>> CONTRACT = 2
Flood fill with goldfill1 pattern
SELECTIONS >>> MODIFY >>> CONTRACT = 3
EDIT >>> CLEAR
SELECTIONS >>> MODIFY >>> CONTRACT = 2
Flood fill with goldfill1 pattern
SELECTIONS >>> MODIFY >>> CONTRACT = 2
EDIT >>> CLEAR
DESELECT
Repeat both Drop Shadows
ADJUST >>> SHARPNESS >>> SHARPEN
LAYERS >>> MERGE >>> MERGE VISIBLE
Save as .pspimage image |
|
STEP 24
LAYERS >>> NEW RASTER LAYER
Flood fill with CREAM #e5cdbd
LAYERS >>> ARRANGE >>> MOVE DOWN
, |
STEP 25
Open up the blonde beauty image in your PSP workspace
Right click on the Title Bar and select COPY from the options
Right click on the Title Bar of your tag image
and select PASTE AS NEW LAYER from the options.
IMAGE >>> RESIZE = 80%
Ensure "Resize all layers" is UNCHECKED
Resample using WEIGHTED AVERAGE
Check "Lock aspect ratio"
ADJUST >>> SHARPNESS >>> SHARPEN
Reposition down a little with your MOVER tool |
|
STEP 26
EFFECTS >>> 3D EFFECTS >>> DROP SHADOW
Vertical & Horizontal offsets = 8
Colour = Black
Opacity = 70
Blur = 15.00
LAYERS >>> MERGE >>> MERGE VISIBLE
, |
STEP 27
LAYERS >> NEW RASTER LAYER
Select your TEXT TOOL
with font and settings of your choice
add your name |
|
STEP 28
LAYERS >>> MERGE >>> MERGE ALL (Flatten)
Save as .jpg image
, |
| |
|
| |
|