STEP 1
In your MATERIALS PALETTE load
Animal zebra pattern in the foreground using these settings |
|
STEP 2
Open a new image 800 x 600
Transparent background
PSP9: Colour Depth = 16 Million Colors (24bit)
PSPX-PSP2018: Colour Depth RGB = 8bits/channel
Flood fill with PATTERN
VIEW >>> RULERS
, |
STEP 3
ADJUST >>> BRIGHTNESS and CONTRAST >>> BRIGHTNESS/CONTRAST
Brightness = 30
Contrast = 10
PSPX6-PSP2018: Linear Mode checked
Select your RASTER DEFORM tool
Mode = SCALE
use default settings
PSPX - PSP2018:Select your PICK tool
Move the centre top node down level with the 450 pixel mark
on your left ruler. |
|
STEP 4
Click the RESET RECTANGLE arrow
Select the MOVER tool to disengage the DEFORMATION tool (PICK tool)
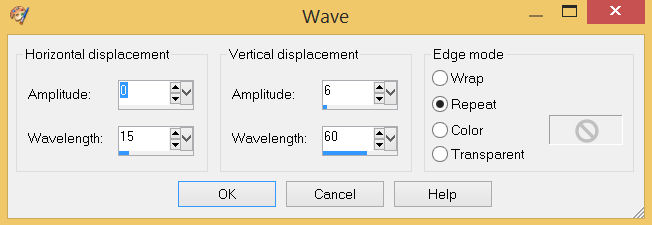
EFFECTS >>> DISTORTION EFFECTS >>> WAVE

, |
STEP 5
EFFECTS >>> REFLECTION EFFECTS >>> ROTATING MIRROR
Horizontal Offset = 0
Vertical Offset = n/a
Rotation Angle = 180
Edge Mode = Reflect
EFFECTS >>> DISTORTION EFFECTS >>> POLAR COORDINATES
Rectangular to polar
Edge Mode = Repeat
SAVE YOUR WORK
|
|
STEP 6
IMAGE >>> RESIZE = 85%
Check "Lock aspect ratio."
Ensure "Resize all layers" is UNCHECKED
Resample using WEIGHTED AVERAGE
LAYERS >>> DUPLICATE
PSP9: IMAGE >>> ROTATE >>> FREE ROTATE = RIGHT 90
Ensure "All layers" is UNCHECKED
PSPX - PSP2018: IMAGE >>> FREE ROTATE = RIGHT 90
Ensure "All layers" is UNCHECKED
EFFECTS >>> REFLECTION EFFECTS >>> ROTATING MIRROR
Horizontal Offset = 0
Vertical Offset = n/a
Rotation Angle = 180
Edge Mode = Reflect
|
|
STEP 7
IMAGE >>> RESIZE = 85%
Check "Lock aspect ratio."
Ensure "Resize all layers" is UNCHECKED
Resample using WEIGHTED AVERAGE
Select your RASTER DEFORM tool
Mode = SCALE
use default settings
PSPX - PSP2018:Select your PICK tool
Move the centre top node down level with the 50 pixel mark
on your left ruler.
Move the centre bottom node up level with the 550 pixel mark
on your left ruler. |
|
STEP 8
Click the RESET RECTANGLE arrow
Select the MOVER tool to disengage the DEFORMATION tool (PICK tool)
ACTIVATE Raster 1
IMAGE >>> RESIZE = 90%
Check "Lock aspect ratio."
Ensure "Resize all layers" is UNCHECKED
Resample using WEIGHTED AVERAGE
SAVE YOUR WORK
|
|
STEP 9
LAYERS >>> NEW RASTER LAYER
Flood fill with WHITE
LAYERS >>> ARRANGE >>> MOVE DOWN
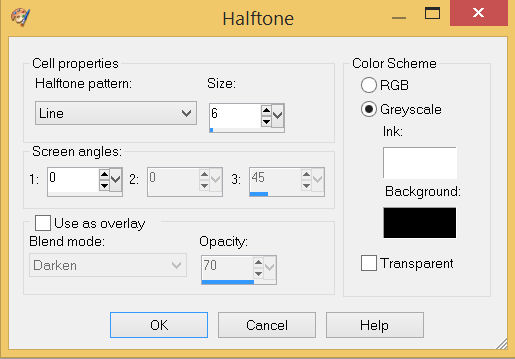
EFFECTS >>> ARTISTIC EFFECTS >>> HALFTONE

, |
STEP 10
Open up the decos-7 image in your PSP workspace
Activate Raster 10
Right click on the Title Bar and select COPY from the options
Right click on the Title Bar of your tag image
and select PASTE AS NEW LAYER from the options.
ADJUST >>> COLOUR BALANCE >>> NEGATIVE IMAGE
PSPX - PSP2018: IMAGE >>> NEGATIVE IMAGE
EFFECTS >>> IMAGE EFFECTS >>> OFFSET
Horizontal Offset = 0
Vertical Offset = 270
Edge Mode = Transparent
LAYERS >>> DUPLICATE
PSP9 - PSPX3: IMAGE >>> FLIP
PSPX4 - PSP2018: Use script available for download at top of page.
(Higher versions follow your version's method)
PSP9 - PSPX3: IMAGE >>> MIRROR
PSPX4 - PSP2018: Use script available for download at top of page.
(Higher versions follow your version's method) |
|
STEP 11
Back to the decos-7 image in your PSP workspace
Activate Raster 11
Right click on the Title Bar and select COPY from the options
Right click on the Title Bar of your tag image
and select PASTE AS NEW LAYER from the options.
ADJUST >>> COLOUR BALANCE >>> NEGATIVE IMAGE
PSPX - PSP2018: IMAGE >>> NEGATIVE IMAGE
PSP9: IMAGE >>> ROTATE >>> FREE ROTATE = RIGHT 90
Ensure "All layers" is UNCHECKED
PSPX - PSP2018: IMAGE >>> FREE ROTATE = RIGHT 90
Ensure "All layers" is UNCHECKED
SAVE YOUR WORK |
STEP 12
EFFECTS >>> IMAGE EFFECTS >>> OFFSET
Horizontal Offset = 350
Vertical Offset = 0
Edge Mode = Transparent
LAYERS >>> DUPLICATE
PSP9 - PSPX3: IMAGE >>> MIRROR
PSPX4 - PSP2018: Use script available for download at top of page.
(Higher versions follow your version's method)
PSP9 - PSPX3: IMAGE >>> FLIP
PSPX4 - PSP2018: Use script available for download at top of page.
(Higher versions follow your version's method) , |
|
STEP 13
LAYERS >>> MERGE >>> MERGE DOWN
Edit >>> Repeat Layer Merge Down
Edit >>> Repeat Layer Merge Down
SAVE YOUR WORK
, |
STEP 14
ACTIVATE Raster 2
LAYERS >>> NEW RASTER LAYER
SELECTIONS >>> SELECT ALL
EFFECTS >>> 3D EFFECTS >>> BUTTONIZE
Height = 8
Width = 8
Opacity = 100
Edge = Solid
COLOUR = White
EFFECTS >>> PLUGINS >>> Mirror Rave >>> Quadrant Flip
DESELECT
|
|
STEP 15
ACTIVATE Raster 1
With your MAGIC WAND
Mode = Replace
Match Mode = RGB Value
Tolerance = 0
Feather = 0
Antialias = UNchecked
Sample Merged = UNCHECKED
PSP9 - PSP2018: Check CONTIGUOUS
PSPX - PSP2018: There is no " Sample Merged"
PSP9 - PSP2018: Use all layers = UNChecked
Select the area indicated |
|
STEP 16
SELECTIONS >>> INVERT
LAYERS >>> NEW RASTER LAYER,
EFFECTS >>> 3D EFFECTS >>> BUTTONIZE
Same settings
EFFECTS >>> PLUGINS >>> Mirror Rave >>> Quadrant Flip
Same settings
DESELECT
SAVE YOUR WORK
|
|
STEP 17
ACTIVATE Copy of Raster 1
With your MAGIC WAND ... Same settings
Select the area indicated |
|
STEP 18
SELECTIONS >>> INVERT
LAYERS >>> NEW RASTER LAYER,
EFFECTS >>> 3D EFFECTS >>> CHISEL
Size = 8
Solid Color = Checked
COLOUR = White
DESELECT
SAVE YOUR WORK
|
|
STEP 19
ACTIVATE Copy of Raster 1
With your MAGIC WAND ... Same settings
Select the CENTRE area of your image
SELECTIONS >>> MODIFY >>> EXPAND = 20
ACTIVATE Raster 2
EDIT >>> CLEAR
DESELECT
, |
|
STEP 20
ACTIVATE Copy of Raster 1
EFFECTS >>> 3D EFFECTS >>> DROP SHADOW
Vertical & Horizontal offsets = 5
Colour = Black
Opacity = 70
Blur = 10.00
ACTIVATE Raster 5
EDIT >>> Repeat Drop Shadow
ACTIVATE Raster 6
EDIT >>> Repeat Drop Shadow
EFFECTS >>> 3D EFFECTS >>> DROP SHADOW
Vertical & Horizontal offsets = - ( minus ) 5
Colour = Black
Opacity = 70
Blur = 10.00
ACTIVATE Raster 5
EDIT >>> Repeat Drop Shadow
ACTIVATE Copy of Raster 1
EDIT >>> Repeat Drop Shadow

LAYERS >>> MERGE >>> MERGE VISIBLE
,
|
STEP 21
EFFECTS >>> 3D EFFECTS >>> DROP SHADOW
Vertical & Horizontal offsets = 5
Colour = Black
Opacity = 70
Blur = 10.00
Repeat Drop Shadow effect changing
Vertical & Horizontal Offsets to - ( minus ) 5
Click OK
Save as .pspimage image
|
|
STEP 22
LAYERS >>> NEW RASTER LAYER
Flood fill with WHITE
LAYERS >>> ARRANGE >>> MOVE DOWN
, |
STEP 23
Open up the 866-bear image in your PSP workspace
Right click on the Title Bar and select COPY from the options
Right click on the Title Bar of your tag image
and select PASTE AS NEW LAYER from the options.
IMAGE >>> RESIZE = 40%
Check "Lock aspect ratio."
Ensure "Resize all layers" is UNCHECKED
Resample using WEIGHTED AVERAGE
ADJUST >>> SHARPNESS >>> SHARPEN |
|
STEP 24
LAYERS >>> MERGE >>> MERGE VISIBLE
LAYERS >>> NEW RASTER LAYER
SELECT your TEXT tool
With a font of your choice add your name |
|
STEP 25
LAYERS >>> MERGE >>> MERGE ALL (Flatten)
Save as .jpg image
, |
| |
|
| |
|