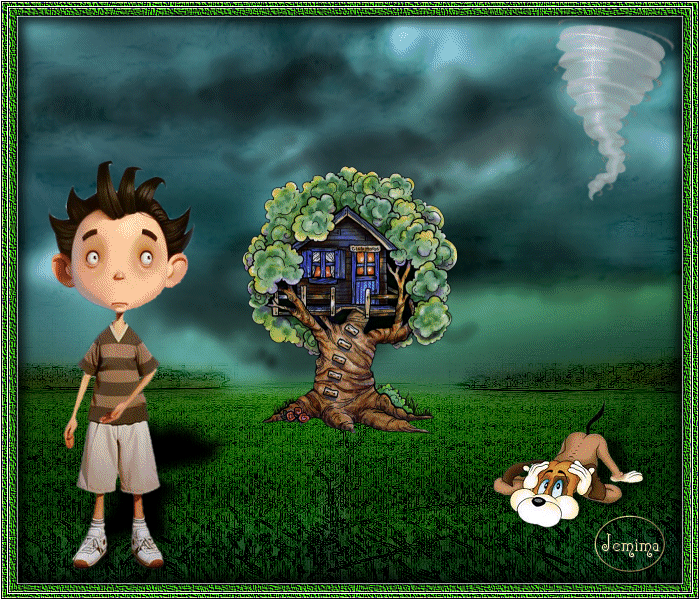
STEP 1
Open up the Horizon-P Koch image in your PSP workspace
WINDOW >>> DUPLICATE
Close the original Image
LAYERS >>> Promote background Layer
VIEW >>> RULERS
LAYERS >>> NEW RASTER LAYER
Flood fill with DARK GREEN #114300
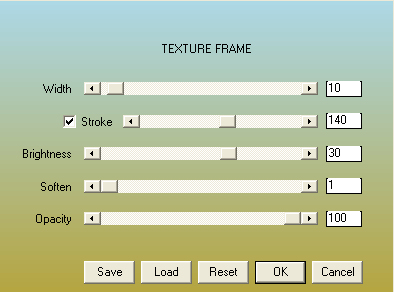
EFFECTS >>> PLUGINS >>> AAA Frames >>> Texture Frame
 , , |
STEP 2
With your MAGIC WAND
Mode = Replace
Match Mode = RGB Value
Tolerance = 0
Feather = 0
Antialias = UNchecked
Sample Merged = UNCHECKED
PSP9 - X9: Check CONTIGUOUS
PSPX - X9: There is no " Sample Merged"
PSPX - X9: Use all layers = UNChecked
Select the centre of your image
EDIT >>> CLEAR
DESELECT
EFFECTS >>> EDGE EFFECTS >>> ENHANCE MORE
|
|
STEP 3
LAYERS >>> DUPLICATE
IMAGE >>> RESIZE = 98%
Ensure "Resize all layers" is UNCHECKED
Resample using WEIGHTED AVERAGE
Check "Lock aspect ratio"
LAYERS >>> MERGE >>> MERGE DOWN
ADJUST >>> SHARPNESS >>> SHARPEN MORE
EFFECTS >>> 3D EFFECTS >>> DROP SHADOW
Vertical & Horizontal offsets = 6
Colour = Black
Opacity = 75
Blur = 15.00
Repeat Drop Shadow effect changing
Vertical & Horizontal Offsets to - ( minus ) 6
Click OK
LAYERS >>> MERGE >>> MERGE DOWN
Rename this layer bgd
SAVE YOUR WORK
|
|
STEP 4
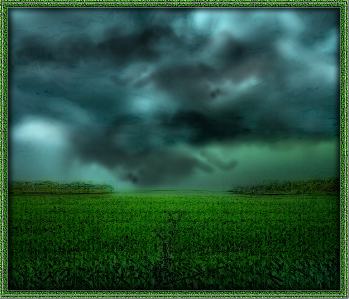
Open up the cloud8944 image in your PSP workspace
Right click on the Title Bar and select COPY from the options
Right click on the Title Bar of your tag image
and select PASTE AS NEW LAYER from the options.
In your LAYER PALETTE change the
BLEND MODE to MULTIPLY
LAYERS >>> DUPLICATE
IMAGE >>> MIRROR
EFFECTS >>> IMAGE EFFECTS >>> OFFSET
Horizontal Offset = 0
Vertical Offset =170
Edge Mode = Transparent
LAYERS >>> MERGE >>> MERGE DOWN (TWICE)
|
|
STEP 5
Open up the tornado image in your PSP workspace
Right click on the Title Bar and select COPY from the options
Right click on the Title Bar of your tag image
and select PASTE AS NEW LAYER from the options.
IMAGE >>> RESIZE = 75%
Ensure "Resize all layers" is UNCHECKED
Resample using WEIGHTED AVERAGE
Check "Lock aspect ratio"
Rename this layer Tornado 4
~~~
LAYERS >>> DUPLICATE
IMAGE >>> RESIZE = 85%
Ensure "Resize all layers" is UNCHECKED
Resample using WEIGHTED AVERAGE
Check "Lock aspect ratio"
Rename this layer Tornado 3
~~~
LAYERS >>> DUPLICATE
IMAGE >>> RESIZE = 85%
Same settings
Rename this layer Tornado 2
~~~
LAYERS >>> DUPLICATE
IMAGE >>> RESIZE = 85%
Same settings
Rename this layer Tornado 1
|
STEP 6
CLOSE layers Tornado 1, Tornado 2, Tornado 3
ACTIVATE Tornado 4 layer
EFFECTS >>> IMAGE EFFECTS >>> OFFSET
Horizontal Offset = 50
Vertical Offset = 50
Edge Mode = Transparent
LAYERS >>> DUPLICATE
IMAGE >>> MIRROR
Rename this layer Tornado 5
|
|
STEP 7
CLOSE layers Tornado 4 and Tornado 5,
OPEN & ACTIVATE Tornado 3 layer
IMAGE >>> MIRROR
EFFECTS >>> IMAGE EFFECTS >>> OFFSET
Horizontal Offset = 150
Vertical Offset = 100
Edge Mode = Transparent
LAYERS >>> DUPLICATE
IMAGE >>> MIRROR
Rename this layer Tornado 6 |
|
STEP 8
CLOSE layers Tornado 3 and Tornado 6 ,
OPEN & ACTIVATE Tornado 2 layer
EFFECTS >>> IMAGE EFFECTS >>> OFFSET
Horizontal Offset = 200
Vertical Offset = 150
Edge Mode = Transparent
LAYERS >>> DUPLICATE
IMAGE >>> MIRROR
Rename this layer Tornado 7 |
|
STEP 9
CLOSE layers Tornado 2 and Tornado 7 ,
OPEN & ACTIVATE Tornado 1 layer
IMAGE >>> MIRROR
EFFECTS >>> IMAGE EFFECTS >>> OFFSET
Horizontal Offset = 260
Vertical Offset = 190
Edge Mode = Transparent
LAYERS >>> DUPLICATE
IMAGE >>> MIRROR
Rename this layer Tornado 8 |
|
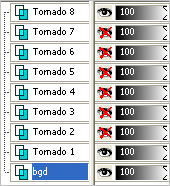
STEP 10
In your LAYER PALETTE
Rearrange the layers as shown.
SAVE YOUR WORK |
|
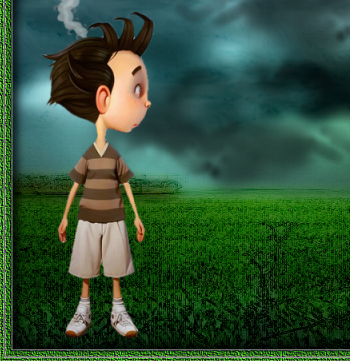
STEP 11
ACTIVATE the Tornado 8 layer
Open up the boy x4 image in your PSP workspace
Activate Raster 1
Right click on the Title Bar and select COPY from the options
Right click on the Title Bar of your tag image
and select PASTE AS NEW LAYER from the options.
EFFECTS >>> IMAGE EFFECTS >>> OFFSET
Horizontal Offset = - ( minus ) 220
Vertical Offset = - ( minus ) 65
Edge Mode = Transparent
Rename this layer Boy 1 |
|
STEP 12
CLOSE the Boy 1 layer
Back to the boy x4 image in your PSP workspace
Activate Raster 2
Right click on the Title Bar and select COPY from the options
Right click on the Title Bar of your tag image
and select PASTE AS NEW LAYER from the options.
EFFECTS >>> IMAGE EFFECTS >>> OFFSET
Horizontal Offset = - ( minus ) 250
Vertical Offset = - ( minus ) 65
Edge Mode = Transparent
Rename this layer Boy 2 |
|
STEP 13
CLOSE the Boy 2 layer
Back to the boy x4 image in your PSP workspace
Activate Raster 3
Right click on the Title Bar and select COPY from the options
Right click on the Title Bar of your tag image
and select PASTE AS NEW LAYER from the options.
EFFECTS >>> IMAGE EFFECTS >>> OFFSET
Horizontal Offset = - ( minus ) 200
Vertical Offset = - ( minus ) 73
Edge Mode = Transparent
Rename this layer Boy 3 |
|
STEP 14
CLOSE the Boy 3 layer
Back to the boy x4 image in your PSP workspace
Activate Raster 4
Right click on the Title Bar and select COPY from the options
Right click on the Title Bar of your tag image
and select PASTE AS NEW LAYER from the options.
EFFECTS >>> IMAGE EFFECTS >>> OFFSET
Horizontal Offset = - ( minus ) 225
Vertical Offset = - ( minus ) 65
Edge Mode = Transparent
Rename this layer Boy 4
SAVE YOUR WORK |
|
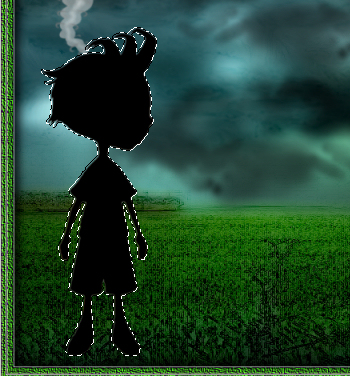
STEP 15
Still on the Boy 4 layer
LAYERS >>> DUPLICATE
SELECTIONS >>> SELECT ALL
SELECTIONS >>> FLOAT
SELECTIONS >>> DEFLOAT
With your FLOOD FILL TOOL
Match Mode = RGB Value
Tolerance = 200
Blend Mode = Darken
Opacity = 100
Fill the selection with BLACK
|
|
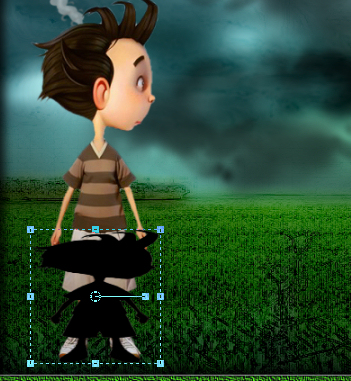
STEP 16
DESELECT
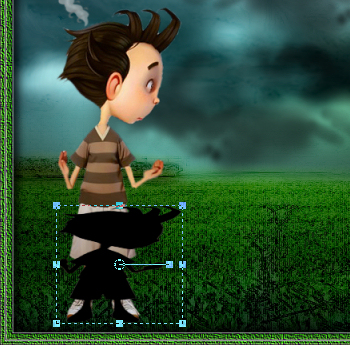
Select your RASTER DEFORM tool
Mode = SCALE
use default settings
PSPX-X9:Select your PICK tool
Pull the centre top node level with the boys waist. |
|
STEP 17
CHANGE the MODE to SHEAR (Shift)
Pull the top right node to the right, level with the
250 pixel mark on your top ruler,
Pull the top left node to the right, level with the
100 pixel mark on your top ruler
Click the RESET RECTANGLE arrow
Select your MOVER tool to disengage
the Deformation / Pick tool
LAYERS >>> ARRANGE >>> MOVE DOWN
ADJUST >>> BLUR >>> GAUSSIAN BLUR
Radius = 5
ACTIVATE Boy 4 layer
LAYERS >>> MERGE >>> MERGE DOWN
Rename this layer Boy 4 |
|
STEP 18
CLOSE the Boy 4 layer
OPEN & ACTIVATE the Boy 3 layer
LAYERS >>> DUPLICATE
*** SELECTIONS >>> SELECT ALL ***
SELECTIONS >>> FLOAT
SELECTIONS >>> DEFLOAT
With your FLOOD FILL TOOL
Same settings
Fill the selection with BLACK
DESELECT
Select your RASTER DEFORM tool
Mode = SCALE
use default settings
PSPX-X9:Select your PICK tool
Pull the centre top node level with the boys waist. |
|
STEP 19
CHANGE the MODE to SHEAR (Shift)
Pull the top right node to the right, level with the
250 pixel mark on your top ruler,
Pull the top left node to the right, level with the
100 pixel mark on your top ruler
Click the RESET RECTANGLE arrow
Select your MOVER tool to disengage
the Deformation / Pick tool
LAYERS >>> ARRANGE >>> MOVE DOWN
ADJUST >>> BLUR >>> GAUSSIAN BLUR
Radius = 5
ACTIVATE Boy 3 layer
LAYERS >>> MERGE >>> MERGE DOWN
Rename this layer Boy 3
SAVE YOUR WORK
|
|
STEP 20
CLOSE the Boy 3 layer
OPEN & ACTIVATE the Boy 2 layer
LAYERS >>> DUPLICATE
Repeat STEP 18 from
*** SELECTIONS >>> SELECT ALL ***
Repeat STEP 19 up to and including
GAUSSIAN BLUR
ACTIVATE Boy 2 layer
LAYERS >>> MERGE >>> MERGE DOWN
Rename this layer Boy 2 |
|
STEP 21
CLOSE the Boy 2 layer
OPEN & ACTIVATE the Boy 1 layer
LAYERS >>> DUPLICATE
Repeat STEP 18 from *** SELECTIONS >>> SELECT ALL ***
Repeat STEP 19 up to and including
GAUSSIAN BLUR
ACTIVATE Boy 1 layer
LAYERS >>> MERGE >>> MERGE DOWN
Rename this layer Boy 1
SAVE YOUR WORK
|
|
| |
|
| |