STEP 1
Open up the waiting.pspimage in your PSP workspace
WINDOW >>> DUPLICATE
Close the original Image
LAYERS >> NEW RASTER LAYER
LAYERS >>> ARRANGE >>> SEND TO BOTTOM
SELECTIONS >>> SELECT ALL
Open up the nature-wallpaper-HD image in your PSP workspace
Right click on the Title Bar and select COPY from the options
Right click on the Title Bar of your tag image
and select PASTE INTO SELECTION from the options.
DESELECT
Rename ths layer bgd
|
|
STEP 2
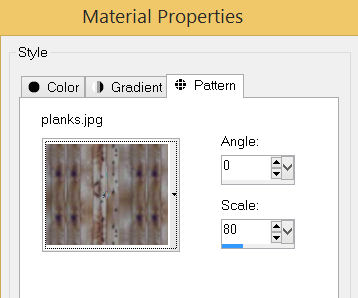
In your MATERIALS PALETTE load
planks pattern in the foreground
using these settings.
|
 |
STEP 3
CLOSE the arch and baby layers
LAYERS >> NEW RASTER LAYER
Choose your SELECTION TOOL then click on the
CUSTOM SELECTION symbol
and enter these coordinates
|
|
STEP 4
Flood fill with the planks pattern
DESELECT
EFFECTS>>> GEOMETRIC EFFECTS >>>
Perspective - Vertical.
|
|
STEP 5
VIEW >>> RULERS
Select your RASTER DEFORM tool
Mode = SCALE
use default settings
PSPX-X9:Select your PICK tool
Pull the centre top node down to the 470 pixel mark on your left ruler.
Pull out the edges of your image ...
Pull the centre left and centre right nodes out past the edges of your image
as shown below.

, |
STEP 6
Click the RESET RECTANGLE arrow
Select your MOVER tool to disengage
the Deformation / Pick tool
LAYERS >>> MERGE >>> MERGE DOWN
SAVE YOUR WORK
|
|
STEP 7
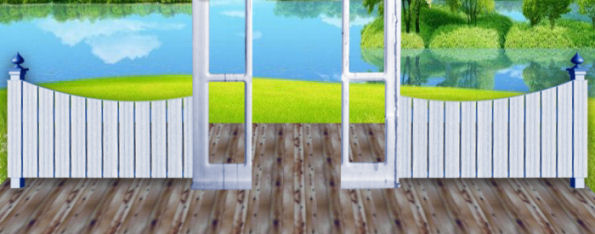
OPEN & ACTIVATE the arch layer
Open up the fence image in your PSP workspace
Right click on the Title Bar and select COPY from the options
Right click on the Title Bar of your tag image
and select PASTE AS NEW LAYER from the options.
EFFECTS >>> IMAGE EFFECTS >>> OFFSET
Horizontal Offset = 230
Vertical Offset = - ( minus ) 166
Edge Mode = Transparent
LAYERS >>> ARRANGE >>> MOVE DOWN |
|
STEP 8
LAYERS >>> DUPLICATE
IMAGE >>> MIRROR
LAYERS >>> MERGE >>> MERGE DOWN
EFFECTS >>> 3D EFFECTS >>> DROP SHADOW
Vertical offset = 5
Horizontal offset = 0
Colour = Black
Opacity = 80
Blur = 25.00
Activate the arch layer
LAYERS >>> MERGE >>> MERGE DOWN
Rename thIs layer arch
SAVE YOUR WORK

, |
STEP 9
OPEN the baby layer
ACTIVATE the bgd layer
Open up the delivery image in your PSP workspace
Activate Layer 1
Right click on the Title Bar and select COPY from the options
Right click on the Title Bar of your tag image
and select PASTE AS NEW LAYER from the options.
EFFECTS >>> IMAGE EFFECTS >>> OFFSET
Horizontal Offset = - ( minus ) 240
Vertical Offset = 240
Edge Mode = Transparent
Rename this layer stork 1 |
|
STEP 10
Back to the delivery image in your PSP workspace
Activate Layer 2
Right click on the Title Bar and select COPY from the options
Right click on the Title Bar of your tag image
and select PASTE AS NEW LAYER from the options.
EFFECTS >>> IMAGE EFFECTS >>> OFFSET
Horizontal Offset = - ( minus ) 215
Vertical Offset = 100
Edge Mode = Transparent
Rename this layer stork 2
SAVE YOUR WORK
|
|
STEP 11
CLOSE stork 1 and stork 2
Back to the delivery image in your PSP workspace
Activate Layer 3
Right click on the Title Bar and select COPY from the options
Right click on the Title Bar of your tag image
and select PASTE AS NEW LAYER from the options.
EFFECTS >>> IMAGE EFFECTS >>> OFFSET
Horizontal Offset = - ( minus ) 240
Vertical Offset = - ( minus ) 60
Edge Mode = Transparent
Rename this layer stork 3 |
|
STEP 12
CLOSE stork 3
ACTIVATE the baby layer
Back to the delivery image in your PSP workspace
Activate Layer 4
Right click on the Title Bar and select COPY from the options
Right click on the Title Bar of your tag image
and select PASTE AS NEW LAYER from the options.
EFFECTS >>> IMAGE EFFECTS >>> OFFSET
Horizontal Offset = - ( minus ) 145
Vertical Offset = - ( minus ) 140
Edge Mode = Transparent
Rename this layer stork 4
SAVE YOUR WORK
|
|
STEP 13
CLOSE stork 4
ACTIVATE the stork 3 layer BUT leave closed.
Back to the delivery image in your PSP workspace
Activate Layer 5
Right click on the Title Bar and select COPY from the options
Right click on the Title Bar of your tag image
and select PASTE AS NEW LAYER from the options.
EFFECTS >>> IMAGE EFFECTS >>> OFFSET
Horizontal Offset = 25
Vertical Offset = - ( minus ) 70
Edge Mode = Transparent
Rename this layer stork 5
SAVE YOUR WORK |
|
STEP 14
CLOSE stork 5
Back to the delivery image in your PSP workspace
Activate Layer 6
Right click on the Title Bar and select COPY from the options
Right click on the Title Bar of your tag image
and select PASTE AS NEW LAYER from the options.
EFFECTS >>> IMAGE EFFECTS >>> OFFSET
Horizontal Offset = 140
Vertical Offset = 90
Edge Mode = Transparent
Rename this layer stork 6
SAVE YOUR WORK |
|
STEP 15
CLOSE stork 6
Back to the delivery image in your PSP workspace
Activate Layer 7
Right click on the Title Bar and select COPY from the options
Right click on the Title Bar of your tag image
and select PASTE AS NEW LAYER from the options.
EFFECTS >>> IMAGE EFFECTS >>> OFFSET
Horizontal Offset = 250
Vertical Offset = 215
Edge Mode = Transparent
Rename this layer stork 7
SAVE YOUR WORK |
|
STEP 16
ACTIVATE the stork 4 layer BUT leave closed.
LAYERS >>> NEW RASTER LAYER
Flood fill with BLUE #7ea1d4
SELECTIONS >>> SELECT ALL
SELECTIONS >>> MODIFY >>> CONTRACT = 3
EDIT >>> CLEAR
Flood fill with OFF WHITE #dfe3ea
SELECTIONS >>> MODIFY >>> CONTRACT = 6
EDIT >>> CLEAR
Flood fill with BLUE #7ea1d4
SELECTIONS >>> MODIFY >>> CONTRACT = 3
EDIT >>> CLEAR
Flood fill with BLACK
SELECTIONS >>> MODIFY >>> CONTRACT = 1
EDIT >>> CLEAR
DESELECT
Rename this layer frame
|
|
STEP 17
ACTIVATE the bgd layer
LAYERS >> NEW RASTER LAYER
Select your TEXT TOOL
with font and settings of your choice
add your name
LAYERS >>> MERGE >>> MERGE DOWN
SAVE YOUR WORK |
|
STEP 18
Set up LAYER PALETTE as shown
Right click on Title Bar and select
Copy merged from the options. |
|
STEP 19
In ANIMATION SHOP
Right click the workspace and select
'Paste As New Animation' from the options.
Back to PSP.
Set up LAYER PALETTE as shown
Right click on Title Bar and select
Copy merged from the options. |
|
STEP 20
In ANIMATION SHOP
Select >>>
'Paste After Current' icon on top menu
Back to PSP.
Set up LAYER PALETTE as shown
Right click on Title Bar and select
Copy merged from the options. |
|
STEP 21
In ANIMATION SHOP
Select >>> 'Paste After Current' icon on top menu
Back to PSP.
Set up LAYER PALETTE as shown
Right click on Title Bar and select
Copy merged from the options. |
|
STEP 22
In ANIMATION SHOP
Select >>> 'Paste After Current' icon on top menu
Back to PSP.
Set up LAYER PALETTE as shown
Right click on Title Bar and select
Copy merged from the options. |
|
STEP 23
In ANIMATION SHOP
Select >>> 'Paste After Current' icon on top menu
Back to PSP.
Set up LAYER PALETTE as shown
Right click on Title Bar and select
Copy merged from the options. |
|
STEP 24
In ANIMATION SHOP
Select >>> 'Paste After Current' icon on top menu
Back to PSP.
Set up LAYER PALETTE as shown
Right click on Title Bar and select
Copy merged from the options. |
|
STEP 25
In ANIMATION SHOP
Select >>> 'Paste After Current' icon on top menu
Back to PSP.
Set up LAYER PALETTE as shown
Right click on Title Bar and select
Copy merged from the options. |
|
STEP 26
In ANIMATION SHOP
Select >>> 'Paste After Current' icon on top menu
EDIT >> Select All
Right click on Title Bar of frames
Select 'Frame Properties' from the options
Display time = 50
, |
STEP 27
Scroll the arrow on the bottom of the frame to first frame
( F:1),
Right click inside the frame to activate
Select 'Frame Properties' from the options
Display time = 100
. |
STEP 28
View >> Animation
and while it is still running,
File >> Save As
Locate the folder in which you wish to save it.
Name your animation.
With the Gif Optimiser keep pressing NEXT
until you get to the last one... click FINISH
Close the Animation
Close the frames.
Close Animation Shop
, |
| |
|
| |
|