STEP 1
Open a new image 700 x 600
Transparent background
PSP9: Colour Depth = 16 Million Colors (24bit)
PSPX-X9: Colour Depth RGB = 8bits/channel.
SELECTIONS >>> SELECT ALL
Open up the MultiColor2103 image in your PSP workspace
Right click on the Title Bar and select COPY from the options
Right click on the Title Bar of your tag image
and select PASTE INTO SELECTION from the options.
DESELECT
.
|
STEP 2
ADJUST >>> BLUR >>> GAUSSIAN BLUR
Radius = 20.00
EFFECTS >>> REFLECTION EFFECTS >>>
ROTATING MIRROR
Horizontal Offset = 0
Vertical Offset = n/a
Rotation Angle = 0
Edge Mode = Reflect.
IMAGE >>> FLIP
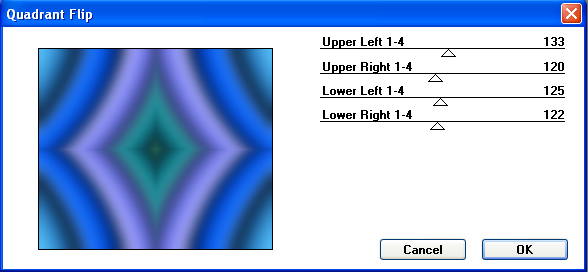
EFFECTS >>> PLUGINS >>> Mirror Rave >>> Quadrant Flip
|
STEP 3
LAYERS >>> DUPLICATE
and again ....
LAYERS >>> DUPLICATE
EFFECTS >>> IMAGE EFFECTS >>> PAGE CURL
.COLOUR = #0e3fbe
Click the first corner
|
|
STEP 4
EFFECTS >>> IMAGE EFFECTS >>> PAGE CURL
Same settings
Click the second corner 
EFFECTS >>> IMAGE EFFECTS >>> PAGE CURL
Same settings
Click the third corner 
EFFECTS >>> IMAGE EFFECTS >>> PAGE CURL
Same settings
Click the fourth corner 
|
|
STEP 5
IMAGE >>> RESIZE = 87%
Ensure "Resize all layers" is UNCHECKED
Resample using WEIGHTED AVERAGE
EFFECTS >>> ARTISTIC EFFECTS >>> HALFTONE |
|
STEP 6
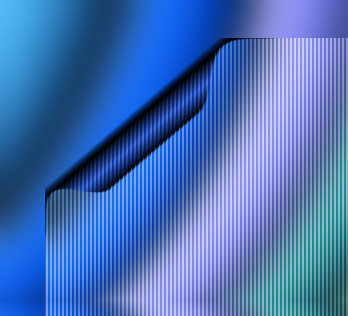
Your Result
SAVE YOUR WORK
|
STEP 7
ACTIVATE Copy of Raster 1
IMAGE >>> RESIZE = 90%
Ensure "Resize all layers" is UNCHECKED
Resample using WEIGHTED AVERAGE
EFFECTS >>> IMAGE EFFECTS >>> PAGE CURL
|
|
STEP 8
"Curl" all 4 corners as before.
|
|
STEP 9
CLOSE the top 2 layers
Activate Raster1
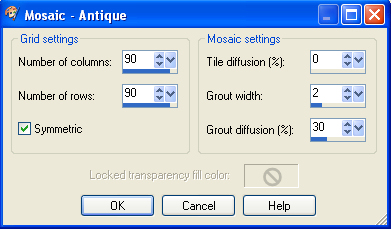
EFFECTS >>> TEXTURE EFFECTS >>> Mosaic - Antique
EFFECTS >>> EDGE EFFECTS >>> ENHANCE

,
|
STEP 10
OPEN ALL LAYERS
In your LAYER PALETTE change the
BLEND MODE to MULTIPLY on Copy of Raster 1
ADJUST >>> SHARPNESS >>> SHARPEN MORE
SAVE YOUR WORK
|
|
STEP 11
ACTIVATE the top layer
CLOSE ALL LAYERS
LAYERS >>> NEW RASTER LAYER
SELECTIONS >>> SELECT ALL
Open up the sg_perspective-flooring-3 image
in your PSP workspace
Right click on the Title Bar and select COPY from the options
Right click on the Title Bar of your tag image
and select PASTE INTO SELECTION from the options.
DESELECT
|
STEP 12
LAYERS >>> NEW RASTER LAYER
Choose your SELECTION TOOL then click on the
CUSTOM SELECTION symbol
and enter these coordinates. |
|
STEP 13
Open up the digital-art-landscape image
in your PSP workspace
Right click on the Title Bar and select COPY from the options
Right click on the Title Bar of your tag image
and select PASTE INTO SELECTION from the options.
DESELECT |
|
STEP 14
Open up the tess railing image in your PSP workspace
Right click on the Title Bar and select COPY from the options
Right click on the Title Bar of your tag image
and select PASTE AS NEW LAYER from the options.
Choose your SELECTION TOOL then click on the
CUSTOM SELECTION symbol
and enter these coordinates. |
|
STEP 15
EDIT >>> CLEAR
DESELECT
VIEW >>> RULERS
Select your RASTER DEFORM tool
Mode = SCALE
use default settings
PSPX-X9:Select your PICK tool
Pull the centre left and right nodes to the outer edges of your image.
Push the centre bottom node up to the 430 pixel mark on your left ruler.
Pull the centre top node down to the 140 pixel mark on your left ruler.
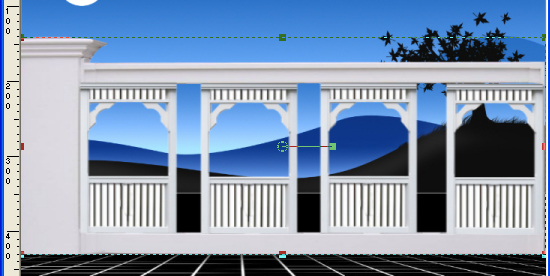
Click the RESET RECTANGLE arrow
Select the MOVER tool to disengage the DEFORMATION tool (PICK tool)
ADJUST >>> SHARPNESS >>> SHARPEN MORE
SAVE YOUR WORK |
STEP 16
EFFECTS >>> PLUGINS >>> EYE CANDY 3 >>>
DROP SHADOW
OR
EFFECTS >>> PLUGINS >>> EYE CANDY 4000 >>>
SHADOWLAB
Center Offset Direction = 315
Center Offset Distance = 6.00
Overall Opacity = 70
Overall Blur (Pixels) = 10.00
Perspectivel Blur (Pixels) = 0.00
Color = BLACK
Check 'Draw Only Outside Selection' |
|
STEP 17
Open up the Elephant_43 image in your PSP workspace
Right click on the Title Bar and select COPY from the options
Right click on the Title Bar of your tag image
and select PASTE AS NEW LAYER from the options.
IMAGE >>> RESIZE = 30%
Ensure "Resize all layers" is UNCHECKED
Resample using WEIGHTED AVERAGE
ADJUST >>> SHARPNESS >>> SHARPEN
EFFECTS >>> IMAGE EFFECTS >>> OFFSET
Horizontal Offset = - ( minus ) 85
Vertical Offset = - ( minus ) 10
Edge Mode = Transparent
LAYERS >>> ARRANGE >>> MOVE DOWN
EFFECTS >>> PLUGINS >>> EYE CANDY 3 >>>
DROP SHADOW... Same settings
OR
EFFECTS >>> PLUGINS >>> EYE CANDY 4000 >>>
SHADOWLAB... Same settings |
|
STEP 18
ACTIVATE the top layer
Open up the Micos_monkey image in your PSP workspace
Right click on the Title Bar and select COPY from the options
Right click on the Title Bar of your tag image
and select PASTE AS NEW LAYER from the options.
IMAGE >>> RESIZE = 25%
Ensure "Resize all layers" is UNCHECKED
Resample using WEIGHTED AVERAGE
ADJUST >>> SHARPNESS >>> SHARPEN
EFFECTS >>> IMAGE EFFECTS >>> OFFSET
Horizontal Offset = - ( minus ) 205
Vertical Offset = 160
Edge Mode = Transparent
|
|
STEP 19
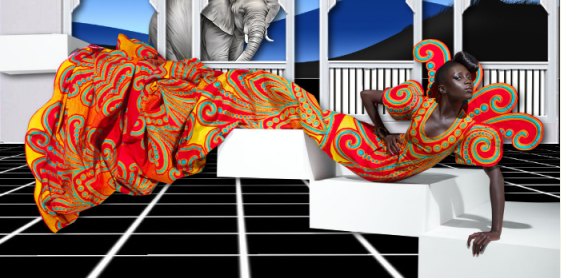
Open up the calguisgrace30810 image in your PSP workspace
Right click on the Title Bar and select COPY from the options
Right click on the Title Bar of your tag image
and select PASTE AS NEW LAYER from the options.
IMAGE >>> MIRROR
EFFECTS >>> IMAGE EFFECTS >>> OFFSET
Horizontal Offset = 0
Vertical Offset = - ( minus ) 165
Edge Mode = Transparent
EFFECTS >>> PLUGINS >>> EYE CANDY 3 >>>
DROP SHADOW
... Same settings
OR
EFFECTS >>> PLUGINS >>> EYE CANDY 4000 >>>
SHADOWLAB
... Same settings
SAVE YOUR WORK
|
STEP 20
Open up the Peacock-bookend image in your PSP workspace
Right click on the Title Bar and select COPY from the options
Right click on the Title Bar of your tag image
and select PASTE AS NEW LAYER from the options.
IMAGE >>> RESIZE = 20%
Ensure "Resize all layers" is UNCHECKED
Resample using WEIGHTED AVERAGE
ADJUST >>> SHARPNESS >>> SHARPEN
EFFECTS >>> PLUGINS >>> EYE CANDY 3 >>>
DROP SHADOW
... Same settings BUT .. change DIRECTION to 135
OR
EFFECTS >>> PLUGINS >>> EYE CANDY 4000 >>> SHADOWLAB
... Same settings BUT .. change DIRECTION to 135
Reposition with your MOVER tool
|
|
STEP 21
Open up the Saphiere_WA_Cougar_1 image
in your PSP workspace
Right click on the Title Bar and select COPY from the options
Right click on the Title Bar of your tag image
and select PASTE AS NEW LAYER from the options.
IMAGE >>> RESIZE = 35%
Ensure "Resize all layers" is UNCHECKED
Resample using WEIGHTED AVERAGE
ADJUST >>> SHARPNESS >>> SHARPEN
EFFECTS >>> IMAGE EFFECTS >>> OFFSET
Horizontal Offset = - ( minus ) 132
Vertical Offset = - ( minus ) 190
Edge Mode = Transparent |
|
STEP 22
LAYERS >>> MERGE >>> MERGE VISIBLE
IMAGE >>> RESIZE = 75%
Ensure "Resize all layers" is UNCHECKED
Resample using WEIGHTED AVERAGE
ADJUST >>> SHARPNESS >>> SHARPEN
With your MAGIC WAND
Mode = Replace
Match Mode = RGB Value
Tolerance = 0
Feather = 0
Antialias = UNchecked
Sample Merged = UNCHECKED
PSP9 - X9: Check CONTIGUOUS
PSPX - X9: There is no " Sample Merged"
PSPX - X9: Use all layers = UNChecked
Select the OUTER transparent area. |
|
STEP 23
SELECTIONS >>> INVERT
SELECTIONS >>> MODIFY >>> CONTRACT = 4
SELECTIONS >>> INVERT
Flood fill with BLUE #1e60f4
SELECTIONS >>> INVERT
SELECTIONS >>> MODIFY >>> EXPAND = 4
SELECTIONS >>> INVERT
EDIT >>> CLEAR
DESELECT
SAVE YOUR WORK |
|
STEP 24
EFFECTS >>> PLUGINS >>> EYE CANDY 3 >>>
DROP SHADOW
~~~~~~~~~~~~~~~~~~~
OR
EFFECTS >>> PLUGINS >>> EYE CANDY 4000 >>>
SHADOWLAB
Center Offset Direction = 315
Center Offset Distance = 5.00
Overall Opacity = 60
Overall Blur (Pixels) = 10.00
Perspectivel Blur (Pixels) = 0.00
Color = BLACK
Check 'Draw Only Outside Selection' |
|
STEP 25
EDIT >>> Repeat Drop Shadow.. change DIRECTION to 135
~~~~~~~~~~~~~~~~~~~
OR
EDIT >>> Repeat Shadowlab.. change DIRECTION to 135
OPEN ALL LAYERS
SAVE YOUR WORK
, |
STEP 26
Open up the Manu70_Needles image
in your PSP workspace
Activate Raster 7
Right click on the Title Bar and select COPY from the options
Right click on the Title Bar of your tag image
and select PASTE AS NEW LAYER from the options.
IMAGE >>> RESIZE = 45%
Ensure "Resize all layers" is UNCHECKED
Resample using WEIGHTED AVERAGE
ADJUST >>> SHARPNESS >>> SHARPEN
EFFECTS >>> IMAGE EFFECTS >>> OFFSET
Horizontal Offset = - ( minus ) 250
Vertical Offset = 185
Edge Mode = Transparent, |
|
STEP 27
LAYERS >>> DUPLICATE
IMAGE >>> MIRROR
LAYERS >>> MERGE >>> MERGE DOWN
Edit >>> Repeat Layer Merge Down
ACTIVATE Copy of Raster 1
, |
STEP 28
EFFECTS >>> PLUGINS >>> EYE CANDY 3 >>>
DROP SHADOW...
Same settings
EDIT >>> Repeat Drop Shadow.. change DIRECTION to 315
LAYERS >>> MERGE >>> MERGE VISIBLE
~~~~~~~~~~~~~~~~~~~
OR
EFFECTS >>> PLUGINS >>> EYE CANDY 4000 >>>
SHADOWLAB... Same settings
EDIT >>> Repeat Shadowlab.. change DIRECTION to 315
LAYERS >>> MERGE >>> MERGE VISIBLE
|
|
STEP 29
Open up the Sanctuary frame image in your PSP workspace
Right click on the Title Bar and select COPY from the options
Right click on the Title Bar of your tag image
and select PASTE AS NEW LAYER from the options.
LAYERS >>> MERGE >>> MERGE VISIBLE
, |
STEP 30
LAYERS >>> NEW RASTER LAYER
SELECT your TEXT tool
With a font of your choice add your name
, |
|
STEP 31
LAYERS >>> MERGE >>> MERGE ALL (Flatten)
Save as .jpg image
|
|
|
|
|