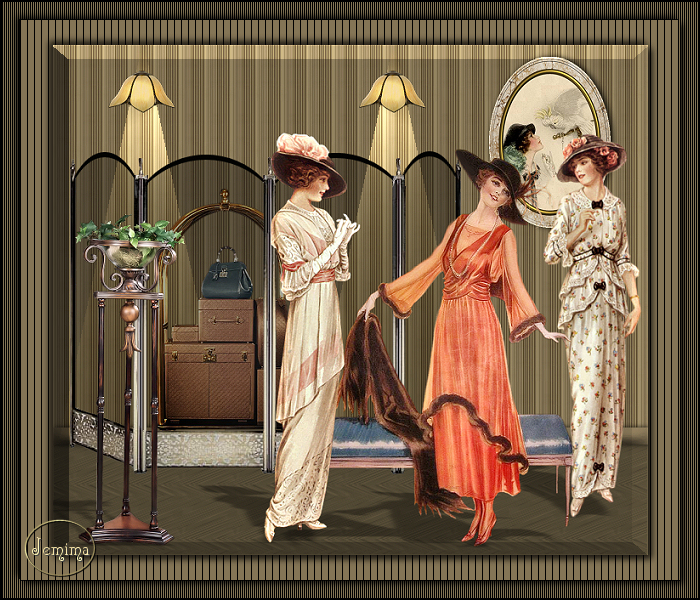
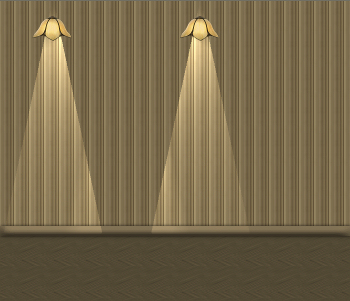
STEP 1
Open a new image 700 x 600
Transparent background
PSP9: Colour Depth = 16 Million Colors (24bit)
PSPX-X9: Colour Depth RGB = 8bits/channel
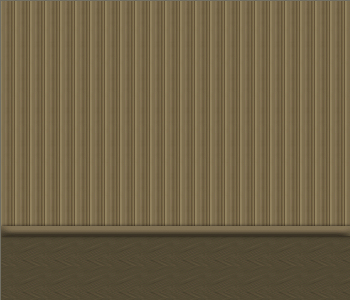
Flood fill with BROWN #706348
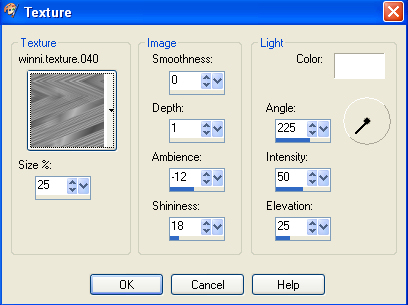
EFFECTS >>> TEXTURE EFFECTS >>> TEXTURE
TEXTURE = winni.texture.040
.
. |
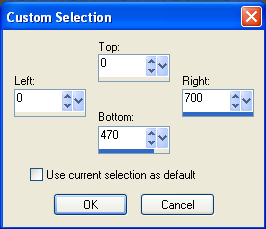
STEP 2
LAYERS >>> NEW RASTER LAYER
Choose your SELECTION TOOL then click on the
CUSTOM SELECTION
symbol
and enter these coordinates.
|
|
STEP 3
Flood fill with BROWN #706348
EFFECTS >>> TEXTURE EFFECTS >>> SCULPTURE
PATTERN = JF178
COLOUR = #c0c0c0
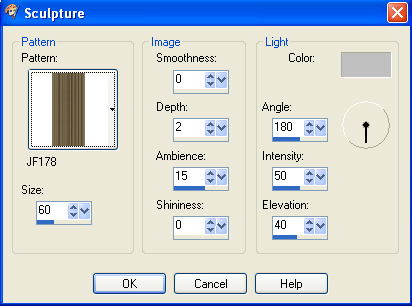
DESELECT
|
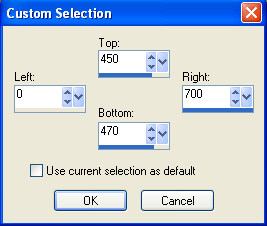
STEP 4
Choose your SELECTION TOOL then click on the
CUSTOM SELECTION symbol
and enter these coordinates.
.
|
|
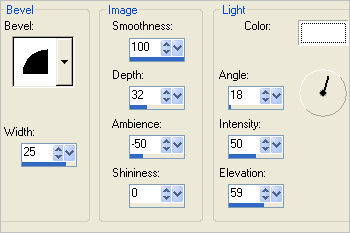
STEP 5
Flood fill with LIGHT BROWN #847556
EFFECTS >>> 3D EFFECTS >>> INNER BEVEL |
|
STEP 6
EFFECTS >>> 3D EFFECTS >>> DROP SHADOW
Vertical offset = 0
Horizontal offset = 2
Colour = Black
Opacity = 80
Blur =10.00
DESELECT
LAYERS >>> MERGE >>> MERGE DOWN
SAVE YOUR WORK
|
|
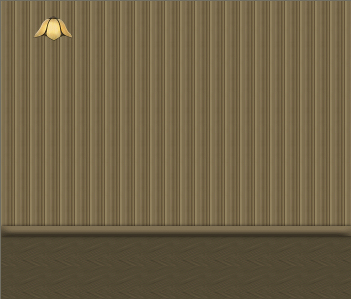
STEP 7
Open up the Wall-lamp image in your PSP workspace
Right click on the Title Bar and select COPY from the options
Right click on the Title Bar of your tag image
and select PASTE AS NEW LAYER from the options.
IMAGE >>> RESIZE = 15%
Ensure "Resize all layers" is UNCHECKED
Resample using WEIGHTED AVERAGE
ADJUST >>> SHARPNESS >>> SHARPEN
EFFECTS >>> IMAGE EFFECTS >>> OFFSET
Horizontal Offset = - ( minus ) 245
Vertical Offset = 245
Edge Mode = Transparent
|
|
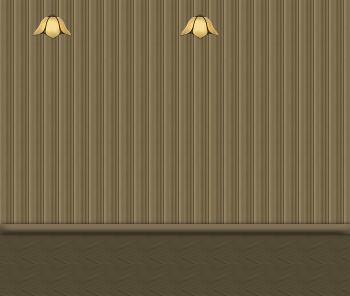
STEP 8
LAYERS >>> DUPLICATE
EFFECTS >>> IMAGE EFFECTS >>> OFFSET
Horizontal Offset = 295
Vertical Offset = 0
Edge Mode = Transparent
LAYERS >>> MERGE >>> MERGE DOWN
|
|
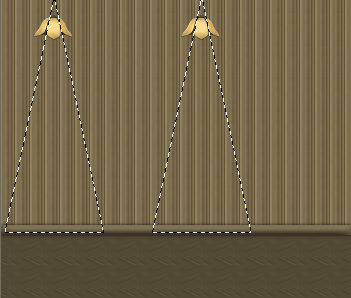
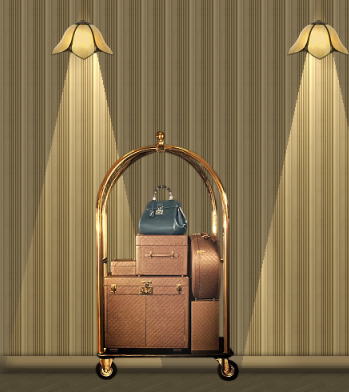
STEP 9
ACTIVATE Raster 1
SELECTIONS >>> Load/Save Selection >>>
Load Selection from disk
Select the SELECTION JF1 selection
SELECTIONS >>> INVERT |
|
STEP 10
EFFECTS >>> ILLUMINATION EFFECTS >>> LIGHTS
FIRST: On Light Source 2, 4 and 5
Make sure the "Settings" box is UNCHECKED
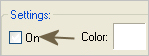
ACTIVATE Light Source 1 and enter these settings.
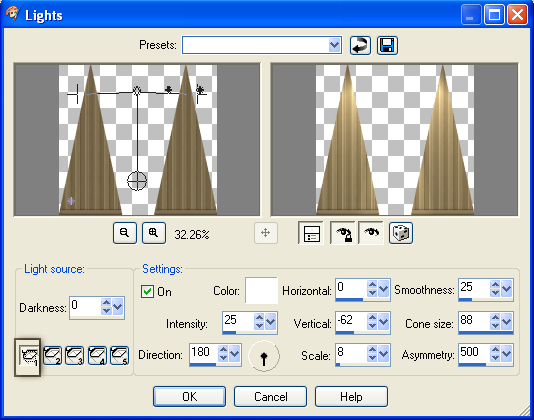
DO NOT CLICK OK
|
STEP 11
ACTIVATE Light Source 3 and enter these settings.
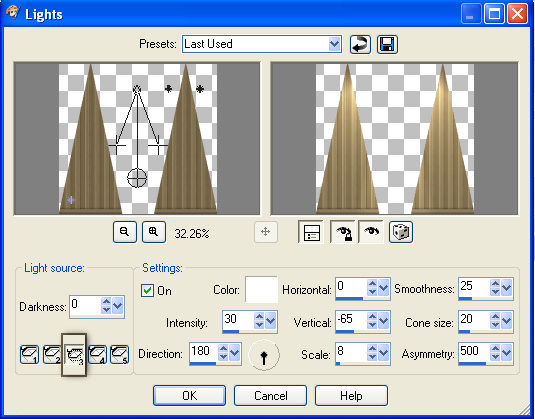
CLICK OK
,
|
STEP 12
Right click on the Title Bar and select COPY from the options
LAYERS >>> NEW RASTER LAYER
Right click on the Title Bar of your tag image
and select PASTE INTO SELECTION from the options.
SELECTIONS >>> SELECT NONE
In your LAYER PALETTE change the OPACITY to 40%
Change the BLEND MODE to SOFT LIGHT
ADJUST >>> BLUR >>> GAUSSIAN BLUR
Radius = 40.00
SAVE YOUR WORK
|
|
STEP 13
ACTIVATE Raster 1
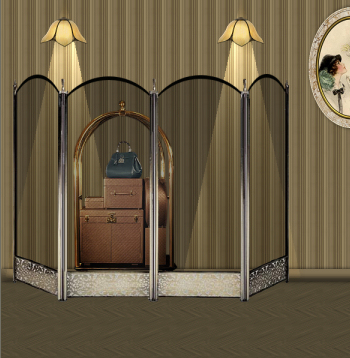
Open up the SvB Hotel Trolley image in your PSP workspace
Right click on the Title Bar and select COPY from the options
Right click on the Title Bar of your tag image
and select PASTE AS NEW LAYER from the options.
IMAGE >>> RESIZE = 50%
Ensure "Resize all layers" is UNCHECKED
Resample using WEIGHTED AVERAGE
Remove the tuber text with your SELECTION TOOL
ADJUST >>> SHARPNESS >>> SHARPEN
EFFECTS >>> IMAGE EFFECTS >>> OFFSET
Horizontal Offset = - ( minus ) 140
Vertical Offset = - ( minus ) 25
Edge Mode = Transparent
|
|
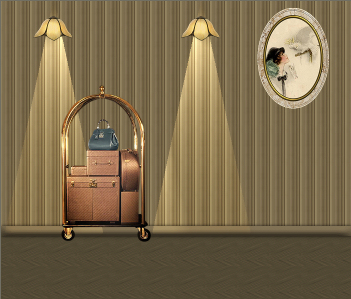
STEP 14
Open up the ladybird1 image in your PSP workspace
Right click on the Title Bar and select COPY from the options
Right click on the Title Bar of your tag image
and select PASTE AS NEW LAYER from the options.
IMAGE >>> RESIZE = 45%
Ensure "Resize all layers" is UNCHECKED
Resample using WEIGHTED AVERAGE
Remove the tuber text with your SELECTION TOOL
ADJUST >>> SHARPNESS >>> SHARPEN
EFFECTS >>> IMAGE EFFECTS >>> OFFSET
Horizontal Offset = 235
Vertical Offset = 185
Edge Mode = Transparent |
|
STEP 15
EFFECTS >>> 3D EFFECTS >>> DROP SHADOW
Vertical offset = 0
Horizontal offset = 3
Colour = Black
Opacity = 80
Blur = 10.00 |
|
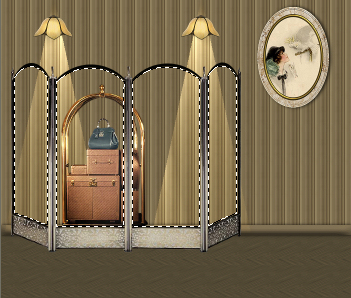
STEP 16
Open up the screen image in your PSP workspace
Right click on the Title Bar and select COPY from the options
Right click on the Title Bar of your tag image
and select PASTE AS NEW LAYER from the options.
EFFECTS >>> IMAGE EFFECTS >>> OFFSET
Horizontal Offset = - ( minus ) 100
Vertical Offset = - ( minus ) 15
Edge Mode = Transparent
|
STEP 17
With your MAGIC WAND
Mode = Replace
Match Mode = RGB Value
Tolerance = 0
Feather = 0
Antialias = UNchecked
Sample Merged = UNCHECKED
PSP9 - X9: Check CONTIGUOUS
PSPX - X9: There is no " Sample Merged"
PSPX - X9: Use all layers = UNChecked
and while depressing your SHIFT KEY...
Select the areas on the screen as shown |
|
STEP 18
SELECTIONS >>> MODIFY >>> EXPAND = 4
LAYERS >>> NEW RASTER LAYER
Flood fill with WHITE
LAYERS >>> ARRANGE >>> MOVE DOWN
DESELECT
In your LAYER PALETTE change the OPACITY to 35%
ADJUST >>> COLOUR BALANCE >>> NEGATIVE IMAGE
PSPX - X9: IMAGE >>> NEGATIVE IMAGE
LAYERS >>> MERGE >>> MERGE VISIBLE
SAVE YOUR WORK |
|
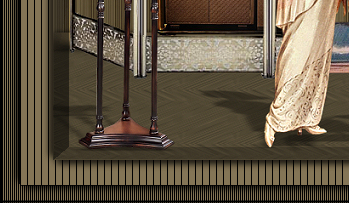
STEP 19
Open up the CJ_Vintage Lady 232 image
in your PSP workspace
Right click on the Title Bar and select COPY from the options
Right click on the Title Bar of your tag image
and select PASTE AS NEW LAYER from the options.
IMAGE >>> RESIZE = 80%
Ensure "Resize all layers" is UNCHECKED
Resample using WEIGHTED AVERAGE
ADJUST >>> SHARPNESS >>> SHARPEN
IMAGE >>> MIRROR
EFFECTS >>> IMAGE EFFECTS >>> OFFSET
Horizontal Offset = 100
Vertical Offset = - ( minus ) 55
Edge Mode = Transparent |
|
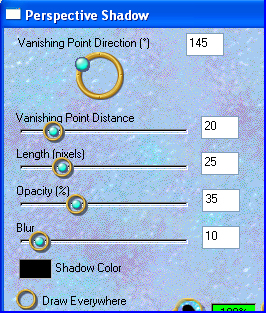
STEP 20
EFFECTS >>> PLUGINS >>> EYE CANDY 3 >>>
PERSPECTIVE SHADOW.
(NOTE: I could not get the same effect
using EYE CANDY 4000) |
|
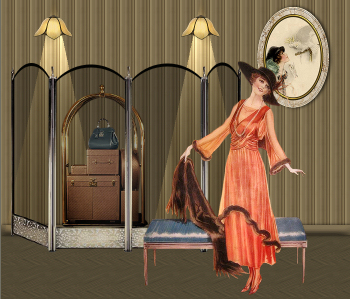
STEP 21
Open up the CGS~VictorianWeddingGirls image
in your PSP workspace
Activate layer 3
Right click on the Title Bar and select COPY from the options
Right click on the Title Bar of your tag image
and select PASTE AS NEW LAYER from the options.
IMAGE >>> RESIZE = 80%
Ensure "Resize all layers" is UNCHECKED
Resample using WEIGHTED AVERAGE
ADJUST >>> SHARPNESS >>> SHARPEN
IMAGE >>> MIRROR
EFFECTS >>> IMAGE EFFECTS >>> OFFSET
Horizontal Offset = - ( minus ) 45
Vertical Offset = - ( minus ) 45
Edge Mode = Transparent
EFFECTS >>> PLUGINS >>> EYE CANDY 3 >>>
PERSPECTIVE SHADOW.
Same settings |
|
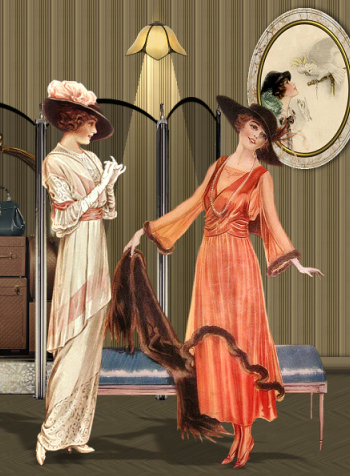
STEP 22
ACTIVATE the Merged layer
Back to the CGS~VictorianWeddingGirls image
in your PSP workspace
Activate layer 2
Right click on the Title Bar and select COPY from the options
Right click on the Title Bar of your tag image
and select PASTE AS NEW LAYER from the options.
IMAGE >>> RESIZE = 75%
Ensure "Resize all layers" is UNCHECKED
Resample using WEIGHTED AVERAGE
ADJUST >>> SHARPNESS >>> SHARPEN
EFFECTS >>> IMAGE EFFECTS >>> OFFSET
Horizontal Offset = 284
Vertical Offset = - ( minus ) 30
Edge Mode = Transparent
EFFECTS >>> PLUGINS >>> EYE CANDY 3 >>>
PERSPECTIVE SHADOW.
Same settings |
|
STEP 23
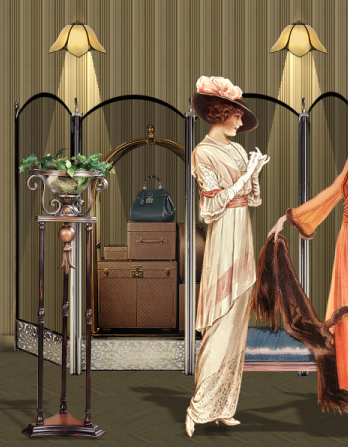
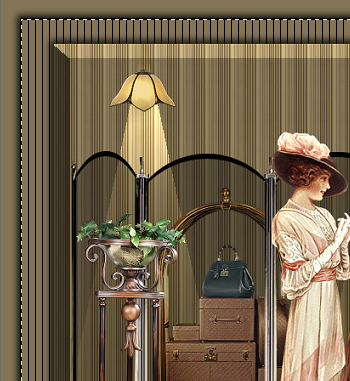
Open up the Vase-201-Azalee image
in your PSP workspace
Select the plant stand with your SELECTION TOOL
Right click on the Title Bar and select COPY from the options
Right click on the Title Bar of your tag image
and select PASTE AS NEW LAYER from the options.
IMAGE >>> RESIZE = 50%
Ensure "Resize all layers" is UNCHECKED
Resample using WEIGHTED AVERAGE
ADJUST >>> SHARPNESS >>> SHARPEN
EFFECTS >>> IMAGE EFFECTS >>> OFFSET
Horizontal Offset = - ( minus ) 260
Vertical Offset = - ( minus ) 80
Edge Mode = Transparent
EFFECTS >>> PLUGINS >>> EYE CANDY 3 >>>
PERSPECTIVE SHADOW.
Same settings
LAYERS >>> MERGE >>> MERGE VISIBLE
SAVE YOUR WORK
|
|
STEP 24
IMAGE >>> RESIZE = 85%
Ensure "Resize all layers" is UNCHECKED
Resample using WEIGHTED AVERAGE
ADJUST >>> SHARPNESS >>> SHARPEN
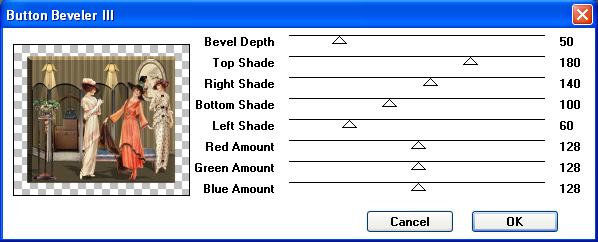
EFFECTS >>> PLUGINS >>> GRAPHICS PLUS >>> Button Beveler III
, |
STEP 25
LAYERS >>> NEW RASTER LAYER
Flood fill with LIGHT BROWN #847556
LAYERS >>> ARRANGE >>> MOVE DOWN
SELECTIONS >>> SELECT ALL
SELECTIONS >>> MODIFY >>> CONTRACT = 20
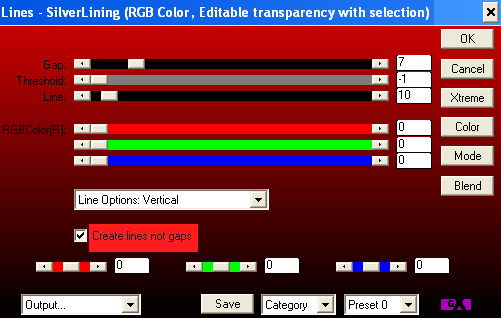
EFFECTS >>> PLUGINS >>> AP 01 LINES >>> Silver Lining
, |
STEP 26
EFFECTS >>> 3D EFFECTS >>> DROP SHADOW
Vertical & Horizontal offsets = 1
Colour = Black
Opacity = 80
Blur = 0
Repeat Drop Shadow effect changing
Vertical & Horizontal Offsets to - ( minus ) 1
Click OK
EFFECTS >>> 3D EFFECTS >>> DROP SHADOW
Vertical & Horizontal offsets = 4
Colour = Black
Opacity = 80
Blur = 10.00
Repeat Drop Shadow effect changing
Vertical & Horizontal Offsets to - ( minus ) 4
Click OK |
|
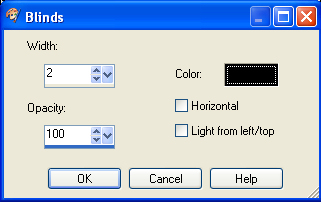
STEP 27
SELECTIONS >>> INVERT
EFFECTS >>> TEXTURE EFFECTS >>> BLINDS |
|
STEP 28
DESELECT
LAYERS >>> NEW RASTER LAYER
Flood fill with BLACK
SELECTIONS >>> SELECT ALL
SELECTIONS >>> MODIFY >>> CONTRACT = 2
EDIT >>> CLEAR
DESELECT
LAYERS >>> MERGE >>> MERGE VISIBLE |
|
STEP 29
LAYERS >>> NEW RASTER LAYER
SELECT your TEXT tool
With a font of your choice add your name.
|
STEP 30
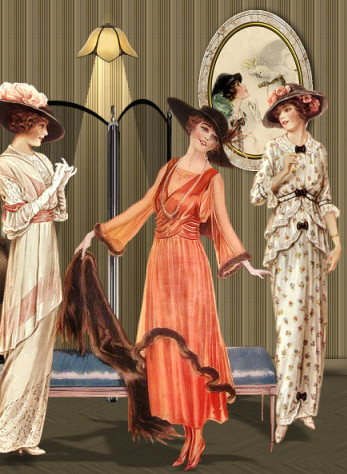
LAYERS >>> MERGE >>> MERGE ALL (Flatten)
Save as .jpg image
.
|
|
|
|
|
|
|