REMEMBER TO SAVE OFTEN.
|
STEP 1
In your MATERIALS PALETTE
Load DARK PINK " #a44855 " in your foreground
Load LIGHT PINK " #eed5d4 " in your background
Then click on the GRADIENT option in your foreground palette
Select the "Foreground-background" option
using these settings. |
|
STEP 2
Open a new image 700 x 600
Transparent background
PSP9: Colour Depth = 16 Million Colors (24bit)
PSPX-X9: Colour Depth RGB = 8bits/channel
VIEW >>> RULERS
Flood fill with GRADIENT
EFFECTS >>> PLUGINS >>> Mehdi >>> Sorting Tiles
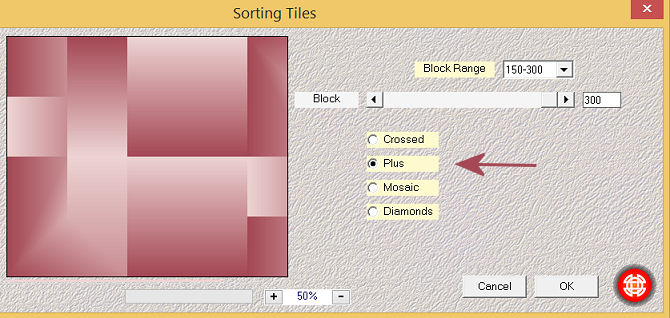
|
STEP 3
LAYERS >>> DUPLICATE (Twice)
EFFECTS >>> PLUGINS >>> MuRa's Filter Meister >>> Perspective Tiling
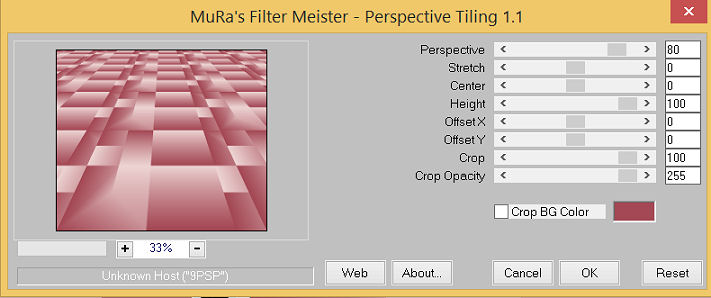
|
STEP 4
EFFECTS >>> REFLECTION EFFECTS >>>
ROTATING MIRROR
Horizontal Offset = 0
Vertical Offset = n/a
Rotation Angle = 180
Edge Mode = Reflect
Select your RASTER DEFORM tool
Mode = SCALE
use default settings
PSPX-X9:Select your PICK tool
Pull the centre top node down level with the 450 pixel mark on your left ruler

Click the RESET RECTANGLE arrow
Select the MOVER tool to disengage the DEFORMATION tool (PICK tool)
ADJUST >>> SHARPNESS >>> SHARPEN MORE
|
STEP 5
CLOSE Copy (2) of Raster 1
ACTIVATE Copy of Raster 1
IMAGE >>> RESIZE =85%
Ensure "Resize all layers" is UNCHECKED
Resample using WEIGHTED AVERAGE
EFFECTS >>> REFLECTION EFFECTS >>> ROTATING MIRROR
Horizontal Offset = 0
Vertical Offset = n/a
Rotation Angle = 0
Edge Mode = Reflect
Select your RASTER DEFORM tool
Mode = SCALE
use default settings
PSPX-X9:Select your PICK tool
Move the centre left node to the right, level with the 100 pixel mark on your top ruler.
Move the centre right node to the left, level with the 600 pixel mark on your top ruler.
Move the centre top node up, level with the 25 pixel mark on your left ruler.
Move the centre bottom node up, level with the 460 pixel mark on your left ruler.


Click the RESET RECTANGLE arrow
Select the MOVER tool to disengage the DEFORMATION tool (PICK tool)
|
STEP 6
EFFECTS >>> ILLUMINATION EFFECTS >>> LIGHTS
Go through Light Sources 2 to 5 and uncheck "Settings"

Open Light Source 1 and enter these settings
COLOUR = #c0c0c0
 , ,
|
STEP 7
In your LAYER PALETTE change the OPACITY to 80%
Change the BLEND MODE to LUMINANCE
LAYERS >>> DUPLICATE
SAVE YOUR WORK
|
|
STEP 8
Open up the perspective image in your PSP workspace
Right click on the Title Bar and select COPY from the options
Right click on the Title Bar of your tag image
and select PASTE AS NEW LAYER from the options.
In your LAYER PALETTE change the BLEND MODE
to OVERLAY
Select your RASTER DEFORM tool
Same settings
PSPX-X9:Select your PICK tool
Move the centre left and right nodes and top and bottom centre nodes level with the edges of the image beneath |
|
STEP 9
Click the RESET RECTANGLE arrow
Select the MOVER tool to disengage the
DEFORMATION tool (PICK tool)
LAYERS >>> DUPLICATE
In your LAYER PALETTE change the
BLEND MODE to LUMINANCE
ADJUST >>> SHARPNESS >>> SHARPEN
|
|
STEP 10
EFFECTS >>> 3D EFFECTS >>> DROP SHADOW
Vertical & Horizontal offsets = 1
Colour = BLACK
Opacity = 80
Blur = 0.00
ACTIVATE Copy of Raster 1
EFFECTS >>> 3D EFFECTS >>> DROP SHADOW
Vertical & Horizontal offsets = 8
Colour = MAROON #612d34
Opacity = 80
Blur = 10.00
Repeat Drop Shadow effect changing
Vertical & Horizontal Offsets to - ( minus ) 8
Click OK
OPEN (Top layer) Copy (2) of Raster 1
|
|
STEP 11
ACTIVATE Raster 1
Open up the IMG_64742 image in your PSP workspace
Right click on the Title Bar and select COPY from the options
Right click on the Title Bar of your tag image
and select PASTE AS NEW LAYER from the options.
LAYERS >>> DUPLICATE
IMAGE >>> MIRROR
LAYERS >>> MERGE >>> MERGE DOWN
In your LAYER PALETTE change the OPACITY to 80%
Change the BLEND MODE to LUMINANCE
LAYERS >>> MERGE >>> MERGE VISIBLE |
|
STEP 12
SAVE YOUR WORK
Open up the Romantic_Table image in your PSP workspace
Right click on the Title Bar and select COPY from the options
Right click on the Title Bar of your tag image
and select PASTE AS NEW LAYER from the options.
IMAGE >>> RESIZE = 50%
Ensure "Resize all layers" is UNCHECKED
Resample using WEIGHTED AVERAGE
ADJUST >>> SHARPNESS >>> SHARPEN |
|
STEP 13
Open up the Fustany-Shamekh image in your PSP workspace
Right click on the Title Bar and select COPY from the options
Right click on the Title Bar of your tag image
and select PASTE AS NEW LAYER from the options.
IMAGE >>> RESIZE = 45%
Ensure "Resize all layers" is UNCHECKED
Resample using WEIGHTED AVERAGE
ADJUST >>> SHARPNESS >>> SHARPEN
EFFECTS >>> IMAGE EFFECTS >>> OFFSET
Horizontal Offset = - ( minus ) 34
Vertical Offset = 13
Edge Mode = Transparent, |
|
STEP 14
In your LAYER PALETTE change the OPACITY to 50%
Choose your FREEHAND SELECTION TOOL
Selection Type = Point to Point
Mode = Replace
Feather = 1
Smoothing = 5
Antialias = Checked
ZOOM IN and select the area shown below
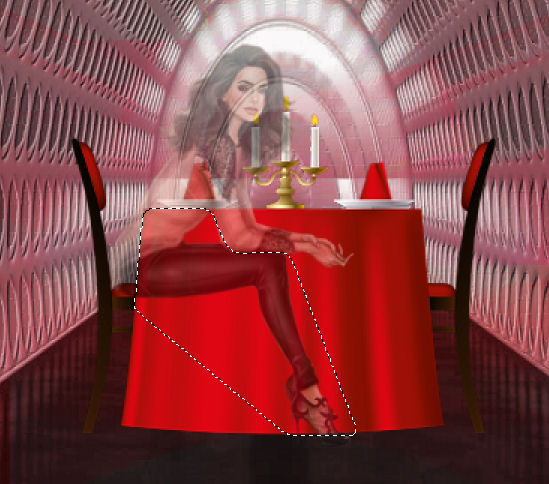 , , |
STEP 15
EDIT >>> CLEAR
DESELECT
In your LAYER PALETTE change the OPACITY to 100%
|
|
STEP 16
EFFECTS >>> 3D EFFECTS >>> DROP SHADOW
Vertical & Horizontal offsets = - ( minus ) 3
Colour = Black
Opacity = 80
Blur = 10.00
ACTIVATE Raster 1
EDIT >>> Repeat Drop Shadow
LAYERS >>> MERGE >>> MERGE VISIBLE
SAVE YOUR WORK |
|
STEP 17
Open up the cream cat image in your PSP workspace
Right click on the Title Bar and select COPY from the options
Right click on the Title Bar of your tag image
and select PASTE AS NEW LAYER from the options.
IMAGE >>> RESIZE = 25%
Ensure "Resize all layers" is UNCHECKED
Resample using WEIGHTED AVERAGE
ADJUST >>> SHARPNESS >>> SHARPEN
EFFECTS >>> IMAGE EFFECTS >>> OFFSET
Horizontal Offset = 85
Vertical Offset = - ( minus ) 130
Edge Mode = Transparent |
|
STEP 18
EFFECTS >>> 3D EFFECTS >>> DROP SHADOW
Vertical & Horizontal offsets = 15
Colour = Black
Opacity = 80
Blur =10.00
Check "Shadow on new layer"
Select your RASTER DEFORM tool
Mode = SCALE
use default settings
PSPX-X9:Select your PICK tool
Move the centre bottom node up level with the cats' feet.
Move the centre top node up to the 370 pixel mark
on your left ruler
Change the Mode = Free (Shift+Ctrl)
Move the top left node to the right level with the 425 pixel
mark on your top ruler and the 370 pixel mark
on your left ruler . |
|
STEP 18B
Click the RESET RECTANGLE arrow
Select the MOVER tool to disengage the DEFORMATION tool (PICK tool)
ADJUST >>> BLUR >>> GAUSSIAN BLUR
Radius = 8.00
ACTIVATE Raster 1
LAYERS >>> MERGE >>> MERGE DOWN
SAVE YOUR WORK
|
STEP 19
,Open up the pretty girl-348 image in your PSP workspace
Right click on the Title Bar and select COPY from the options
Right click on the Title Bar of your tag image
and select PASTE AS NEW LAYER from the options.
IMAGE >>> RESIZE = 80%
Ensure "Resize all layers" is UNCHECKED
Resample using WEIGHTED AVERAGE
ADJUST >>> SHARPNESS >>> SHARPEN
EFFECTS >>> IMAGE EFFECTS >>> OFFSET
Horizontal Offset = 185
Vertical Offset = - ( minus ) 45
Edge Mode = Transparent |
|
STEP 20
EFFECTS >>> 3D EFFECTS >>> DROP SHADOW
Same settings
Select your RASTER DEFORM tool
Mode = SCALE
use default settings
PSPX-X9:Select your PICK tool
Move the centre bottom node up level with the 550 pixel mark
on your left ruler .
Move the centre top node down to the 275 pixel mark
on your left ruler
|
|
STEP 20B
Change the Mode = Free (Shift+Ctrl)
Move the top left node to the right level with the 500 pixel
mark on your top ruler and the 275 pixel mark
on your left ruler .
Move the centre top node to the right level with the 650 pixel
mark on your top ruler and the 275 pixel mark
on your left ruler |
|
STEP 21
Click the RESET RECTANGLE arrow
Select the MOVER tool to disengage the DEFORMATION tool (PICK tool)
ADJUST >>> BLUR >>> GAUSSIAN BLUR
Radius = 8.00
ACTIVATE Raster 1
LAYERS >>> MERGE >>> MERGE DOWN
SAVE YOUR WORK, |
STEP 22
Open up the kitten-44 image in your PSP workspace
Right click on the Title Bar and select COPY from the options
Right click on the Title Bar of your tag image
and select PASTE AS NEW LAYER from the options.
IMAGE >>> MIRROR
IMAGE >>> RESIZE = 20%
Ensure "Resize all layers" is UNCHECKED
Resample using WEIGHTED AVERAGE
ADJUST >>> SHARPNESS >>> SHARPEN
EFFECTS >>> IMAGE EFFECTS >>> OFFSET
Horizontal Offset = 100
Vertical Offset = 35
Edge Mode = Transparent, |
|
STEP 23
Open up the flowers_by_kmygraphic image
in your PSP workspace
Right click on the Title Bar and select COPY from the options
Right click on the Title Bar of your tag image
and select PASTE AS NEW LAYER from the options.
IIMAGE >>> RESIZE = 50%
Ensure "Resize all layers" is UNCHECKED
Resample using WEIGHTED AVERAGE
ADJUST >>> SHARPNESS >>> SHARPEN
EFFECTS >>> IMAGE EFFECTS >>> OFFSET
Horizontal Offset = - ( minus ) 205
Vertical Offset = - ( minus ) 60
Edge Mode = Transparent, |
|
STEP 24
EFFECTS >>> 3D EFFECTS >>> DROP SHADOW
Same settings
Select your RASTER DEFORM tool
Mode = SCALE
use default settings
PSPX-X9:Select your PICK tool
Move the centre bottom node up level with the 480 pixel mark
on your left ruler .
Move the centre top node down to the 350 pixel mark
on your left ruler
Change the Mode = Free (Shift+Ctrl)
Move the top left node to the right level with the 100 pixel
mark on your top ruler and the 350 pixel mark
on your left ruler .
|
|
STEP 25
Click the RESET RECTANGLE arrow
Select the MOVER tool to disengage the DEFORMATION tool (PICK tool)
ADJUST >>> BLUR >>> GAUSSIAN BLUR
Radius = 8.00
ACTIVATE Raster 2
LAYERS >>> MERGE >>> MERGE DOWN
SAVE YOUR WORK |
STEP 26
Open up the child-4b image
in your PSP workspace
Right click on the Title Bar and select COPY from the options
Right click on the Title Bar of your tag image
and select PASTE AS NEW LAYER from the options.
IIMAGE >>> RESIZE = 40%
Ensure "Resize all layers" is UNCHECKED
Resample using WEIGHTED AVERAGE
ADJUST >>> SHARPNESS >>> SHARPEN
EFFECTS >>> IMAGE EFFECTS >>> OFFSET
Horizontal Offset = - ( minus ) 125
Vertical Offset = - ( minus ) 160
Edge Mode = Transparent,, |
|
STEP 27
EFFECTS >>> 3D EFFECTS >>> DROP SHADOW
Same settings
Select your RASTER DEFORM tool
Mode = SCALE
use default settings
PSPX-X9:Select your PICK tool
Move the centre bottom node up level with the 560 pixel mark
on your left ruler .
Move the centre top node down to the 420 pixel mark
on your left ruler
Change the Mode = Free (Shift+Ctrl)
Move the top left node to the right level with the 200 pixel
mark on your top ruler and the 420 pixel mark
on your left ruler |
|
STEP 28
Click the RESET RECTANGLE arrow
Select the MOVER tool to disengage the DEFORMATION tool (PICK tool)
ADJUST >>> BLUR >>> GAUSSIAN BLUR
Radius = 8.00
LAYERS >>> MERGE >>> MERGE VISIBLE
SAVE YOUR WORK |
STEP 29
LAYERS >>> NEW RASTER LAYER
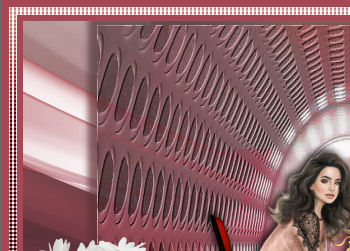
Flood fill with DARK PINK #a44855
SELECTIONS >>> SELECT ALL
SELECTIONS >>> MODIFY >>> CONTRACT = 8
EDIT >>> CLEAR
Flood fill with GRADIENT
EFFECTS >>> ARTISTIC EFFECTS >>> HALFTONE
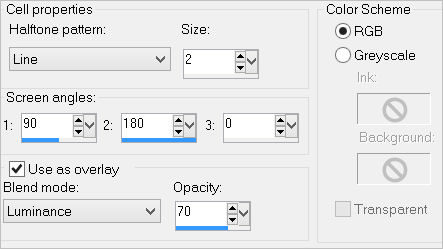
ADJUST >>> SHARPNESS >>> SHARPEN MORE
|
STEP 30
SELECTIONS >>> MODIFY >>> CONTRACT = 8
EDIT >>> CLEAR
Flood fill with DARK PINK #a44855
SELECTIONS >>> MODIFY >>> CONTRACT = 6
EDIT >>> CLEAR
DESELECT |
 |
STEP 31
With your MAGIC WAND
Mode = ADD (Shift)
Match Mode = RGB Value
Tolerance = 0
Feather = 0
Antialias = UNchecked
Sample Merged = UNCHECKED
PSP9 - X9: Check CONTIGUOUS
PSPX - X9: There is no " Sample Merged"
PSPX - X9: Use all layers = UNChecked,
Select the 2 DARK PINK borders |
|
STEP 32
EFFECTS >>> 3D EFFECTS >>> DROP SHADOW
Vertical & Horizontal offsets = 1
Colour = Black
Opacity = 100
Blur = 0
UNCHECK "Shadow on new layer")
Repeat Drop Shadow effect changing
Vertical & Horizontal Offsets to - ( minus ) 1
Click OK
EFFECTS >>> 3D EFFECTS >>> INNER BEVEL
COLOUR = #eeecec
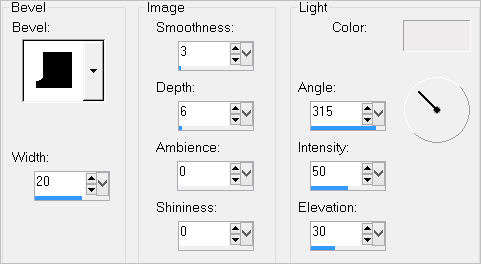
ADJUST >>> SHARPNESS >>> SHARPEN MORE
DESELECT
|
STEP 33
EFFECTS >>> 3D EFFECTS >>> DROP SHADOW
Vertical & Horizontal offsets = 8
Colour = Black
Opacity = 55
Blur = 15.00
Repeat Drop Shadow effect changing
Vertical & Horizontal Offsets to - ( minus ) 8
Click OK
LAYERS >>> MERGE >>> MERGE VISIBLE |
|
STEP 34
LAYERS >>> NEW RASTER LAYER
SELECT your TEXT tool
With a font of your choice add your name
|
|
STEP 35
LAYERS >>> MERGE >>> MERGE ALL (Flatten)
Save as .jpg image
|
|
|
|
|