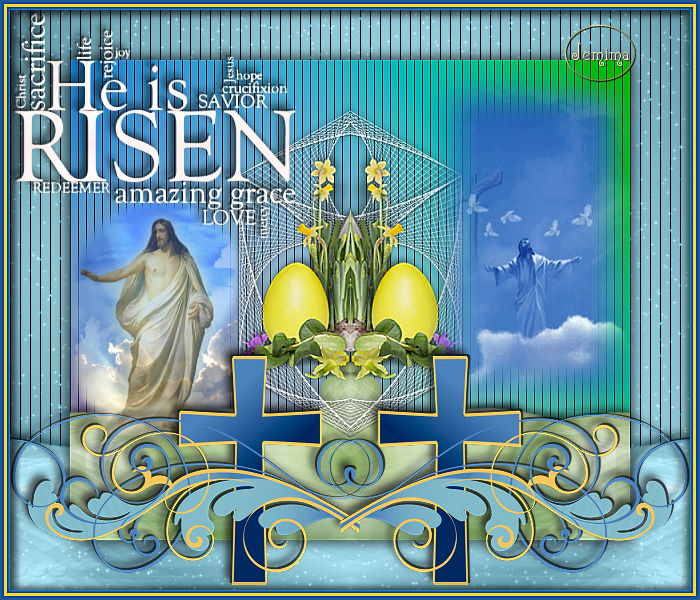
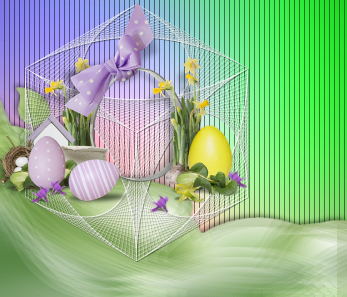
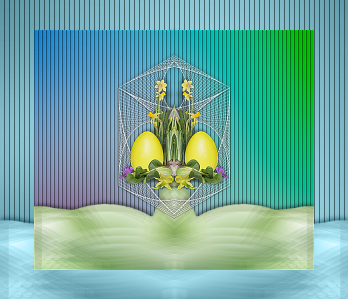
STEP 1
Open a new image 700 x 600
Transparent background
PSP9: Colour Depth = 16 Million Colors (24bit)
PSPX-X9: Colour Depth RGB = 8bits/channel
SELECTIONS >>> SELECT ALL
Open up the 475-colorful-fog image in your PSP workspace
Right click on the Title Bar and select COPY from the options
Right click on the Title Bar of your tag image
and select PASTE INTO SELECTION from the options.
DESELECT.
.
|
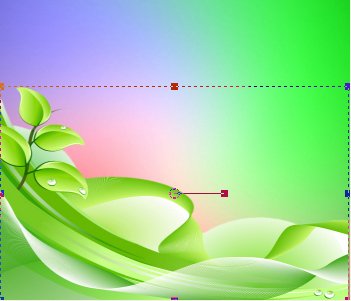
STEP 2
Open up the Green_nature_back1 image
in your PSP workspace
Right click on the Title Bar and select COPY from the options.
Right click on the Title Bar of your tag image
and select PASTE AS NEW LAYER from the options.
EFFECTS >>> IMAGE EFFECTS >>> OFFSET
Horizontal Offset = - ( minus ) 91
Vertical Offset = - ( minus ) 80
Edge Mode = Transparent
Select your RASTER DEFORM tool
Mode = SCALE
use default settings
PSPX-X9:Select your PICK tool
Pull the centre right node out to the edge of your image.
|
|
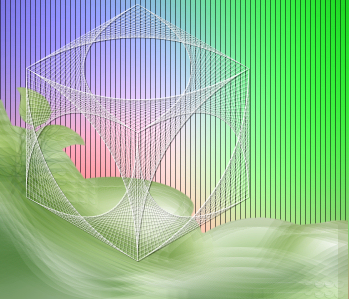
STEP 3
Click the RESET RECTANGLE arrow
Select the MOVER tool to disengage the DEFORMATION tool (PICK tool)
In your MATERIALS PALETTE
Load GREEN " #96be53 " in your background
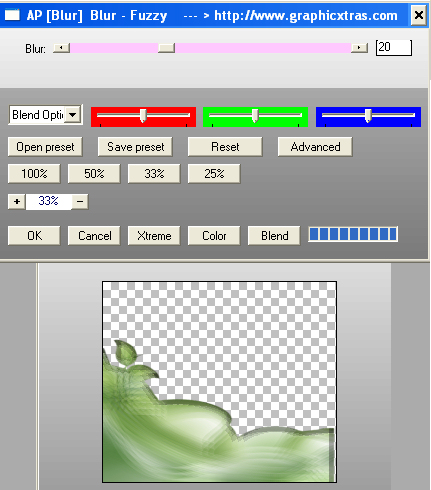
NOTE: If you have a different version of the next plugin use the settings in STEP 3A below.
EFFECTS >>> PLUGINS >>> AP [BLUR] >>> Blur - Fuzzy
.
|
STEP 3A

. |
STEP 4
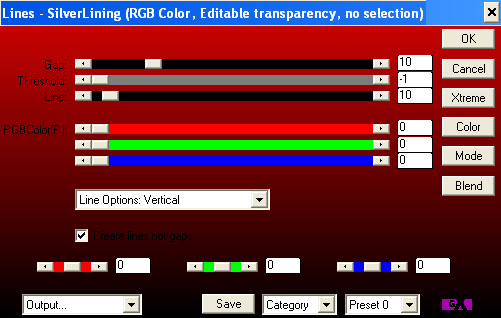
ACTIVATE Raster 1
EFFECTS >>> PLUGINS >>> AP 01 [Innovations] >>>Lines >>> SilverLining
.
|
STEP 5
LAYERS >>> NEW RASTER LAYER
Flood fill with BLUE #8bc4d3
LAYERS >>> ARRANGE >>> MOVE DOWN
(We will use this later) |
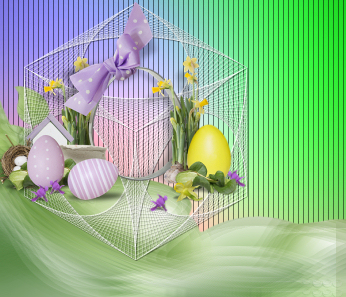
STEP 6
With Raster 2 active
Open up the 81687.png image
in your PSP workspace
Right click on the Title Bar and select COPY from the options.
Right click on the Title Bar of your tag image
and select PASTE AS NEW LAYER from the options.
ADJUST >>> COLOUR BALANCE >>> NEGATIVE IMAGE
PSPX - X9: IMAGE >>> NEGATIVE IMAGE
EFFECTS >>> IMAGE EFFECTS >>> OFFSET
Horizontal Offset = - ( minus ) 75
Vertical Offset = 35
Edge Mode = Transparent
EFFECTS >>> 3D EFFECTS >>> DROP SHADOW
Vertical & Horizontal offsets = 2
Colour = Black
Opacity = 50
Blur = 0
|
|
STEP 7
Open up the 309954f3_L image in your PSP workspace
Right click on the Title Bar and select COPY from the options.
Right click on the Title Bar of your tag image
and select PASTE AS NEW LAYER from the options.
EFFECTS >>> IMAGE EFFECTS >>> OFFSET
Horizontal Offset = - ( minus ) 115
Vertical Offset = 85
Edge Mode = Transparent
|
|
STEP 8
ACTIVATE Raster 2
EFFECTS >>> 3D EFFECTS >>> DROP SHADOW
Vertical & Horizontal offsets = - ( minus ) 4
Colour = Black
Opacity = 50
Blur = 15.00
|
|
STEP 9
ACTIVATE Raster 4
EDIT >>> Repeat Drop Shadow
ACTIVATE Raster 5
EDIT >>> Repeat Drop Shadow
In your LAYER PALETTE change the
BLEND MODE to BURN on Raster 1
SAVE YOUR WORK
|
|
STEP 10
ACTIVATE Raster 2
EFFECTS >>> REFLECTION EFFECTS >>>
ROTATING MIRROR
Horizontal Offset = 0
Vertical Offset = n/a
Rotation Angle = 0
Edge Mode = Reflect
ACTIVATE Raster 5
LAYERS >>> MERGE >>> MERGE DOWN
EFFECTS >>> REFLECTION EFFECTS >>>
ROTATING MIRROR
Same settings |
|
STEP 11
ACTIVATE Raster 4
IMAGE >>> RESIZE = 95%
Ensure "Resize all layers" is UNCHECKED
Resample using WEIGHTED AVERAGE
ADJUST >>> SHARPNESS >>> SHARPEN
Right click on the Title Bar and select COPY MERGED
from the options
Right click on the Title Bar of your tag image
and select PASTE AS NEW LAYER from the options.
IMAGE >>> RESIZE = 80%
Ensure "Resize all layers" is UNCHECKED
Resample using WEIGHTED AVERAGE
ADJUST >>> SHARPNESS >>> SHARPEN |
|
STEP 12
ACTIVATE Raster 2
LAYERS >>> MERGE >>> MERGE DOWN
In your LAYER PALETTE change the
BLEND MODE to LUMINANCE (L)
ACTIVATE Raster 4
LAYERS >>> MERGE >>> MERGE DOWN
SAVE YOUR WORK
|
|
STEP 13
ACTIVATE Raster 5
EFFECTS >>> 3D EFFECTS >>> DROP SHADOW
Vertical & Horizontal offsets = 4
Colour = Black
Opacity = 50
Blur = 15.00
Repeat Drop Shadow effect changing
Vertical & Horizontal Offsets to - ( minus ) 4
Click OK
|
|
STEP 14
ACTIVATE the Raster 1 layer
EFFECTS >>> PLUGINS >>> XERO >>> SPARKLES
Main colour = WHITE
Highlights = WHITE
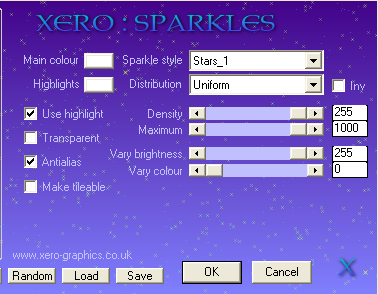
EDIT >>> Repeat Sparkles (3 times)
SAVE YOUR WORK
|
STEP 15
ACTIVATE Raster 5
Open up the HIR_Scroll image in your PSP workspace
Right click on the Title Bar and select COPY from the options
Right click on the Title Bar of your tag image
and select PASTE AS NEW LAYER from the options.
IMAGE >>> RESIZE = 50%
Ensure "Resize all layers" is UNCHECKED
Resample using WEIGHTED AVERAGE
ADJUST >>> SHARPNESS >>> SHARPEN
EFFECTS >>> 3D EFFECTS >>> DROP SHADOW
Vertical & Horizontal offsets = - ( minus ) 2
Colour = Black
Opacity = 50
Blur = 0
EFFECTS >>> IMAGE EFFECTS >>> OFFSET
Horizontal Offset = - ( minus ) 160
Vertical Offset = - ( minus ) 170
Edge Mode = Transparent |
|
STEP 16
LAYERS >>> DUPLICATE
LAYERS >>> MERGE >>> MERGE DOWN
LAYERS >>> DUPLICATE
IMAGE >>> MIRROR
LAYERS >>> MERGE >>> MERGE DOWN

, |
STEP 17
Open up the quote-easter image in your PSP workspace
Right click on the Title Bar and select COPY from the options
Right click on the Title Bar of your tag image
and select PASTE AS NEW LAYER from the options.
IMAGE >>> RESIZE = 50%
Ensure "Resize all layers" is UNCHECKED
Resample using WEIGHTED AVERAGE
LAYERS >>> DUPLICATE
LAYERS >>> MERGE >>> MERGE DOWN
ADJUST >>> COLOUR BALANCE >>> NEGATIVE IMAGE
PSPX - X9: IMAGE >>> NEGATIVE IMAGE
EFFECTS >>> IMAGE EFFECTS >>> OFFSET
Horizontal Offset = - ( minus ) 195
Vertical Offset =175
Edge Mode = Transparent
EFFECTS >>> 3D EFFECTS >>> DROP SHADOW
Same settings
SAVE YOUR WORK
|
|
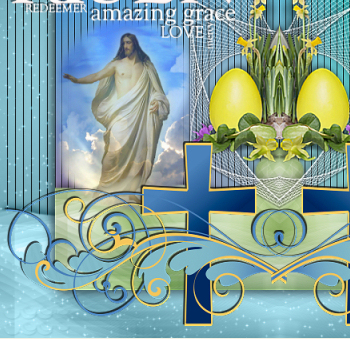
STEP 18
ACTIVATE Raster 5
Open up the Risen image in your PSP workspace
Right click on the Title Bar and select COPY from the options
Right click on the Title Bar of your tag image
and select PASTE AS NEW LAYER from the options.
IMAGE >>> RESIZE = 90%
Ensure "Resize all layers" is UNCHECKED
Resample using WEIGHTED AVERAGE
ADJUST >>> SHARPNESS >>> SHARPEN
Reposition with your MOVER tool |
|
STEP 19
Open up the HIR-HolySpirit image in your PSP workspace
Right click on the Title Bar and select COPY from the options
Right click on the Title Bar of your tag image
and select PASTE AS NEW LAYER from the options.
IMAGE >>> RESIZE = 90%
Ensure "Resize all layers" is UNCHECKED
Resample using WEIGHTED AVERAGE
ADJUST >>> SHARPNESS >>> SHARPEN
Reposition with your MOVER tool
SAVE YOUR WORK
|
|
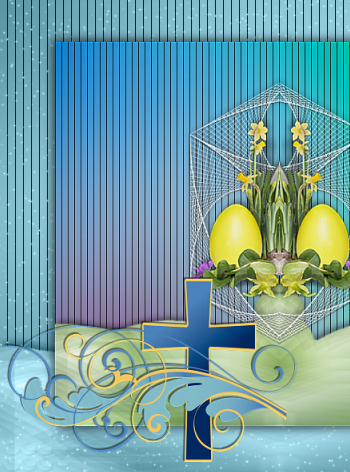
STEP 20
ACTIVATE Raster 2
EFFECTS >>> 3D EFFECTS >>> DROP SHADOW
Vertical & Horizontal offsets = - ( minus ) 5
Colour = Black
Opacity = 65
Blur = 10.00
Repeat Drop Shadow effect changing
Vertical & Horizontal Offsets to - ( minus ) 6
ACTIVATE Raster 4
EDIT >>> Repeat Drop Shadow. |
|
STEP 21
LAYERS >>> MERGE >>> MERGE VISIBLE
LAYERS >>> NEW RASTER LAYER
Flood fill with BLUE #205992
SELECTIONS >>> SELECT ALL
SELECTIONS >>> MODIFY >>> CONTRACT = 4
EDIT >>> CLEAR
Flood fill with YELLOW #ecbb38
SELECTIONS >>> MODIFY >>> CONTRACT = 3
EDIT >>> CLEAR
Flood fill with BLUE #205992
SELECTIONS >>> MODIFY >>> CONTRACT = 3
EDIT >>> CLEAR
DESELECT |
|
STEP 22
EFFECTS >>> 3D EFFECTS >>> DROP SHADOW
Vertical & Horizontal offsets = 5
Colour = Black
Opacity = 65
Blur = 10.00
EFFECTS >>> 3D EFFECTS >>> DROP SHADOW
Vertical & Horizontal offsets= - ( minus ) 3
Colour = Black
Opacity = 65
Blur = 10.00 |
|
STEP 23
LAYERS >>> MERGE >>> MERGE VISIBLE
LAYERS >>> NEW RASTER LAYER
Select your TEXT tool
Using a font of your choice
Add your name |
|
STEP 24
LAYERS >>> MERGE >>> MERGE ALL (Flatten)
Save as .jpg image
, |
| |
|
| |
|
| |
|