STEP 1
Open up the wallup-37896 image in your PSP workspace
WINDOW >>> DUPLICATE
Close the original Image
LAYERS >>> Promote background layer
ADJUST >>> HUE & SATURATION >>> COLORIZE
Hue = 154
Saturation = 93
EFFECTS >>> REFLECTION EFFECTS >>>
ROTATING MIRROR
Horizontal Offset = 0
Vertical Offset = n/a
Rotation Angle = 180
Edge Mode = Reflect.
|
|
STEP 2
With your MAGIC WAND
Mode = Replace
Match Mode = RGB Value
Tolerance = 15
Feather = 2
Antialias = Checked
Sample Merged = UNCHECKED
PSP9 - X9: Check CONTIGUOUS
PSPX - X9: There is no " Sample Merged"
PSPX - X9: Use all layers = UNChecked
PSP9 - X9: ANTIALIAS = Outside .
Select the BLACK area, then...
depress your SHIFT KEY and select the 2 small blue areas
on the left and right of your image.
|
|
STEP 3
EDIT >>> CLEAR (Twice)
DESELECT
EFFECTS >>> IMAGE EFFECTS >>> OFFSET
Horizontal Offset = 0
Vertical Offset = - ( minus ) 100
Edge Mode = Transparent.
|
|
STEP 4
IMAGE >>> RESIZE = 75%
Ensure "Resize all layers" is UNCHECKED
Resample using WEIGHTED AVERAGE.
EFFECTS >>> IMAGE EFFECTS >>> OFFSET
Horizontal Offset = 0
Vertical Offset = - ( minus ) 75
Edge Mode = Transparent.
|
|
STEP 5
PSP9: IMAGE >>> ROTATE >>> FREE ROTATE = LEFT 90
Ensure "All layers" is UNCHECKED
PSPX - PSPX9: IMAGE >>> FREE ROTATE = LEFT 90
Ensure "All layers" is UNCHECKED
EFFECTS >>> IMAGE EFFECTS >>> OFFSET
Horizontal Offset = 160
Vertical Offset = 115
Edge Mode = Transparent.
LAYERS >>> DUPLICATE
IMAGE >>> MIRROR
LAYERS >>> MERGE >>> MERGE VISIBLE
SAVE YOUR WORK
|
|
STEP 6
PSP9: IMAGE >>> ROTATE >>> FREE ROTATE = LEFT 90
Ensure "All layers" is UNCHECKED
PSPX - PSPX9: IMAGE >>> FREE ROTATE = LEFT 90
Ensure "All layers" is UNCHECKED
IMAGE >>> RESIZE = 75%
Ensure "Resize all layers" is UNCHECKED
Resample using WEIGHTED AVERAGE.
|
|
STEP 7
VIEW >>> RULERS
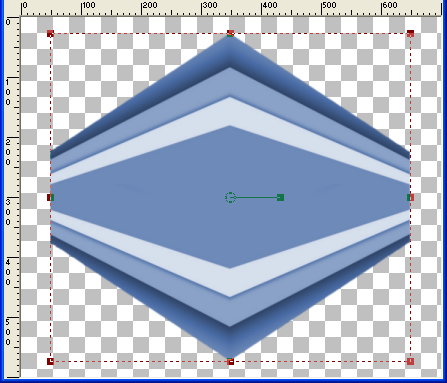
Select your RASTER DEFORM tool
Mode = SCALE
use default settings
PSPX-X9:Select your PICK tool
Drag the centre left node left to the 50 pixel mark
on your top ruler
Drag the centre right node right to the 650 pixel mark
on your top ruler
Drag the centre top node up to the 25 pixel mark
on your left ruler
Drag the centre bottom node down to the 575 pixel mark
on your left ruler
 , ,
|
STEP 8
Click the RESET RECTANGLE arrow
Select the MOVER tool to disengage the DEFORMATION tool (PICK tool)
EFFECTS >>> DISTORTION EFFECTS >>> PUNCH
STRENGTH = 50%
|
|
STEP 9
With your MAGIC WAND
Same settings
Select the centre blue area
SELECTIONS >>> INVERT
|
|
STEP 10
EFFECTS >>> 3D EFFECTS >>> DROP SHADOW
Vertical offset = 12
Horizontal offset = 0
Colour = Black
Opacity = 70
Blur = 25.00
Repeat Drop Shadow effect changing
Vertical offsets to - ( minus ) 12
Click OK
DESELECT
Repeat both Drop Shadows
SAVE YOUR WORK
|
|
STEP 11
In your MATERIALS PALETTE
Load BLUE ' #6d8ab9 ' in your background
With your MAGIC WAND
Same settings
Select the centre blue area
LAYERS >>> NEW RASTER LAYER
EFFECTS >>> ARTISTIC EFFECTS >>> BALLS & BUBBLES
Illumination Tag... use these settings
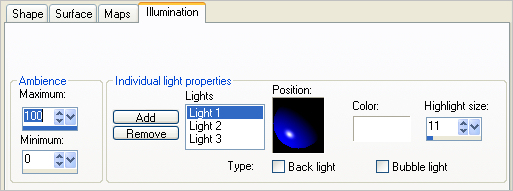
Maps Tag... use these settings
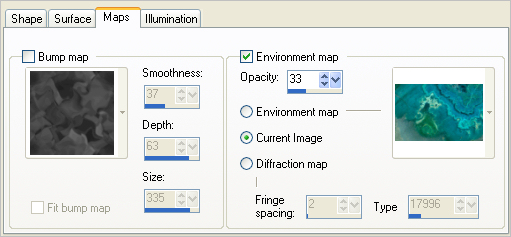
Surface Tag... use these settings
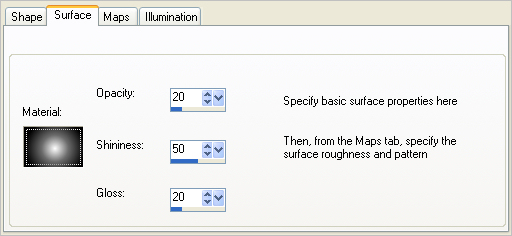
Shape Tag... use these settings
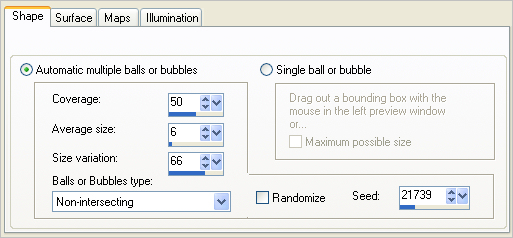
CLICK OK
DESELECT
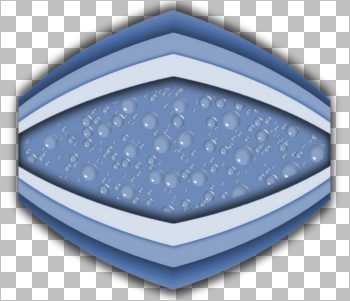
,
SAVE YOUR WORK
|
STEP 12
IMAGE >>> RESIZE = 95%
Ensure "Resize all layers" is UNCHECKED
Resample using WEIGHTED AVERAGE
ACTIVATE the Merged layer
Repeat RESIZE
LAYERS >>> NEW RASTER LAYER
LAYERS >>> ARRANGE >>> SEND TO BOTTOM
Flood fill with BLUE #47679d
|
|
STEP 13
Open up the abstract_tech image in your PSP workspace
Right click on the Title Bar and select COPY from the options
Right click on the Title Bar of your tag image
and select PASTE AS NEW LAYER from the options.
In your LAYER PALETTE change the
BLEND MODE to SCREEN |
|
STEP 14
CLOSE Raster 1
ACTIVATE the Merged layer
Open up the Blue-Whale_Hydro image in your PSP workspace
Right click on the Title Bar and select COPY from the options
Right click on the Title Bar of your tag image
and select PASTE AS NEW LAYER from the options.
IMAGE >>> RESIZE = 50%
Ensure "Resize all layers" is UNCHECKED
Resample using WEIGHTED AVERAGE
ADJUST >>> SHARPNESS >>> SHARPEN
EFFECTS >>> IMAGE EFFECTS >>> OFFSET
Horizontal Offset = 130
Vertical Offset = 25
Edge Mode = Transparent |
|
STEP 15
Open up the dolphin66 image in your PSP workspace
Right click on the Title Bar and select COPY from the options
Right click on the Title Bar of your tag image
and select PASTE AS NEW LAYER from the options.
IMAGE >>> RESIZE = 50%
Ensure "Resize all layers" is UNCHECKED
Resample using WEIGHTED AVERAGE
ADJUST >>> SHARPNESS >>> SHARPEN
EFFECTS >>> IMAGE EFFECTS >>> OFFSET
Horizontal Offset = - ( minus ) 175
Vertical Offset = 85
Edge Mode = Transparent |
|
STEP 16
Open up the Sanstitre2 image in your PSP workspace
Right click on the Title Bar and select COPY from the options
Right click on the Title Bar of your tag image
and select PASTE AS NEW LAYER from the options.
IMAGE >>> MIRROR
IMAGE >>> RESIZE = 50%
Ensure "Resize all layers" is UNCHECKED
Resample using WEIGHTED AVERAGE
ADJUST >>> SHARPNESS >>> SHARPEN
EFFECTS >>> IMAGE EFFECTS >>> OFFSET
Horizontal Offset = - ( minus ) 60
Vertical Offset = - ( minus ) 75
Edge Mode = Transparent
|
|
STEP 17
Choose your FREEHAND SELECTION TOOL
Selection Type = Point to Point
Mode = Replace
Feather = 2
Smoothing = 5
Antialias = Checked
Select the area shown |
|
STEP 18
EDIT >>> CLEAR
DESELECT
OPEN & ACTIVATE Raster 1 (Bubbles)
Select your RASTER DEFORM tool
Mode = SCALE
use default settings
PSPX-X9:Select your PICK tool
adjust as shown below
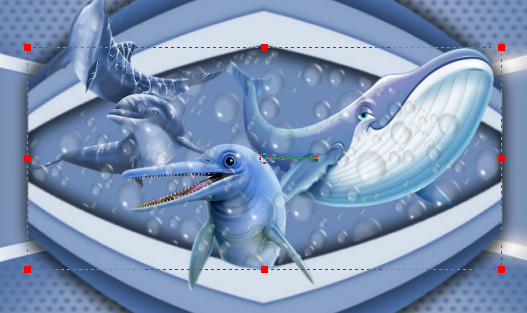
Click the RESET RECTANGLE arrow
Select the MOVER tool to disengage the DEFORMATION tool (PICK tool)
SAVE YOUR WORK |
STEP 19
LAYERS >>> MERGE >>> MERGE VISIBLE
ADJUST >>> SHARPNESS >>> SHARPEN
LAYERS >>> NEW RASTER LAYER
Flood fill with BLUE #47679d
SELECTIONS >>> SELECT ALL
SELECTIONS >>> MODIFY >>> CONTRACT = 4
EDIT >>> CLEAR
Flood fill with OFF WHITE #d6dfec
SELECTIONS >>> MODIFY >>> CONTRACT = 4
EDIT >>> CLEAR
Flood fill with BLUE #47679d
SELECTIONS >>> MODIFY >>> CONTRACT = 4
EDIT >>> CLEAR
DESELECT
ADJUST >>> SHARPNESS >>> SHARPEN MORE
EDIT >>> Repeat Sharpen More |
|
STEP 20
LAYERS >>> DUPLICATE
IMAGE >>> RESIZE = 87%
Ensure "Resize all layers" is UNCHECKED
Resample using WEIGHTED AVERAGE
ADJUST >>> SHARPNESS >>> SHARPEN
EFFECTS >>> 3D EFFECTS >>> DROP SHADOW
Vertical & Horizontal offsets = 6
Colour = Black
Opacity = 70
Blur = 10.00
Repeat Drop Shadow effect changing
Vertical & Horizontal Offsets to - ( minus ) 6
Click OK |
|
STEP 21
ACTIVATE Raster 1
Repeat both Drop Shadows |
|
STEP 22
ACTIVATE Copy of Raster 1
Open up the GGBlueCrab_001 image in your PSP workspace
Right click on the Title Bar and select COPY from the options
Right click on the Title Bar of your tag image
and select PASTE AS NEW LAYER from the options.
IMAGE >>> RESIZE = 60%
Ensure "Resize all layers" is UNCHECKED
Resample using WEIGHTED AVERAGE
ADJUST >>> SHARPNESS >>> SHARPEN
EFFECTS >>> 3D EFFECTS >>> DROP SHADOW
Vertical & Horizontal offsets = - ( minus ) 6
Colour = Black
Opacity = 70
Blur = 10.00
Reposition with your MOVER tool |
|
STEP 23
Open up the vsc_blue-crab image in your PSP workspace
Right click on the Title Bar and select COPY from the options
Right click on the Title Bar of your tag image
and select PASTE AS NEW LAYER from the options.
IMAGE >>> RESIZE = 45%
Ensure "Resize all layers" is UNCHECKED
Resample using WEIGHTED AVERAGE
ADJUST >>> SHARPNESS >>> SHARPEN
EFFECTS >>> 3D EFFECTS >>> DROP SHADOW
Vertical & Horizontal offsets = - ( minus ) 6
Colour = Black
Opacity = 70
Blur = 10.00
Reposition with your MOVER tool |
|
STEP 24
LAYERS >>> MERGE >>> MERGE VISIBLE
LAYERS >>> NEW RASTER LAYER
SELECT your TEXT tool
With a font of your choice add your name , |
|
STEP 25
LAYERS >>> MERGE >>> MERGE ALL (Flatten)
Save as .jpg image
,
|
| |
|
| |
|