STEP 1
In your MATERIALS PALETTE
Load BLACK " #000000 " in your foreground
Load MAROON " #893415 " in your background
|
|
STEP 2
Open a new image 700 x 600
Transparent background
PSP9: Colour Depth = 16 Million Colors (24bit)
PSPX-X9: Colour Depth RGB = 8bits/channel
Flood fill with MAROON
LAYERS >>> NEW RASTER LAYER
Flood fill with BLACK
|
STEP 3
In your MATERIALS PALETTE load
zilverpatroon pattern in the background
using these settings. |
|
STEP 4
LAYERS >>> NEW RASTER LAYER
CLOSE Raster 1 & Raster 2
Flood fill with BLACK
SELECTIONS >>> SELECT ALL
SELECTIONS >>> MODIFY >>> CONTRACT = 1
EDIT >>> CLEAR
Flood fill with zilverpatroon pattern
SELECTIONS >>> MODIFY >>> CONTRACT = 4
EDIT >>> CLEAR
Flood fill with BLACK
SELECTIONS >>> MODIFY >>> CONTRACT = 1
EDIT >>> CLEAR
DO NOT DESELECT |
|
STEP 5
LAYERS >>> NEW RASTER LAYER
SELECTIONS >>> MODIFY >>> CONTRACT = 10
Flood fill with BLACK
SELECTIONS >>> MODIFY >>> CONTRACT = 1
EDIT >>> CLEAR
Flood fill with zilverpatroon pattern
SELECTIONS >>> MODIFY >>> CONTRACT = 4
EDIT >>> CLEAR
Flood fill with BLACK
SELECTIONS >>> MODIFY >>> CONTRACT = 1
EDIT >>> CLEAR
Flood fill with zilverpatroon pattern
SELECTIONS >>> MODIFY >>> CONTRACT = 3
EDIT >>> CLEAR
Flood fill with BLACK
SELECTIONS >>> MODIFY >>> CONTRACT = 1
EDIT >>> CLEAR
DESELECT |
|
STEP 6
SAVE YOUR WORK
In your MATERIALS PALETTE load
JF_dots pattern in the background
using these settings.
|
|
STEP 7
ACTIVATE Raster 2 but leave closed
LAYERS >>> NEW RASTER LAYER
Flood fill with JF_dots pattern
EFFECTS >>> REFLECTION EFFECTS >>>
ROTATING MIRROR
Horizontal Offset = 0
Vertical Offset = n/a
Rotation Angle = 180
Edge Mode = Reflect
IMAGE >>> RESIZE = 94%
Check "Lock aspect ratio."
Ensure "Resize all layers" is UNCHECKED
Resample using WEIGHTED AVERAGE
ADJUST >>> SHARPNESS >>> SHARPEN |
|
STEP 8
ACTIVATE Raster 4
Open up the Wings-3d image in your PSP workspace
Right click on the Title Bar and select COPY from the options
Right click on the Title Bar of your frame image
and select PASTE AS NEW LAYER from the options.
IMAGE >>> RESIZE = 85%
Check "Lock aspect ratio."
Ensure "Resize all layers" is UNCHECKED
Resample using WEIGHTED AVERAGE
ADJUST >>> SHARPNESS >>> SHARPEN |
|
STEP 9
EFFECTS >>> 3D EFFECTS >>> DROP SHADOW
Vertical & Horizontal offsets = 3
Colour = WHITE
Opacity = 70
Blur = 5.00
EFFECTS >>> 3D EFFECTS >>> DROP SHADOW
Vertical & Horizontal offsets = 3
Colour = BLACK
Opacity = 70
Blur = 5.00
ADJUST >>> SHARPNESS >>> SHARPEN
SAVE YOUR WORK
|
|
STEP 10
Open up the shield-29 image in your PSP workspace
Right click on the Title Bar and select COPY from the options
Right click on the Title Bar of your frame image
and select PASTE AS NEW LAYER from the options.
IMAGE >>> RESIZE = 75%
Check "Lock aspect ratio."
Ensure "Resize all layers" is UNCHECKED
Resample using WEIGHTED AVERAGE
EFFECTS >>> IMAGE EFFECTS >>> OFFSET
Horizontal Offset = 0
Vertical Offset = - ( minus ) 53
Edge Mode = Transparent |
|
STEP 11
SELECTIONS >>> SELECT ALL
SELECTIONS >>> FLOAT
SELECTIONS >>> DEFLOAT
SELECTIONS >>> MODIFY >>> CONTRACT = 20
EDIT >>> CLEAR
DESELECT
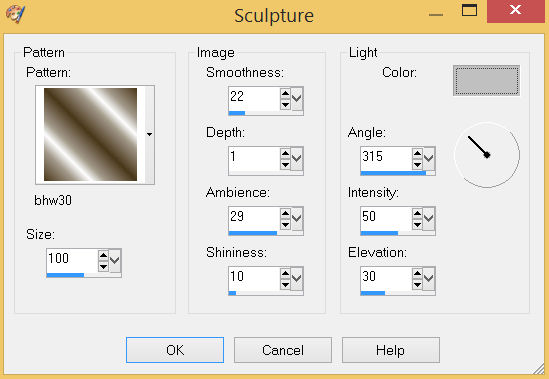
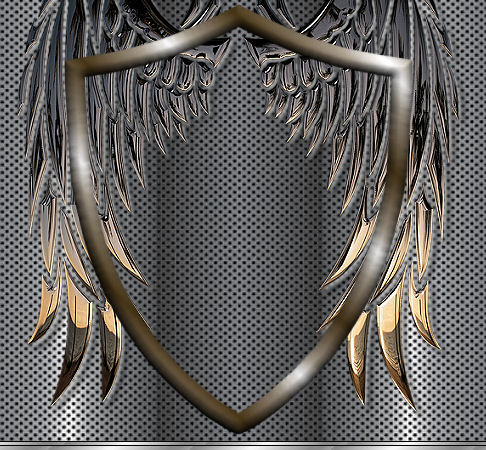
EFFECTS >>> TEXTURE EFFECTS >>> SCULPTURE
COLOUR = #c0c0c0
 |
STEP 12
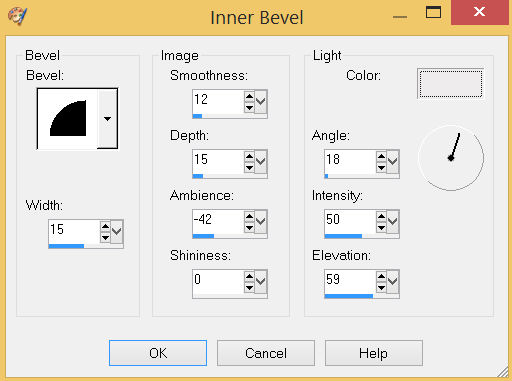
EFFECTS >>> 3D EFFECTS >>> INNER BEVEL
COLOR = #eeecec


SAVE YOUR WORK |
STEP 13
ACTIVATE Raster 6
Open up the sword2 image in your PSP workspace
Right click on the Title Bar and select COPY from the options
Right click on the Title Bar of your frame image
and select PASTE AS NEW LAYER from the options.
EFFECTS >>> IMAGE EFFECTS >>> OFFSET
Horizontal Offset = 40
Vertical Offset = 20
Edge Mode = Transparent
LAYERS >>> DUPLICATE
IMAGE >>> MIRROR
LAYERS >>> MERGE >>> MERGE DOWN
ADJUST >>> SHARPNESS >>> SHARPEN
|
|
STEP 14
Open up the knights-helmet image in your PSP workspace
Choose your SELECTION TOOL
Selection Type = Rectangle
Mode = Replace
Feather = 0
Antialias = UNChecked
Select the lower left helmet
|
STEP 15
OPEN ALL LAYERS
ACTIVATE Raster 4
Right click on the Title Bar and select COPY from the options
Right click on the Title Bar of your frame image
and select PASTE AS NEW LAYER from the options.
IMAGE >>> RESIZE = 75%
Check "Lock aspect ratio."
Ensure "Resize all layers" is UNCHECKED
Resample using WEIGHTED AVERAGE
ADJUST >>> SHARPNESS >>> SHARPEN
EFFECTS >>> IMAGE EFFECTS >>> OFFSET
Horizontal Offset = 0
Vertical Offset = 190
Edge Mode = Transparent
ADJUST >>> HUE & SATURATION >>> COLORIZE
Hue = 20
Saturation =53
SAVE YOUR WORK
|
|
STEP 16
EFFECTS >>> 3D EFFECTS >>> DROP SHADOW
Vertical offset = - ( minus ) 1
Horizontal offset = 7
Colour = Black
Opacity = 70
Blur = 10.00
ACTIVATE Raster 8
EDIT >>> Repeat Drop Shadow
ACTIVATE Raster 7
EDIT >>> Repeat Drop Shadow
|
|
STEP 17
With your MAGIC WAND
Mode = Replace
Match Mode = RGB Value
Tolerance = 0
Feather = 0
Antialias = UNchecked
Sample Merged = UNCHECKED
PSP9 - X9: Check CONTIGUOUS
PSPX - X9: There is no " Sample Merged"
Select the CENTRE area of your image.
SELECTIONS >>> MODIFY >>> EXPAND = 15 |
|
STEP 18
ACTIVATE Raster 8
EDIT >>> CLEAR
ACTIVATE Raster 6
EDIT >>> CLEAR
ACTIVATE Raster 9
EDIT >>> CLEAR
ACTIVATE Raster 5
EDIT >>> CLEAR
ACTIVATE Raster 2
EDIT >>> CLEAR
DESELECT
|
|
STEP 19
ACTIVATE Raster 4
EFFECTS >>> 3D EFFECTS >>> DROP SHADOW
Vertical & Horizontal offsets = 5
Colour = Black
Opacity = 70
Blur = 7.00
Repeat Drop Shadow effect changing
Vertical & Horizontal Offsets to - ( minus ) 5
Click OK
CLOSE Raster 1
LAYERS >>> MERGE >>> MERGE VISIBLE
SAVE YOUR WORK
|
|
STEP 20
Open up the knights two image in your PSP workspace
Choose your SELECTION TOOL
Same settings
Select the left knight
Right click on the Title Bar and select COPY from the options
Right click on the Title Bar of your frame image
and select PASTE AS NEW LAYER from the options.
, |
STEP 21
IMAGE >>> RESIZE = 55%
Check "Lock aspect ratio."
Ensure "Resize all layers" is UNCHECKED
Resample using WEIGHTED AVERAGE
ADJUST >>> SHARPNESS >>> SHARPEN
EFFECTS >>> 3D EFFECTS >>> DROP SHADOW
Vertical & Horizontal offsets = 5
Colour = Black
Opacity = 70
Blur = 7.00
Reposition with your MOVER tool
|
|
STEP 22
Back to the knights two image in your PSP workspace
Choose your SELECTION TOOL
Same settings
Select the right knight
Right click on the Title Bar and select COPY from the options
Right click on the Title Bar of your frame image
and select PASTE AS NEW LAYER from the options.
,, |
STEP 23
IMAGE >>> RESIZE = 55%
Check "Lock aspect ratio."
Ensure "Resize all layers" is UNCHECKED
Resample using WEIGHTED AVERAGE
ADJUST >>> SHARPNESS >>> SHARPEN
EFFECTS >>> 3D EFFECTS >>> DROP SHADOW
Vertical & Horizontal offsets = 5
Colour = Black
Opacity = 70
Blur = 7.00
Reposition with your MOVER tool
LAYERS >>> MERGE >>> MERGE VISIBLE
Save as .pspimage image
This is your frame.
|
|
STEP 24
OPEN & ACTIVATE Raster 1
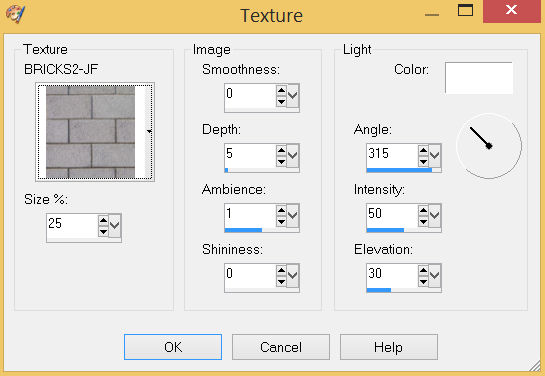
EFFECTS >>> TEXTURE EFFECTS >>> TEXTURE
TEXTURE = BRICKS2-JF
 , , |
STEP 25
Open up the knight169 image in your PSP workspace
Right click on the Title Bar and select COPY from the options
Right click on the Title Bar of your frame image
and select PASTE AS NEW LAYER from the options.
IMAGE >>> RESIZE = 70%
Check "Lock aspect ratio."
Ensure "Resize all layers" is UNCHECKED
Resample using WEIGHTED AVERAGE
ADJUST >>> SHARPNESS >>> SHARPEN
Reposition with your MOVER tool.
LAYERS >>> MERGE >>> MERGE VISIBLE
|
|
STEP 26
LAYERS >>> NEW RASTER LAYER
Select your TEXT tool
and with a font of your choice add your name
, |
STEP 27
LAYERS >>> MERGE >>> MERGE ALL (Flatten)
Save as .jpg image
, |
| |
|
| |
|
| |
|