STEP 1
Open a new image 700 x 600
Transparent background
PSP9: Colour Depth = 16 Million Colors (24bit)
PSPX-X9: Colour Depth RGB = 8bits/channel
Open up the 9860ee image in your PSP workspace
Right click on the Title Bar and select COPY from the options
Right click on the Title Bar of your frame image
and select PASTE AS NEW LAYER from the options.
VIEW >>> RULERS
.
|
STEP 2
Select your RASTER DEFORM tool
Mode = SCALE
use default settings
PSPX - X9:Select your PICK tool
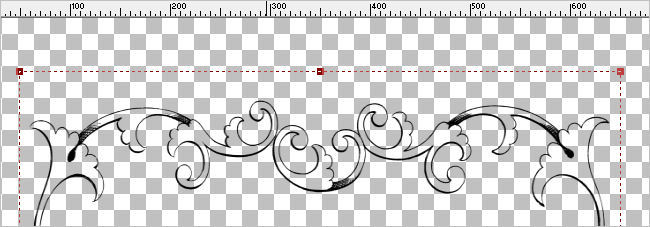
Move the centre left node to the right, level with the
50 pixel
mark on your top ruler
Move the centre right node to the left, level with the 650 pixel
mark on your top ruler
 ,
, |
STEP 3
Click the RESET RECTANGLE arrow
Select another tool to disengage the DEFORMATION / PICK TOOL
LAYERS >>> DUPLICATE
LAYERS >>> MERGE >>> MERGE DOWN
, |
STEP 4
SELECTIONS >>> SELECT ALL
SELECTIONS >>> FLOAT
SELECTIONS >>> DEFLOAT
Select your FLOOD FILL Tool
Match Mode = RGB Value
Tolerance = 200
Sample Merged = UNChecked
Blend Mode = Normal
Opacity = 100
Zoom in and flood fill the black area selected
with BLACK (Twice) |
|
STEP 5
LAYERS >>> DUPLICATE
Zoom in and flood fill the black area selected
with WHITE (3 TIMES)
DESELECT
ACTIVATE Raster 1
Flood fill with RED so you can see your work
|
|
STEP 6
ACTIVATE the top layer
With your MAGIC WAND
Mode = Add (Shift)
Match Mode = RGB Value
Tolerance = 28
Feather = 2
Antialias = Checked
Sample Merged = UNCHECKED
PSP9 - X9: Check CONTIGUOUS
PSPX - X9: There is no " Sample Merged"
PSP9 - X9: ANTIALIAS = Outside
Work your way around the image selecting all the transparent areas

|
STEP 7
Flood fill selected areas with WHITE
DESELECT
SELECTIONS >>> SELECT ALL
SELECTIONS >>> FLOAT
SELECTIONS >>> DEFLOAT
SELECTIONS >>> MODIFY >>> EXPAND = 1
Flood fill selected areas with WHITE
DESELECT
SAVE YOUR WORK
|
|
STEP 8
LAYERS >>> ARRANGE >>> MOVE DOWN
ACTIVATE Raster 2
With your MAGIC WAND
Mode = Replace
Match Mode = RGB Value
Tolerance = 0
Feather = 0
Antialias = Checked
Sample Merged = UNCHECKED
PSP9 - X9: Check CONTIGUOUS
PSPX - X9: There is no " Sample Merged"
PSP9 - X9: ANTIALIAS = Outside
Select the area outside the frame
SELECTIONS >>> MODIFY >>> EXPAND = 1
|
|
STEP 9
ACTIVATE Copy of Raster 2
EDIT >>> CLEAR
DESELECT
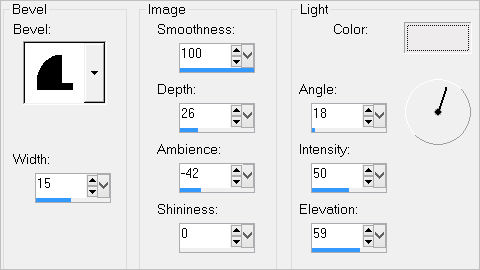
EFFECTS >>> 3D EFFECTS >>> INNER BEVEL
COLOUR = #eeecec
 |
STEP 10
ACTIVATE Raster 2
LAYERS >>> MERGE >>> MERGE DOWN
LAYERS >>> DUPLICATE
PSP9: IMAGE >>> ROTATE >>> FREE ROTATE = LEFT 90
Ensure "All layers" is UNCHECKED
PSPX - PSPX9: IMAGE >>> FREE ROTATE = LEFT 90
Ensure "All layers" is UNCHECKED
, |
|
STEP 11
Select your RASTER DEFORM tool
Mode = SCALE
use default settings
PSPX - X9:Select your PICK tool
Move the centre left node level with the 80 pixel mark
on your top ruler
Move the centre top node level with the 50 pixel mark
on your left ruler
Move the centre bottom node level with the 550 pixel mark
on your left ruler

 |
STEP 12
Click the RESET RECTANGLE arrow
Select another tool to disengage the DEFORMATION / PICK TOOL
LAYERS >>> MERGE >>> MERGE DOWN
SAVE YOUR WORK |
STEP 13
ACTIVATE Raster 1
Flood fill with WHITE
ACTIVATE Copy of Raster 2
With your MAGIC WAND ...same settings
Select the area outside the frame
SELECTIONS >>> INVERT
SELECTIONS >>> MODIFY >>> CONTRACT = 6
ACTIVATE Raster 1
SELECTIONS >>> INVERT
EDIT >>> CLEAR
SELECTIONS >>> INVERT |
|
STEP 14
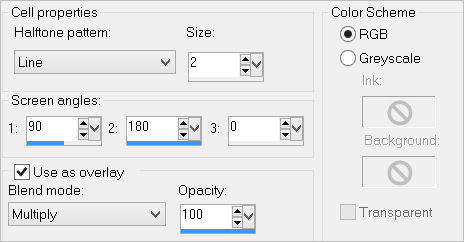
EFFECTS >>> ARTISTIC EFFECTS >>> HALF TONE
 , , |
STEP 15
ADJUST >>> SHARPNESS >>> SHARPEN MORE
ADJUST >>> BRIGHTNESS and CONTRAST >>> BRIGHTNESS/CONTRAST
Brightness = - (Minus) 35
Contrast = 11
PSPX6-X9: Linear mode checked
DESELECT |
|
STEP 16
ACTIVATE Copy of Raster 2
With your MAGIC WAND ...same settings
Select the area inside the frame
SELECTIONS >>> MODIFY >>> EXPAND = 7
ACTIVATE Raster 1
EDIT >>> CLEAR
DESELECT
SAVE YOUR WORK
|
|
STEP 17
ACTIVATE Copy of Raster 2
EFFECTS >>> 3D EFFECTS >>> DROP SHADOW
Vertical & Horizontal offsets = 2
Colour = Black
Opacity = 60
Blur = 10.00
Repeat Drop Shadow effect changing
Vertical & Horizontal Offsets to - ( minus ) 2
Click OK, |
|
STEP 18
ADJUST >>> HUE & SATURATION >>> COLORIZE
Hue = 157
Saturation = 45
ACTIVATE Raster 1
EDIT >>> Repeat Colorize |
|
STEP 19
ACTIVATE Copy of Raster 2
LAYERS >>> NEW RASTER LAYER
Flood fill with BLACK
SELECTIONS >>> SELECT ALL
SELECTIONS >>> MODIFY >>> CONTRACT = 2
EDIT >>> CLEAR
Flood fill with WHITE
SELECTIONS >>> MODIFY >>> CONTRACT = 6
EDIT >>> CLEAR
Flood fill with BLACK
SELECTIONS >>> MODIFY >>> CONTRACT = 2
EDIT >>> CLEAR
DESELECT |
|
STEP 20
With your MAGIC WAND ...same settings
Select the WHITE area on the border
EFFECTS >>> 3D EFFECTS >>> INNER BEVEL
Same settings EXCEPT
Change SMOOTHNESS to 0
DESELECT
LAYERS >>> DUPLICATE
IMAGE >>> RESIZE = 90%
Check "Lock aspect ratio."
Ensure "Resize all layers" is UNCHECKED
Resample using WEIGHTED AVERAGE
ADJUST >>> SHARPNESS >>> SHARPEN MORE
LAYERS >>> MERGE >>> MERGE DOWN , |
|
STEP 21
With your MAGIC WAND ...same settings
Select the transparent area as indicated. |
|
STEP 22
LAYERS >>> NEW RASTER LAYER
LAYERS >>> ARRANGE >>> MOVE DOWN
SELECTIONS >>> MODIFY >>> EXPAND = 2
Flood fill with WHITE
EFFECTS >>> ARTISTIC EFFECTS >>> HALF TONE
Same settings
ADJUST >>> SHARPNESS >>> SHARPEN MORE
ADJUST >>> HUE & SATURATION >>> COLORIZE
Hue = 157
Saturation = 70 |
|
STEP 23
SELECTIONS >>> INVERT
EFFECTS >>> 3D EFFECTS >>> DROP SHADOW
Vertical & Horizontal offsets = 2
Colour = Black
Opacity = 70
Blur = 10.00
Repeat Drop Shadow effect changing
Vertical & Horizontal Offsets to - ( minus ) 2
Click OK
SELECTIONS >>> INVERT |
|
STEP 24
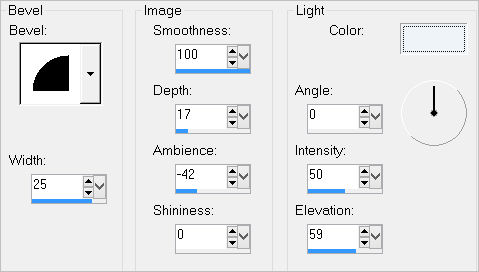
EFFECTS >>> 3D EFFECTS >>> INNER BEVEL
COLOUR =
#eef4f8
DESELECT
 , , |
STEP 25
With your MAGIC WAND.... Same settings.
Select the CENTRE transparent area
LAYERS >>> NEW RASTER LAYER
LAYERS >>> ARRANGE >>> MOVE DOWN
EDIT >>> Repeat Move Layer Down
Flood fill with WHITE
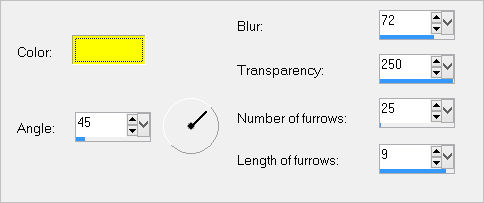
EFFECTS >>> TEXTURE EFFECTS >>> FINE LEATHER
COLOUR = #ffff00
 , ,
|
STEP 26
DESELECT
ACTIVATE Copy of Raster 2
With your MAGIC WAND.... Same settings.
Select the area indicated.
, |
|
STEP 27
SELECTIONS >>> INVERT
SELECTIONS >>> MODIFY >>> CONTRACT = 14
ACTIVATE Raster 4
EDIT >>> CLEAR
DESELECT |
|
STEP 28
ACTIVATE Raster 2
EFFECTS >>> 3D EFFECTS >>> DROP SHADOW
Vertical & Horizontal offsets = 3
Colour = Black
Opacity = 60
Blur = 10.00
Repeat Drop Shadow effect changing
Vertical & Horizontal Offsets to - ( minus ) 3
Click OK
LAYERS >>> MERGE >>> MERGE VISIBLE
Save as .pspimage image
|
STEP 29
LAYERS >>> NEW RASTER LAYER
Flood fill with BLACK
LAYERS >>> ARRANGE >>> MOVE DOWN
, |
STEP 30
Open up the digital-art-woman image in your PSP workspace
Right click on the Title Bar and select COPY from the options
Right click on the Title Bar of your frame image
and select PASTE AS NEW LAYER from the options. |
|
STEP 31
LAYERS >>> MERGE >>> MERGE VISIBLE
LAYERS >>> NEW RASTER LAYER
Select your TEXT tool
and with a font of your choice add your name
LAYERS >>> MERGE >>> MERGE ALL (Flatten)
Save as .jpg image
|
|
|
|
|